F3D3
Series
Service Manual Parts Replacement / Section 2.12
Questions? Call Franke Technical Support Group For Your Area. Copyright
2012 Franke, Inc. All rights reserved.
2.12 Low Product Sensor Replacement
[See Section 1.5 for Part Number]
1)
Roll the unit out to access to rear service panel.
2)
Disconnect power at outlet. [Pull plug.]
3)
Remove screws securing rear service access panel. Lift
panel up and out.
4)
Disconnect Low Product Sensor cable from harness.
5)
Use a ‘C’ Ring pliers to remove the external ‘C’ Ring
retainer from the Low Product Sensor Sleeve.
6)
Remove the retaining washer with its bent tab retainer.
7)
The Low Product Sensor slides out of the outer sleeve.
NOTE:
May need to be unscrewed (counterclockwise) to
break sealant (front of the sensor) from outer sleeve.
8)
Take new Low Product Sensor and apply a small amount
of silicone sealant to the nose then slide it back into the
plastic sensor sleeve.
NOTE:
This may require a helper
to hold sleeve from inside freezer.
9)
Replace the retaining washer over the sensor sleeve,
with the bent tab in the slot on the plastic sleeve.
10) Re-insert the external ‘C’ Ring.
11) Reattach the Low Product Sensor cable to the harness.
12) Plug in unit power cord to power supply.
Adjust Low Product Sensor Sensitivity
by:
13) Position the empty hopper in the freezer compartment.
14) Switch ON main power and press LANE-POWER touch
pad on control overlay.
Tip:
Enlist help to view front
panel overlay while you adjust sensor.
15) Open the small plastic plug on the back of the sensor
with your fingertips or the small plastic screwdriver.
16) Using the small plastic screwdriver provided, slowly turn
the adjustment screw on the sensor clockwise until the
word:
Low Product
appears in lane touchpad display,
then back that screw counterclockwise until that Low
Product display warning goes
OFF
.
Test
the Low Product Sensor by:
17) Fill hopper with fries to a level above Low Product
Sensor or place your hand over sensor. If
Low Product
warning appears in display, repeat Sensor Sensitivity
adjustment described in Step 16.
18) If this sensor adjustment corrects problem, replace small
plastic plug in back of Low Product Sensor.
NOTE:
This
plug must be closed to avoid water getting into sensor.
19) Re-hang and secure rear service access panel and
return Dispenser to normal operating position.
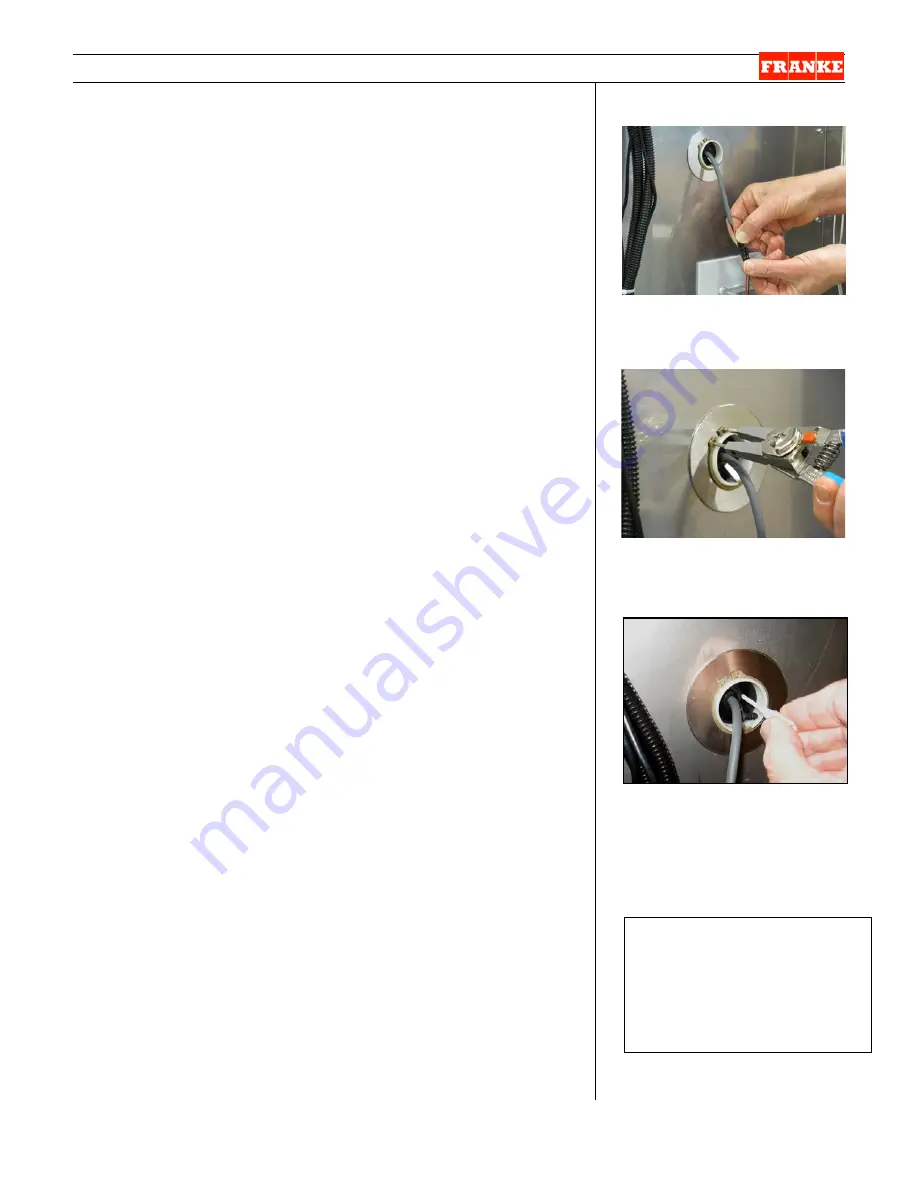
[Photo 1]
Disconnect Low Product Sensor
from harness terminal.
[Photo 2
]
Remove the ’C’ Ring & retaining
ring and pull out the sensor.
[Photo 3]
Adjust Sensitivity:
After removing the small plastic
plug, use the plastic 2 mm
[1/16”] screwdriver provided to
adjust sensor sensitivity.
Rev. 1 6/2012
Tools Required:
Medium Phillips
screwdriver
2 mm [1/16”] flat blade
screwdriver [Provided]
‘C’ ring pliers


