background image


BASIC OPERATION AND EDITING


Doc v15XL 


16


Doc v15XL


4.3


The Grid 

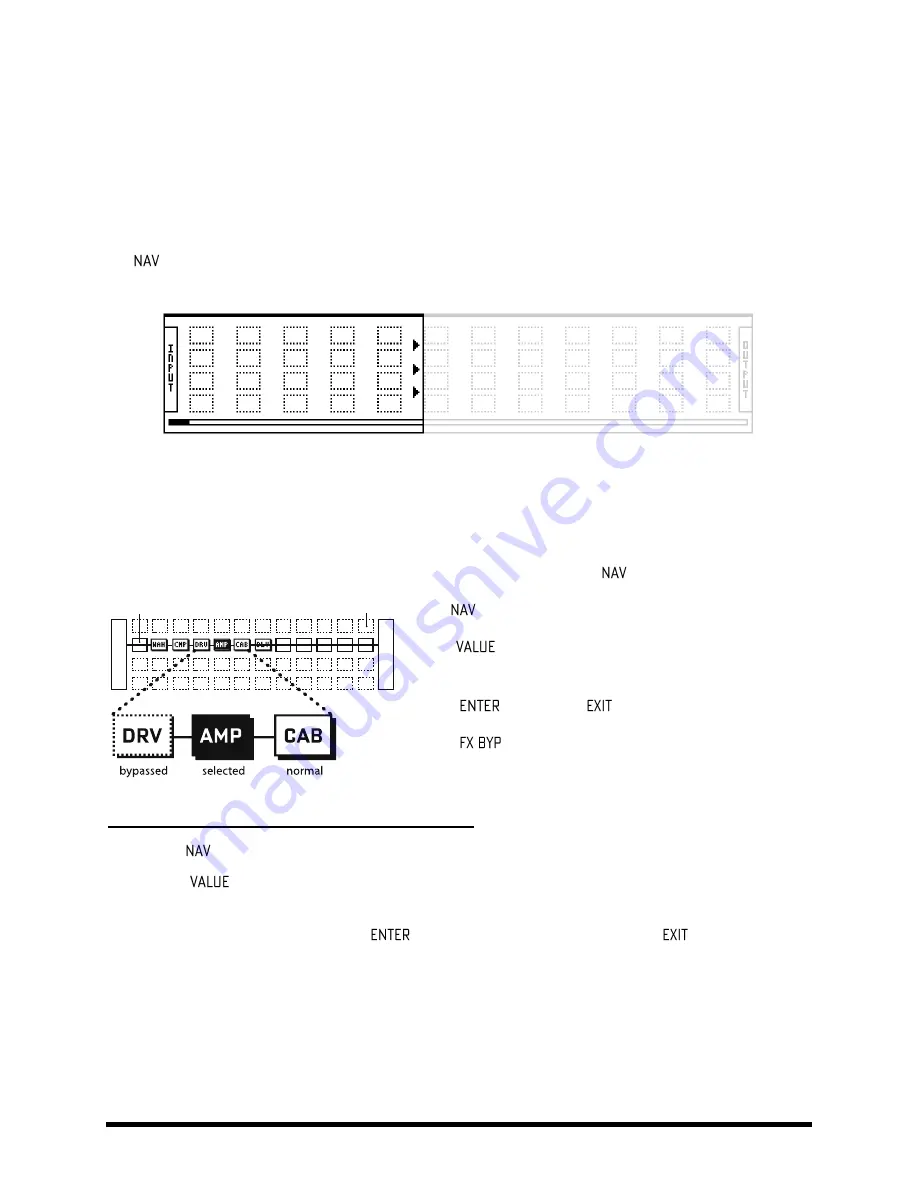
The grid is a 12×4 matrix into which BLOCKS are inserted and connected together to build presets.  

To display the GRID for any preset, press LAYOUT and select the EDIT page. 

The INPUT appears at the left, the OUTPUT at the right. The Axe-Fx LCD display can only show file columns at once. 
The 

 buttons are used to show off-screen columns. A bottom scrollbar indicates where you are in the overall 

left-to-right layout.  


Figure 4-1 – In this image of an empty grid, off-screen areas are grayed. 


Inserting and Removing Blocks 

4.3.1

As explained in “The Concept” on page 

2

, the Axe-Fx II grid is populated with BLOCKS—components pulled from an 

inventory of amps, cabs, stompbox, studio effects, mixers, and more. The insertion, modification, or removal of 
blocks happens at the grid cursor, a solid-filled rectangle that you move with the 

 buttons. 

1. The 

 buttons select grid locations.  

2. Turn 

 to scroll through the list of available blocks for the 

selected space. 

3. Press 

 to confirm or 

 to cancel changes. 

4. Press 

to engage or bypass the selected block. 


STEP-BY-STEP: INSERTING or CHANGING a BLOCK 


Use the 

 buttons to select the desired grid location. 


Turn the 

 wheel. Available block names (AMP 1, CAB 1, etc.) will be displayed on the screen in 

alphabetical order, and the selected block (if visible) will flash. 


When the desired item is found, press 

 to insert it into the grid. To cancel, press 

 instead. 

The total number of blocks you can insert in any one preset is limited by the number of available blocks. The total 
“CPU utilization” must never exceed 98%. (Check CPU Utilization on the STATUS page of the UTILITY menu). Each 
block has a “cost,” and when the sum of all blocks reaches the limit, a warning message prevents you from adding 
additional blocks. The Axe-Fx II is extremely powerful, and most presets do not come close to the limit. 

I

N

P

U

T

O
U

T
P

U

T

shunt

empty space

Содержание Axe-Fx II XL

Страница 1: ......

Страница 2: ...CAUTION To reduce the risk of fire or electric shock do not remove screws There are no user serviceable parts inside Refer servicing to qualified service personnel 1 Obey all warnings on the Axe Fx II...

Страница 3: ...This equipment has been tested and found to comply with the limits for a Class B Digital device pursuant to part 15 of the FCC rules These limits are designed to provide reasonable protection against...

Страница 4: ...ck today will be even better in the future with new sounds new features and more This quickly makes a paper manual obsolete This Getting Started Guide covers the things that are less likely to change...

Страница 5: ...ts Getting Started iii Contents iv 1 Introduction 1 2 Hardware Overview 3 3 Connections 9 4 Basic Operation and Editing 15 5 Basic Blocks Guide 27 6 Modifiers 28 7 Additional Topics 30 8 Troubleshooti...

Страница 6: ...when connected to Axe Edit our free companion software product Musicians tell us that the Axe Fx II is inspiring and fun Here are some highlights Freely Routable Place effects freely in any order and...

Страница 7: ...shows a preset as it appears on the Axe Fx grid On this grid signal is routed through the dark solid line from the INPUT through a totally passive sonically transparent SHUNT to feed a WAH block The W...

Страница 8: ...portant events This LED is lit when any change has been made to the current preset This LED is lit while data is received at the MIDI IN port These flash briefly whenever the signal level at the corre...

Страница 9: ...r for their respective outputs SCALES allows the creation of custom harmonies for use with the pitch shifter block Engages the tuner Press or to close Contains six pages used to configure the various...

Страница 10: ...ight Output 1 unbalanced 1 4 Jacks Balanced XLR jacks and XLR Ground Lift Switch The main processed output of the Axe Fx II appears at these jacks Use the XLR jacks to connect to balanced inputs emplo...

Страница 11: ...one or both units could occur Be careful not to insert USB or other cables into the MFC expansion port of the Axe Fx II as doing so WILL damage your Axe Fx II Port mis use leaves tell tale signs and i...

Страница 12: ...sent from the computer to the Axe Fx II Computer audio can be sent directly to the main outputs or routed through onboard FX Note Audio MIDI ports have different names on different systems To pass unp...

Страница 13: ...o simultaneously record a raw dry guitar track for subsequent reamping The source for these channels is the unprocessed signal from the main input of the Axe Fx II whether front or rear Warning As wit...

Страница 14: ...he output knob to its MAXIMUM position and a preset containing all shunts will output unity gain This type of operation would typically be limited to when you re running the unit in an amp s FX loop P...

Страница 15: ...ONS Doc v15XL 10 3 3 Connection Diagrams Familiarize yourself with the capabilities of inputs outputs and control connections through this overview The diagrams that follow illustrate real world appli...

Страница 16: ...ff Balanced XLR or unbalanced 1 4 jacks and cables can be used to connect the Axe Fx II with the former providing the advantage that less noise will be picked up over longer cable runs If only one spe...

Страница 17: ...the RETURN on a tube head or combo or a guitar oriented tube power amp one that significantly affects to the tone and feel In either case it is completely safe and reasonable to try both setting ways...

Страница 18: ...e Axe Fx II main outs feed your amp s Return Power Amp Input and the amp powers your real speakers To extend this configuration for optional stereo connect OUT1 R to the RETURN of a second amplifier b...

Страница 19: ...se a STEREO cab type if your post amp effects are stereo Another possibility is to use a preset with totally separate signal paths In the example below the top direct signal path contains a fully simu...

Страница 20: ...the RECALL menu 1 The knob selects Presets sequentially 2 The UP DOWN buttons change by 1 3 The LEFT RIGHT buttons change by 1 10 4 Turn the to DIR for a directory of all presets by number The A Z pag...

Страница 21: ...le that you move with the buttons 1 The buttons select grid locations 2 Turn to scroll through the list of available blocks for the selected space 3 Press to confirm or to cancel changes 4 Press to en...

Страница 22: ...e a shunt connects the Input to the WAH and five shunts connect the Delay DLY to the Output Empty grid locations are indicated by dotted outlines and the absence of a three letter abbreviation or thru...

Страница 23: ...o RIGHT A cable MUST originate from a BLOCK or a SHUNT Empty locations are not viable origins If you try to connect to an EMPTY location a SHUNT will be created there You can ONLY connect to blocks in...

Страница 24: ...el without removing press instead A Shortcut for Spanning Empty Spaces This shortcut allows you to span multiple empty grid columns with a series of automatic shunts and cables This technique is espec...

Страница 25: ...tor cables being modified or removed so be sure to observe how the elements of your preset are interconnected before proceeding with a MOVE operation Press Use the buttons to select the MOVE tab Selec...

Страница 26: ...connectors which appear in Axe Edit almost as one continuous cable connect the INPUT to the AMP the AMP to the CAB and the CAB to the OUTPUT Figure 4 3 Amp Cab Preset EXAMPLE 2 Long Pedal Chain Here e...

Страница 27: ...ints between the input and the output with various effects appearing before and after two independent amps Notice the complex send and return feedback loop routing in parallel with the dry signal and...

Страница 28: ...of the selected parameter will be displayed in inverse with VAL shown above if it is a knob or shown to its left in text menu pages In scrolling menu pages the sidebar has an indicator to show relati...

Страница 29: ...a very short gap as the block is reconfigured When you save a preset the current X Y state of each X Y block is saved as well so the preset loads with your choices already selected The X Y state of e...

Страница 30: ...xe Fx II can be bypassed or engaged in three different ways 1 Press the front panel button while the block is either selected in the grid or open to edit 2 Use a MODIFIER attached to the block s BYPAS...

Страница 31: ...he wheel selects numbered memory locations left right skip by 10 Navigating down to the NAME parameter allows you to edit preset names before saving Turn the wheel to select from all available charact...

Страница 32: ...nd Comp A 3 band stereo compressor with precision controls 2 Multi Delay A variety of special delay effects including plex diffusor multi tape and more 2 Tremolo Panner Creates classic tremolo plus au...

Страница 33: ...e button to show the MODIFIER screen Select a SOURCE to assign to the current parameter or choose NONE to remove an existing modifier For more on modifier sources see the online PDF Axe Fx II Owner s...

Страница 34: ...to open the WAH block EDIT menu 3 The modifier symbol beneath the CONTROL knob indicates that a modifier can be added here Select the CONTROL parameter and press to open the MODIFIER screen 4 Change...

Страница 35: ...tting for every block in the preset the X Y selection for those blocks that support it the main level of the FX LOOP block and the preset s MAIN output level Scene changes can be seamless and instanta...

Страница 36: ...block in a given scene Select the scene as described above Navigate to the desired block and enter its EDIT menu Press X or Y to set the desired state Note X Y is supported for many but not all block...

Страница 37: ...the IR CAPTURE GUIDE available on our web site and in the Axe Fx II Owner s Manual 7 4 Firmware Updates with Fractal Bot Fractal Bot is an application for Mac or Windows computers which enables you t...

Страница 38: ...saved settings Q One or more of my presets produces no sound A This might be any one or several of a number of things Is everything still wired up correctly Most of the time the problem is a faulty or...

Страница 39: ...also lower the GAIN setting on the Global Graphic EQ Q My screen is blinking EXCESS CPU UTILIZATION REDUCE LOAD A First try undoing the last change you made by turning the value wheel in the opposite...

Страница 40: ...x 1 4 TRS phone jacks Format Switch Momentary or Latching Pedal 10 100k max linear taper expression type MFC INTERFACE Connector RJ 45 Ethernet EtherCON IMPORTANT Do NOT connect this to a computer or...

Страница 41: ...switches of the 20 block types that support this function AMP1 AMP2 etc Program Change True Number Bank Select O O O O Bank Select and Program Change messages may be used to recall the presets of the...

Страница 42: ...authorization of repairs to authorized service centers Unauthorized service repair or modification will void this warranty DISCLAIMER AND LIMITATION OF WARRANTY THE FOREGOING WARRANTY IS THE ONLY WAR...

Отзывы: