Wing Joining
The left and right wing panels are connected to-
gether with a rectangular fibreglass rod (10 x 12 x
220mm long) and a Ø 7 x 90mm anti-rotation dowel
at the trailing edge. The joined wing is attached to
the fuselage with 2 more (factory-fitted) fibreglass
dowels in the leading edge, that fit into matching
holes in the fuselage bulkhead, and a pair of M4 x
25mm allen bolts at the back that screw thru' the
wing into T-nuts in the fuselage. All 3 dowels fit into
fibreglass tubes that are installed in the wing during
manufacture. You only need to glue in the rectangu-
lar wing joiner, the rear anti-rotation dowel, and fit
the wing bolts and T-nuts.
Check the fit of the rectangular wing joiner in the
tube in the wing. If it is too tight you can sand it a lit-
tle with 600 grit sandpaper. Temporarily join the
wings,
without
gluing the joiners in, fit onto the fuse-
lage and drill Ø 4mm holes thru’ the moulded dim-
ples in the underside of the trailing edge for the wing
bolts, perpendicular the the bottom wing surface,
right thru’ the 6mm balsa/fibreglass plate inside the
fuselage. Counterbore the holes in the bottom sur-
face of the wing for the M4 washers, Ø 10mm and
approx. 4mm deep, until you reach the factory-in-
stalled plywood plate inside the wing, so that the
washers will fit inside and the bolt heads will be al-
most flush with the surface. Open up the holes in the
balsa plate in the fuselage
only
to Ø 5.5m for the T-
nuts. Reinstall the wings, screw the T-nuts onto the
wingbolts and then secure them to the plate with a
little 30 minute epoxy & micro-balloons mixture.
When cured, remove the wings.
The rectangular joining rod should be glued into one
panel, and the Ø 7mm dowel into the other panel, in
both cases with 50% of their length projecting out of
the wing roots. Glue the rectangular joiner into the
wing that it has a looser fit in, to reduce any play.
Lightly sand the outer surface of both joiners for half
their length, to provide a good key for the glue, and
wax the other half that will be exposed. Wax the sur-
face of both wing roots. If the joiners can slide too far
into the wings that they will be glued into, then drop
a small scrap of balsa stick in the wing tubes first to
prevent that.
Apply a
little
slow (minimum 30 minute) epoxy and micro-balloons mixture into the 2 tubes in the
wings, and slide half the length of the wing joiners into them. Wipe off any excess epoxy that seeps
out with lighter-fluid, and re-wax the exposed joiners as necessary.
Fox Composites Co., Ltd.
6
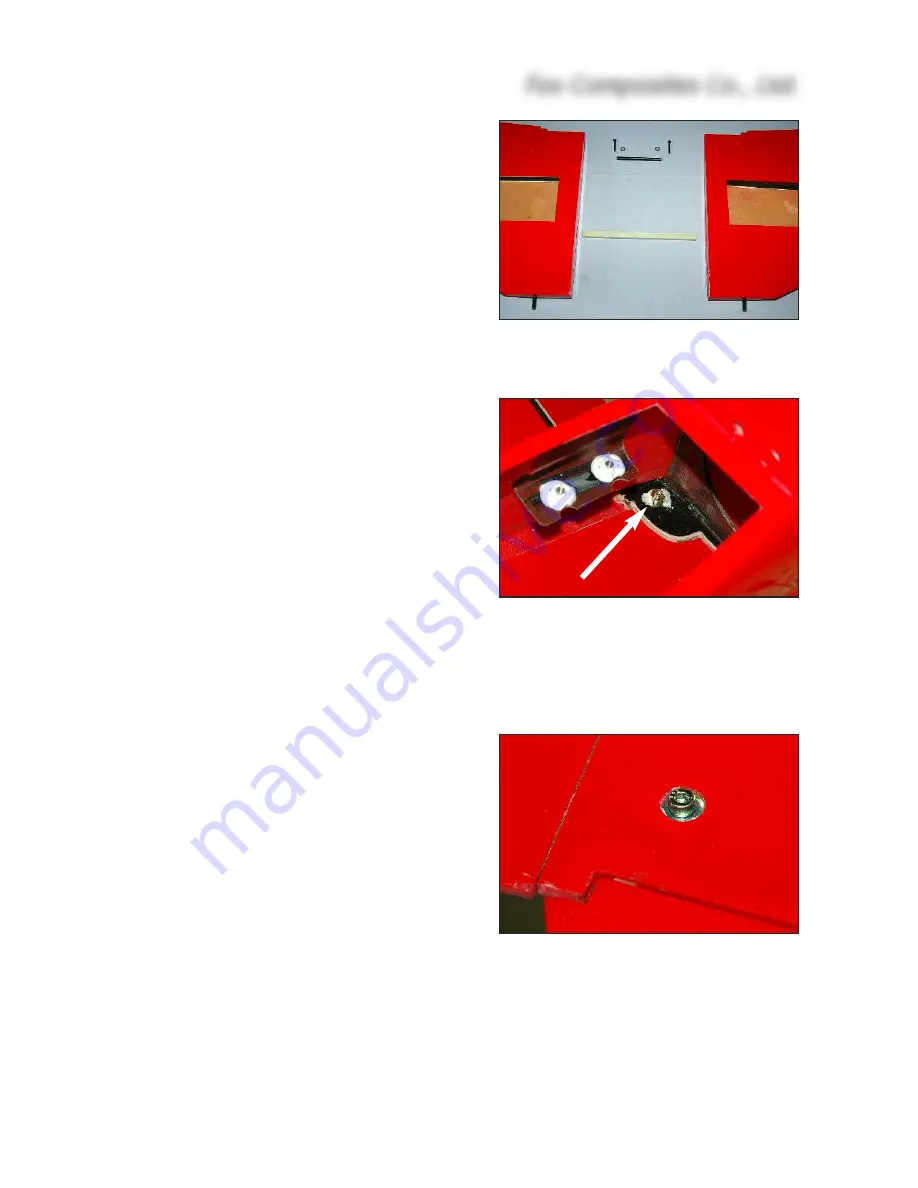
(above) T-nuts for the wing bolts are
glued onto the composite plate (ar-
rowed). You can also see the T-nuts for
the turbine mounting here.
(below) Counterbore holes in wing un-
derside for the M4 bolts & washers.
(above) Wing panels are joined with a
rectangular fibreglass rod and a Ø 7mm
dowel just in front of the trailing edge.


