
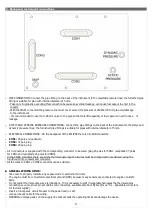


3. Backpanel instrument connections
•
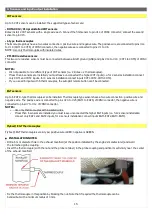
MAP CONNECTION: Connect the pipe fitting on the back of the instrument to the manifold pressure lines; the furnished pipe
fitting is suitable for pipe with internal diameter of 5 mm.
- Take care to properly executing this connection because an eventual leakage can cause fuel vapour to enter in the
cockpit.
- With the MAP1 connected the pressure line must never exceed the pressure of 250kPa/74 In.Hg to avoid damage
to the instrument.
- It's recommended to insert a restrictor valve to the pipe so that only little quantity of fuel vapour can exit in case of
leakage.
•
STATIC AND DYNAMIC PRESSURE CONNECTIONS: Connect the pipe fittings on the back of the instrument to the statyc and
dynamic pressure lines; the furnished pipe fittings is suitable for pipes with internal diameter of 5 mm.
•
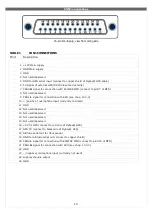
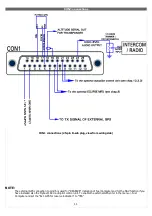
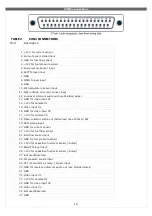
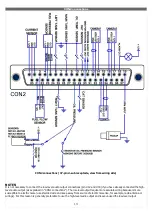
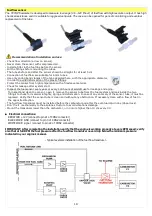
ELECTRICAL CONNECTIONS: On the backpanel of the ECLIPSE there is 3 D-SUB connectors:
•
CON1:
25 poles, receptacle
•
CON2:
37 poli, plug
•
CON3:
25 poli, plug
- All 3 connectors is supplied with the corresponding connector to be wired (plug 25 poles for CON1, receptacle 37 poles
for CON2 and receptacle 25 poles for CON3).
- In the CON3 connector there are all the thermocouple inputs: all wires must be crimped and not soldered, using the
furnished crimp contacts and connector.
- All the wires to CON1 e CON2 connectors can be soldered.
•
GENERAL WIRING HINTS:
- Take care to properly insulate any exposed wire to avoid short circuits.
- The engine must be connected to electrical ground (GND) because many sensors are connected to engine or aicraft
body.
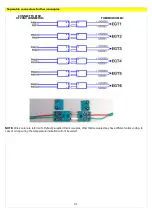
- Do not solder thermocouple wires terminations. If it is necessary to split in separable harnesses the thermocouples
connections you must use proper cables and connectors, available also from Flybox® (see “4.1 - Separable connectors
for thermocouples”).
- Insert a 3-Amperes circuit breaker to the power lead (+12V).
- Use aeronautic cable for the wiring.
- WARNING: Voltage peaks on the supply line that exceeds the operating limits can damage the device.
9
Содержание Eclipse
Страница 6: ...ECLIPSE PART I INSTALLATION 6 ...
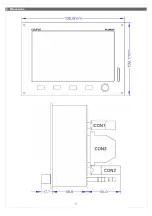
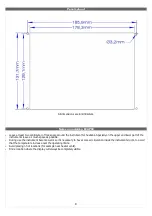
Страница 7: ...2 Dimensions 7 ...
Страница 22: ...ECLIPSE PART II OPERATING MANUAL 22 ...


