


NOTE:
If appears the message “BAD MECHANICAL INSTALLATION! NOT ENOUGH SERVO TRAVEL” it means that
the servo is not correctly installed, as the travel of the servo arm is too small to function properly. In this case
you should modify the mechanical installation, for example by using an outer hole of the servo arm.
•
Step#8: position the control stick to the forward limit (without forcing). Click on
P3
button (NEXT) or the remote
button to store the position and go to the next step.
•
Step#9: position the control stick to the backward limit (without forcing). Click on
P3
button (NEXT) or the
remote button to store the position and end the calibration.
NOTE:
If appears the message “BAD MECHANICAL INSTALLATION! NOT ENOUGH SERVO TRAVEL” it means
that the servo is not correctly installed, as the travel of the servo arm is too small to function properly. In this
case you should modify the mechanical installation, for example by using an outer hole of the servo arm.
At the end of the calibration procedure the display briefly shows the confirmation message “Servo Calib Done”.
Once finished the calibration you must execute this check (ground based):
- With Eclipse on the attitude indicator screen and ACU control unit turned on, insert the autopilot by
pressing the “HDG/TRK” button on the ACU. Rotate clockwise the HDG/TRK knob (so that the
heading bug is at the right of the actual heading) and check that the flight control move as to turn the
aircraft right.
Rotate counter clockwise the HDG/TRK knob (so that the heading bug is at the left of the actual
heading) and check that the flight control move as to turn the aircraft left.
Check also that the servo pitch does not move.
- Engage the autopilot on pitch axis by pressing the “ALT” button on the ACU. Using the ALT knob set
the altitude bug to a higher value than the actual altitude and check that the flight control move as to
increase the aircraft altitude; set the altitude bug to a lower value than the actual altitude and check
that the flight control move as to decrease the aircraft altitude.
If movement direction of one or both servos is reversed it means that the calibration is wrong, so
NEVER ENGAGE THE AUTOPILOT IN FLIGHT but repeat the servos calibration procedure and check
again.
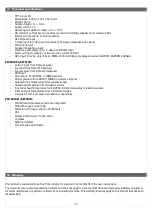
10.5.1 Communications check (ground based)
- Turn on Eclipse instrument only
- Turn on ACU control unit and check that appear “AP:OFF” in the top left of the
attitude indicator section of the Eclipse.
If no message appear means that there is a communication problem between Eclipse
and ACU control unit: check again the electrical wirings.
- Press the “HDG/TRK” button on the ACU panel and verify that the message “AP:OFF”
become “AP:HDG”.
If the message remains “AP:OFF” it means that there is a communication problem
between ACU control unit and servo/s: check again the electrical wirings.
10.5.2 Remote button operation check (ground based)
- Continuing from previous step (autopilot engaged and message “AP:HDG” on display), press the remote disengage
button and check that the message “AP:HDG” become “AP:OFF”.
If the message remains “AP:HDG” it means that there is a problem with the remote button: check the electrical
wiring and the correct functionality of the button itself.
10.5.3 Servo torque check (ground based)
- Engage the autopilot by pressing the “HDG/TRK” button on the ACU (check the message “AP:HDG” on Eclipse
display).
- Force the control stick to the left or right limit, so that you override the servo force and after 1 second the autopilot
disengages automatically (check the message “AP:OFF” on display).
- Engage the autopilot by pressing the “ALT” button on the ACU (check the message “AP:ALT” on Eclipse display).
- Force the control stick to the forward or backward limit, so that you override the servo force and after 1 second the
autopilot disengages automatically (check the message “AP:OFF” on display).
At this stage you should check also the override force: it must be strong enough to give a fairly good control
authority to the servos, but not so strong as to be difficult to override with the control stick. See chap.10.6.2 for roll
servo torque setup and chap.10.6.3 for pitch servo torque setup.
61
Содержание Eclipse
Страница 6: ...ECLIPSE PART I INSTALLATION 6 ...
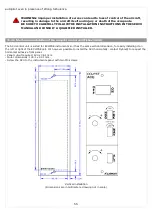
Страница 7: ...2 Dimensions 7 ...
Страница 22: ...ECLIPSE PART II OPERATING MANUAL 22 ...


