


10.7.1 Autopilot setup – Roll axis (flight based)
Autopilot engage - “Gain” parameter set
- Start the flight and when you are in safe condition (read chap.10.7) insert the autopilot by pressing the “HDG/TRK”
button on the ACU control unit (the led will turn on as confirmation). Note that the autopilot will only hold the
current heading by controlling the roll axis, so the pitch axis must be controlled by the pilot; ensure that you are not
affecting the roll axis, so that you can determine the autopilot performance.
If the autopilot behavior is sufficiently stable keep it engaged for some minutes and observe the way in which it
mantains the heading/tracking:
- If the autopilot deviates heavily from the heading/tracking set or make very slow adjustments you need to increase
the value of the “Gain” parameter.
- If the autopilot is too aggressive with excessively fast adjustments you need to decrease the value of the “Gain”
parameter.
The “Gain” parameter selects the amount of autopilot activity for a given roll angle error (that is the difference between
the desired heading/tracking and the actual heading/tracking). With low “Gain” values (minimum=1) the autopilot
system is very slow with few corrections, with high “Gain” values (maximum=40) the autopilot is more “aggressive” with
a lot of fast corrections. Above a certain upper limit, however, the system becomes unstable and start to oscillate.
To change the “Gain” parameter:
- Enter in the “System setup” by pressing P1+P4 buttons
- Rotate the knob to select the “Autopilot” menu and press it to enter
- Rotate the knob to select the “Roll servo setup” menu and press it to enter
- Rotate the knob to select the “Gain” parameter and press it.
- Rotate the knob to change the value and press it to store the new value.
Heading/tracking change
During this phase you observe the autopilot behavior during a turn, further optimizing the “Gain” parameter which as
said is what establishes the autopilot response.
- With the autopilot engaged in “HDG/TRK” mode, start an autopilot commanded turn by rotating the HDG/TRK knob
on the ACU control unit.
- Repeat again some heading/tracking change, observing the behavior of the autopilot:
•
If the autopilot will cause excessive oscillations (fast left/right bank movements) and seems too “aggressive” in
the regulation, you need to decrease the “Gain” parameter.
•
If the autopilot is too “smooth” and slow to reach the heading/tracking set (or cannot reach it) you need to
increase the “Gain” parameter.
- It's recommended to change the value by 1 or 2 steps and then observe the effects on the autopilot behavior.
As you can imagine the optimal setting is highly dependent on the flight controls and the aircraft type, so you probably
find the optimal setting after some flights, in which you learn also the way the autopilot control the aircraft.
You should be able to find a “Gain” value that is acceptable for both heading holds and turns in smooth air; may be
required, in case of turbulence, to change this value (probably needs to be increased a bit).
Check of the parameters “Turn rate” and “Max Roll Bank”
It's possible to check if the values set for the turn rate and for the maximum bank angle are compatible by measuring
the time the autopilot takes to complete a turn: for example if in the “Turn Rate” parameter you have set a value of
2°/s, the aircraft must take nearly 45 seconds to complete a 90° turn. If it takes more time it means that the “Max Roll
Bank” parameter are set too low, so the autopilot is forced not to exceed this angle and as a result also the turn rate
become slower than what set in “Turn Rate” parameter.
Now you have checked and configured all the parameters so you can disengage the autopilot by pressing the HDG/TRK
button on the ACU control unit (the led will turn off as confirmation).
65
Содержание Eclipse
Страница 6: ...ECLIPSE PART I INSTALLATION 6 ...
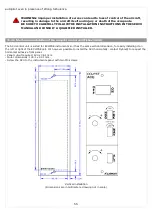
Страница 7: ...2 Dimensions 7 ...
Страница 22: ...ECLIPSE PART II OPERATING MANUAL 22 ...


