background image

3. Useful Additional Functions
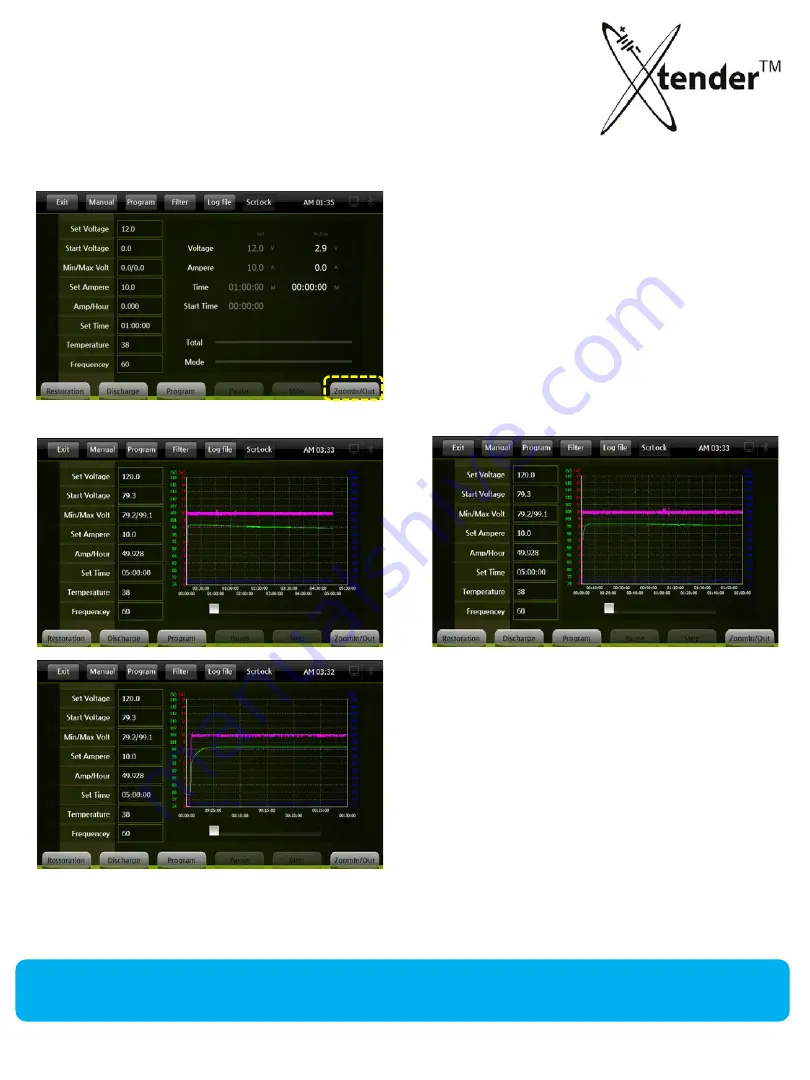
ZOOM :

Zoom : You can load graph on the screen  
during operation of xtender or from the log files 
saved in SD card.

Graph shows for the results of every 30/60/120 
minutes or total hours through zoom function 
on the screen. 

By using Zoom Function,  you can check easily the changing process of batteries..

52

Содержание Xtender

Страница 1: ...Operation Manual For more information or technical assistance please call us toll free 1 800 333 1194 or visit us online at shop fsip biz 1 ...

Страница 2: ...instructions during operation Machine model information Accessories Xtender Machines Identification and Functions Xtender Machines Cable Connections 1 Start Program Start System Program 2 Operation Restoration Discharge Operation Screen Manual Mode Program Mode Program Pulse Scenarios Patterns CONTENTS 2 ...

Страница 3: ...tender Machines Latest Firmware Download Software Update 5 Xtender Monitoring Program for PC Program Installation Operation of Equipment Log Files Viewing Printing Useful Program Functions 6 Important Information Xtender Error Messages Xtender Alarm Messages 7 Trouble Shooting 8 MET Certificates CONTENTS 3 ...

Страница 4: ...onstant current constant voltage constant current with high performance high efficiency Discharge through technology of smart current control and inversion Easy program application 5 steps of modes for charge discharge with max operation time of 99H 59M Six 6 scenario patterns can be applied according to performance degradation of used batteries Test results VI Graphs show the full process of oper...

Страница 5: ...d this manual before operation of this equipment equipments DANGER Danger indicates an extremely hazardous situation If not observed and avoided will result in death or serious injuries WARNING Warning indicates a hazardous situation If not observed and avoided could result in death or serious injuries CAUTION Caution indicates a hazardous situation If not observed and avoided could result in mino...

Страница 6: ...supply you should ground in accordance with your local safety regulation Before contact with interface ports make sure that power supply is not connected Before inspecting the Xtender for maintenance or repair first shut off power supply and wear safety gear in order to avoid risk of hazardous electric shock While equipment is running or connected with power supply any contact with physical or con...

Страница 7: ...gularly to protect your safety Don t attempt to disassemble or modify the units at your own discretion Unauthorized modification or abnormal operation of unit could result in serious injury or property damage Be sure to turn off power supply before working on repairing or maintaining the equipment in order to avoid risk of hazardous electric shock Ensure that the cooling vents on each side of the ...

Страница 8: ... to the unit Charge or Discharge using proper Voltage and Ampere per the specification and condition of battery Keep the unit clean and vacuum the ventilation area regularly Dust or dirt on the ventilation will reduce the cooling capacity and cause the performance degradation of the unit Never try to restore or discharge frozen batteries Operation of the unit including restoration and discharge sh...

Страница 9: ...ed damaged or frozen batteries are strictly prohibited to Restore or Discharge using the Xtender Do not attempt to disassemble modify or repair the unit on your own unless instructed otherwise and guided clearly in operation manual It can cause electric shock or malfunction of the machine It may also void any warranties Any damage or removal of the stickers attached on unit may void any warranties...

Страница 10: ...he Xtender for any other purposes Avoid using in extremely high or low temperatures dusty dirty areas or in high humidity conditions Keep the unit out of direct sunlight Do not scratch or impact the surface of the unit using any solid materials Do shut off the power to the unit before moving the unit ONLY connect Lead Acid Batteries 10 ...

Страница 11: ...hines near them and do not make spark during the operation of the machine CAUTION OF SULFURIC ACID Batteries contain strong corrosive sulfuric acid It can cause lose of eyesight burns to the skin or damage to clothing Wear protective goggles and rubber gloves to prevent dangerous accidents in advance CHILDREN PROHIBITED Due to the risk of explosion and physical damage caused by the sulfuric acid c...

Страница 12: ...t and high humidity can damage the battery DO NOT IMPACT OR SLANT THE BATTERIES MORE THAN 45 TILT The leaking of electrolyte when impacting slanting or overturning the batteries can cause sever damage Please be fully aware of safety instructions in this manual to prevent any possible danger during operation DO NOT USE OVER CAPACITY OR FOR OTHER THAN INTENDED PURPOSE In the case of using the batter...

Страница 13: ... it gets into your mouth you should rinse your mouth out and brush your teeth several times In case you swallowed it you should drink lots of water and seek medical care as soon as possible If it stained your skin or clothes you should wash with the plenty of fresh water If there are abnormal symptoms like a skin burn seek medical care Please be fully aware of safety instructions in this manual to...

Страница 14: ...Line Up 93 M1001 93 M1005 93 M1007 93 M1009 14 ...

Страница 15: ...le 1 1 93 M1001 93 M1005 2 Output Cable 2 1 93 M1007 93 M1009 3 Output Cable 3 1 93 M1007 4 Output Cable 4 1 93 M1007 93 M1009 5 Output Cable 5 1 93 M1007 6 Output Cable 6 1 93 M1009 Accessories provided are subject to change without prior notice for safety or inventory 15 ...

Страница 16: ... No Photo Description SPEC Qty Xtender Model 7 Temperature Sensor PT100 2 5m 1 common 8 Serial Cable Xtender to Router 1 common 9 Xtender Router 1 common 10 USB Cable Router to PC 1 common 11 Server Ant 2 4GHz 2 common 12 Xtender Ant 2 4GHz 1 common 13 SD Card 2G 1 common 14 SD Card Reader 1 common 15 Key 1 common 16 ...

Страница 17: ... Popular Accessories provided are subject to change without prior notice for safety or inventory No Photo Description Qty Xtender Model 16 Gloves 1 common 17 Apron 1 common 18 Arm Cover 1 common 19 Face Shield 1 common 17 ...

Страница 18: ...w sulfuric gases enter into the Xtender through the vent during restoration discharge Key Switch Emergency Switch Touch Screen Display Monitor SD Card Serial Port Input AC 1PH 3Wire Output DC 2Wire Temp Sensor Antenna Ventilation Holes Circuit Breaker CP 18 ...

Страница 19: ...w sulfuric gases enter into the Xtender through the vent during restoration discharge Key Switch Emergency Switch Touch Screen Display Monitor SD Card Serial Port Input AC 3PH 3Wire Output DC 2Wire Temp Sensor Power Led Antenna Ventilation Holes Circuit Breaker CP 19 ...

Страница 20: ...low sulfuric gases enter into the Xtender through the vent during restoration discharge Touch Screen Display Monitor Input AC 3PH 3Wire Output DC 2Wire Fuse Temp Sensor Key Switch Emergency Switch Power Led Antenna Ventilation Holes SD Card Serial Port 20 ...

Страница 21: ... INPUT Xtender Electricity power AC 220V Single Phase 60Hz 2 TEMP SENSOR Connect Temp Sensor with Model PC 100 provided 3 CIRCUIT BREAKER Xtender Protection Device It will automatically cut electricity off during the excessive current or a power failure 4 OUTPUT Battery has a polarity of Be sure that they are connected correctly 5 GROUND Xtender to Earth Ground 1 2 3 4 5 Wiring Instructions 21 ...

Страница 22: ...OR Connect Temp Sensor with Model PC 100 provided 3 CIRCUIT BREAKER Xtender Protection Device It will automatically cut electricity off during the excessive current or a power failure 4 OUTPUT Battery has polarity of Be sure that they are connected correctly 5 INPUT Electricity power AC 3 Phases 220V 60Hz L1 L2 L3 3Wires GROUND Xtender to Earth Ground 1 2 3 4 5 Wiring Instructions 22 ...

Страница 23: ...t Temp Sensor with Model PC 100 provided 3 CIRCUIT BREAKER Protection Device It will automatically cut electricity off during the excessive current or a power failure CIRCUIT BREAKER REQUIRED FOR THIS MODEL IS 80 AMPS 4 OUTPUT Battery has polarity of Be sure that they are connected correctly 5 INPUT Electricity power AC 3 Phases 220V 60Hz L1 red L2 yellow L3 blue 3 Wires GROUND Xtender to Earth Gr...

Страница 24: ...2 TEMP SENSOR Connect Temp Sensor with Model PC 100 provided 3 Fuse Xtender Protection Device It will automatically cut electricity off when excessive ampere or power blackout 4 OUTPUT Battery has polarity of Be sure that they are connected correctly 5 INPUT Xtender Electricity AC 3 Phases 220V or 400V 50Hz or 60Hz L1 L2 L3 3Wires GROUND Xtender to Earth Ground 1 2 3 4 5 Wiring Instructions 24 ...

Страница 25: ...will show in screen 3 After booting up PC main screen will show as above 4 Select the mode by touching the position OPERATION Enter the mode for Restoration Discharging SETTING Configure the Xtender settings Software upgrade Each model shows on screen 93 M1001 93 M1005 93 M1007 93 M1009 Main Screen 25 ...

Страница 26: ...ssword to prevent tampering Bluetooth Bluetooth wireless communication between Xtender and integrated receiver Back light off Automatically backlighting off energy saving mode Language Korean English Spanish and Japanese S W upgrade Latest Firmware and Software Update Upgrade of Xtender HW SW Version Xtender Time Connection Information Operation Restoration Discharge data will be recorded on SD Me...

Страница 27: ...ouch Screen is for setting of coordinate location You can select Touch Calibration Run for activation 1 When you activate will be shown up on the screen as under 2 Keep press with finger or touch pen it will move and calculate location of coordinate 27 ...

Страница 28: ... 6 letters from C H A R G E example CCHHAE or EGRAHC 3 Set Password YES 4 Activate Screen Lock OFF ON After 10 minutes it will be in effect Screen Lock can be set directly from the menu on Operation Screen When you forget the password or need urgent operation you can power off then power on to cancel Screen Lock and reset a password A forced power off during operation could damage the units or cau...

Страница 29: ...1 Start Setting SETTING SCREEN SCREEN LOCK Screen Lock is in effect When you touch the Screen Lock the picture will be shown as above and you can release Screen Lock with your password 29 ...

Страница 30: ... SCREEN BACK LIGHT OFF For the life span of LCD energy saving LCD Back light will be automatically off after set time regardless of operation of Xtender You can resume back light on by touching any part of screen options Always On After 30min Back light off automatically after 3o minute After 1 hour Back light off automatically after 1 hour 30 ...

Страница 31: ...1 Start Setting SETTING SCREEN LANGUAGE Xtender supports Korean English Spanish and Japanese Other languages will be added to the list continuously 31 ...

Страница 32: ...REEN S W UPGRADE Download the latest software to your SD Card from website for free Then you can upgrade Xtender through this SD Card Details of Upgrade will be explained in next page Only use software files supplied by FSIP 32 ...

Страница 33: ...during operation of Xtender When touching any part of the 2 area it will show the running information by graph Main Screen Operation Screen Set Set value Active Active value Current Voltage Current Ampere Charge Discharge Time Other information 1 2 1 2 Set V Start V Min Max V Set A Amp Hour Set Time Temp present Temperature Freq input Frequency OPERATION SCREEN Operation Screen 33 ...

Страница 34: ...t OPERATION SCREEN MENUS Top menu of Operation is related to setup of each mode of Xtender operation Bottom menu of the Screen is related to the operation of Xtender mode TOP MENU Exit Return to Main Screen Manual Go into manual mode Prog Go into program mode Filter Go into filter mode for graph Log file Bring the Log files saved ScrLock Activate Inactivate Screen Lock Signal of Serial communicati...

Страница 35: ...the operation screen without saving the set data Exit Return to Operation Screen Calc Calculator You can calculate total Voltage for Battery operation Restoration Discharge Calculator works only to set Voltage Click Voltage Click Calc Calculator will pop up as picture Calculate the voltage by inputting the data Click INS the data will be put in Click Manual on Top menu 35 ...

Страница 36: ...ct Ampere in 1 area of the screen Click 1 5 on keypad Click Enter on keypad 15 A will be shown as Ampere set value in 1 area of the screen Example 10 Hours Select Time in 1 area of the screen Click 1 0 on keypad Click Enter on keypad 10 00 T will be shown as Time set value in 1 area of the screen You should check the specification of batteries for set Voltage Ampere and Time before inputting set v...

Страница 37: ... Mode Check Set values 1 2 1 Select either Restoration or Discharge from Xtender bottom menu to begin programmed manual cycle If manual mode is programmed to discharge battery select Discharge if manual mode is programmed to regenerate battery select Restoration 2 Time will start counting when Restoration or Discharge starts operation and total AH Ampere Hour will be shown on the screen Screen Tou...

Страница 38: ...lling Active Ampere until Set Time This process is same as Pulse 2 in Program Mode Xtender checks temperature of Battery every five 5 minutes and it will decrease Active Ampere by 10 when temperature reaches over 50 adjustable in Setup menu Install temperature sensor connected with back side of Xtender unit on the top or good place on batteries to check the temperature of battery If connecting to ...

Страница 39: ...for Discharge When Active Voltage reaches Set Voltage it will complete Discharge Mode regardless of Set Time When it reaches Set Time it will complete Discharge Mode even though it does not reach Set Voltage Regardless of Set Voltage This is same as Pulse 1 in Program Mode Don t discharge under final voltage provided by battery manufacturers for discharging Discharge under final voltage specified ...

Страница 40: ...on and two 2 patterns for Discharge in Program Mode MODE Restoration Discharge Pulse patterns Set V Set A Set T per each Mode MODE ON OFF Activate or Skip depend on your selection As you can see on the screen Operator can perform Restoration and Discharge as per his scenarios of Mode program setting screen You should check specification conditions of used batteries before you input Set V Set A and...

Страница 41: ...anges In Program Mode Only Method Restoration or Discharge Pulse Restoration Insert 1 6 by keypad Discharge Insert 1 2 by keypad Restoration Regeneration Charge Discharge C A U T I O N Caution You should check specification conditions of used batteries before you input Set V Set A and Set Time for regeneration of batteries Wrong set values will cause damages to batteries due to over charge or othe...

Страница 42: ... V has not yet reached Set V Constant Current Charging will be applied Pulse 2 Restoration Pulse2 Scenario Start Charging with Set A until Actual Voltage reaches Set Voltage Constant current When Actual V reaches Set V maintain Set V until Set Time by controlling Actual Ampere Constant Voltage When it reaches Set time it will finish the Mode You should check specification conditions of used batter...

Страница 43: ...Keep Zero 0 Ampere for 1 minute Stop charging for 1 minute Discharge for 5 minutes at 1 3 A of Set A Ex 30A 10A Keep Zero 0 Ampere for 1 minute Repeat continuously When it reached Set T it will finish the Mode Pulse 4 Restoration Pulse 4 scenario Start Charging with at Set A for 5 minutes regardless whether it reaches or over Set V Keep Zero 0 Ampere for 1 minute Discharge for 5 minutes at 1 3 A o...

Страница 44: ... controlling Actual A Constant Mode Pulse 6 Restoration Pulse 6 Scenario Start Charging with Set A until it reaches Set V same as pulse 1 But when Actual Voltage suddenly drops to 0 2V during Charge it will finish the Mode regardless of Set Time If this drop by 0 2V does not happen it will continue until Set Time and finish the Mode You should check specification conditions of used batteries befor...

Страница 45: ...it will also finish the Mode even though it has not reached Set V Pulse 2 Discharge Pulse 2 Scenario Start Discharging with Set A Constant Current When Actual V reaches Set V it maintains Set V by controlling Actual A Constant V When it reaches Set T it will finish the Mode You should check specification conditions of used batteries before you input Set V Set A and Set Time for regeneration of bat...

Страница 46: ...ng steps assuming the process begins with a fully charged battery to be regenerated 1 Discharge Battery to 20 capacity while monitoring AH output 2 Mass charge battery 3 Final equalization charge battery 4 Again discharge battery while monitoring AH output comparing to step 1 5 Repeat step 2 6 Repeat step 3 When the above program cycle is completed mode 1 can be compared to mode 3 two discharge cy...

Страница 47: ...ry regeneration process ALWAYS FOLLOW BATTERY MANUFACTURERS RECCOMENDATIONS a Select MODE 1 and follow formula in the below chart i Number of Cells of nominal battery voltage b Select MODE 2 c Continue until all 6 Modes have been completely programmed 4 Example program using 36V battery with 680 AH 6 hour rating assuming process is began with fully charged battery 5 Once each mode is successfully ...

Страница 48: ... Start charging with 74 8A until measured voltage reaches 45V or 8 hour timer expires Constant current bulk charging regeneration cycle c MODE 3 Start charging with 37 4A until measured voltage equals 45V when measured voltage equals 45V maintain set voltage until 8 hour timer expires by varying current Constant voltage equalization cycle d MODE 4 Second battery discharge with same parameters as m...

Страница 49: ...peration Screen Operation Screen Click Filter on Top Menu Filter Setting Screen Select items what you want to show up on the Graphic Screen by ON OFF Set Voltage Set Ampere Voltage Active Voltage Ampere Active Voltage Temperature Active Temperature Filter Graph Example for selecting all 5 items Active Ampere Set Ampere Active Voltage Set Voltage Temperature 49 ...

Страница 50: ...ls of Xtender operation by loading log files saved in your SD Memory Card Active Log Files are created by the operation time of Xtender and saved as the title of Starting date time of operation R Restoration Regeneration Charge D Discharge P Program Mode You can output the results on the screen and check the operation easily If you have problems during operation of Xtender please send your Log Fil...

Страница 51: ...ery SCREEN LOCK Non activation Activation ScrLock is the function that protects Xtender from changing Set Data by others except authorized operators Lock process Activate according to following process Click ON to Screen Lock in Setting Screen Setting of Password was explained in page 29 Click ScrLock of operation Top Menu it starts the function of Screen Lock After 10 minutes Screen Lock activate...

Страница 52: ...the screen during operation of xtender or from the log files saved in SD card Graph shows for the results of every 30 60 120 minutes or total hours through zoom function on the screen By using Zoom Function you can check easily the changing process of batteries 52 ...

Страница 53: ...B adapter and insert into pc usb drive Copy the downloaded files from your pc to the SD card When copying firmware do not place it into subfolders Install the SD Card in your Xtender and Power on Select APP MCU on the Setting Screen and click S W upgrade APP MCU will be updated and then program will reboot automatically after update 53 ...

Страница 54: ...SOFTWARE UPDATE If you select Yes for update Xtender will check files in SD card and give you the information of devices as shown in the picture After checking devices perform the upgrade Only use software files supplied by FSIP 54 ...

Страница 55: ...oring program for PC can control the Xtender and manage the operation data easily by using integrated router BMS Battery Monitoring System can be synchronized with the Xtender through this program Integration Router Operation indicator Power Red LED Bluetooth Blue LED BMS Antenna DC 5V Not needed with USB connection USB Port Server to PC Serial Port Server to Xtender Not needed when using Bluetoot...

Страница 56: ...INSTALLATION Integrated Monitoring program for PC can control the Xtender and manage the operation data easily by using integrated server BMS Battery Monitoring System can be synchronized with the Xtender through this program Structure map of Integration Sever with Xtender 56 ...

Страница 57: ... Program for PC Install the program in your PC using Setup exe file from the CD ROM supplied INTEGRATED MONITORING PROGRAM PROGRAM INSTALLATION Integrated Monitoring shortcut will be generated on the desktop of your PC 57 ...

Страница 58: ...tomatically Integrated Monitoring program can perform following functions Xtender Operation BMS Operation Xtender Operation BMS Operation at the same time Integrated operation is possible only for Discharging not for Restoration Loading the Log Files saved and issuing the Test Reports I Receiver Log Option Support Device connected list Log files of Xtender MCS Log files of BMS History Change of Te...

Страница 59: ...ne 1 1 INTEGRATED MONITORING PROGRAM FOR EQUIPMENT CONTROL Activate Integrated Monitoring Program Select I Receiver on the top menus will be shows as MCS serial number Serial No of the units will be shown as above Select one unit on the list and double click it or click connect for activation 59 ...

Страница 60: ...D MONITORING PROGRAM FOR EQUIPMENT CONTROL Select equipment you want to operate MCS Xtender only BMS BMS only MCS BMS Xtender BMS synchronized Synchronization only possible during manual discharge Xtender only Xtender BMS synchronized BMS only 60 ...

Страница 61: ...ct MCS only for Xtender only You can select the communication method from options below Wireless Bluetooth 2 4GHz Fixed Line Serial communication by cable Serial cable should be connected between Xtender and Router Xtender is connected Click from top menu to proceed Information of MCS 61 ...

Страница 62: ...g Click start after input setting data Manual Restoration Setting Manual Discharge Setting Program Setting Folder for saving Log file Information of Customers Batteries Tip Tag will help you find log files saved Tip If you leave a record it will help you to issue the Test Report and manage the Log Files 62 ...

Страница 63: ...5 Xtender Monitoring Program for PC INTEGRATED MONITORING PROGRAM Xtender CONTROL Graph in progress 63 ...

Страница 64: ...of Xtender Operation Check Point Acting values on the check point of graph Voltage Ampere Temperature Time Vision Graph items to be selected To elapsed Graph until elapsed time To step return to previous range You can leave a comment in Log files then click the save button to save your record in Log files When you check the Log file you can find the record from Comment Operation Mode Bottom Menus ...

Страница 65: ...ring Program for PC INTEGRATED MONITORING PROGRAM Xtender CONTROL When you change Set values during Xtender operation Select and revise set value After revising set values click Resetting button to apply new values 65 ...

Страница 66: ...utton for activation 5 Xtender Monitoring Program for PC INTEGRATED MONITORING PROGRAM BMS CONTROL Select BMS Process of connection with BMS BMS Voltage Setting Full Battery Voltage Full charging voltage Battery Warning Voltage Duration Operation Time BMS Server Setting Set ID Channel The num of BMS cell 66 ...

Страница 67: ... Xtender Monitoring Program for PC INTEGRATED MONITORING PROGRAM BMS CONTROL BMS is in progress BMS proceed during Set Time When you change Set values during BMS operation Select to revise set values 67 ...

Страница 68: ...SED TO MONITOR MANUAL DISCHARGE CYCLE ONLY Select MCS BMS Process of connecting with MCS BMS Click button to synchronize MCS and BMS Click of MCS on the left input Set Values Click Next Click of BMS on the right input Set values Click Sync START MCS and BMS are synchronized integrated 68 ...

Страница 69: ...D MONITORING PROGRAM LOG FILE VIEWING PRINTING Log file saved in SD memory card or in PC shows the details of operation in a short time Test Report can be printed for customers We can review Xtender use history data through reviewing Log Files 69 ...

Страница 70: ...RATED MONITORING PROGRAM LOG FILE VIEWING PRINTING Click Log button on the top menu Select item on the list MCS Xtender BMS or Program Use Log Files will be pop up on the screen Select one Log file on the list it will show up on the screen 70 ...

Страница 71: ...5 Xtender Monitor Program for PC INTEGRATED MONITOR PROGRAM LOG FILE VIEWING PRINTING Example Xtender Log file on the Screen Information of Xtender operation 71 ...

Страница 72: ...tender Log file Bottom Menus Line Graph Table chart 1 1 Type 2 3 2 Check Point Check Point Function Possible to check the information of Voltage Ampere Temperature Time on the point of the line graph by selecting each line 3 Vision Select items to be shown on the screen You can select Grid gap on the list to show up as per your choice 4 4 Zoom out To elapsed until elapsed time To setup until set t...

Страница 73: ... as the graphic file 2 Print Test Report Input the information and make Preview for printing Test Report Setting of time for the printing of Chart Elapsed time Setup time Although it does not continue to operation during full set time Time axis will be printed for full set time It is very useful to compare the improvement between before and after regeneration for the customers 73 ...

Страница 74: ...5 Xtender Monitoring Program for PC INTEGRATED MONITORING PROGRAM LOG FILE VIEWING PRINTING Example BMS Log file on Screen Information of BMS operation 74 ...

Страница 75: ...G FILE VIEWING PRINTING BMS Log file Bottom Menu Table Chart Table 1 1 Type 2 3 2 Vision Color Activated Inactivated 3 Back Color If you set default value of Voltage for Good Green Color and Bad Red Color status Table data will be shown with gradation effect of color 75 ...

Страница 76: ...PROGRAM LOG FILE VIEWING PRINTING BMS Log file Bottom Menus Line Line Graph 1 1 Line 2 3 2 Click Point 3 Y axis You can change minimum or maximum value of the Set Voltage for Y axis If you select a line graph on the screen it will show the time on the point 76 ...

Страница 77: ... FILE VIEWING PRINTING BMS Log file Bottom Menus Column Column Graph Example 1 1 Column 2 3 2 Vision 3 Y axis You can change minimum or maximum value of the Set Voltage for Y axis Starting volt Last volt Average volt Lowest volt Select Voltage from the list to output 77 ...

Страница 78: ...as graphic file 2 Print Test Report Input the information and make Preview for printing Test Report Setting time for the printing of Chart Elapsed time Setup time Although the operation doesn t continue for full set time Time axis will be printed for full set time It is very useful to compare the improvement between before and after regeneration for the customers 78 ...

Страница 79: ... inner clock or Log file name Year Month Day MM dd yyyy Expression style of date for inner clock or Log file name Month Day Year dd MM yyyy Expression style of date for inner clock or Log file name Day Month Year MCS Set Folder to save MCS log file BMS Set Folder to save BMS log file Enable event sound Set Alarm about when operation is stopped or disconnected or recognizing the lowest Voltage from...

Страница 80: ...S Tag Log File is saved in the name of Date and Time of operation hour Example 2012_02_16_115429_R_noTag csv 2012 02 16 11 54 29 Restoration If you have any difficulties searching the Log File of a specific operation please use the Tag Function to search the Log File conveniently 80 ...

Страница 81: ...5 Xtender Monitoring Program for PC INTEGRATED MONITORING PROGRAM USEFUL FUNCTIONS Tag Save the log files with Tag specific name or title Special characters won t be input 81 ...

Страница 82: ...nitoring Program for PC INTEGRATED MONITORING PROGRAM USEFUL FUNCTIONS Comment If you enter any notes in the Comment field during the operation of Xtender or BMS you can review it when you activate the Log files 82 ...

Страница 83: ...TORING PROGRAM SUPPORT Manual Operation manual of Xtender BMS Contact us e mail address for your inquiry Visit our website website address for firmware update or other information Check for update it will check and upgrade your Xtender automatically 83 ...

Страница 84: ...cification of Xtender Capacity per Xtender Model Voltage Model Set Voltage 93 M1001 1 2V 100V 93 M1005 1 2V 120V 93 M1007 1 2V 150V 93 M1009 1 2V 75V Set Ampere is out of range of specification of Xtender Capacity per Xtender Model Ampere Model Set Ampere 93 M1001 0A 30A 93 M1005 0A 50A 93 M1007 0A 100A 93 M1009 0A 300A Battery is not well connected to Xtender for operation contact failure low vol...

Страница 85: ...M1007 100A 93 M1009 300A Actual Voltage is higher than Set Voltage when Xtender starts Restoration Active Voltage exceeds Max Voltage during operation Max Voltage per Xtender Model Active current exceeds Max Ampere during operation Max Current per Xtender Model Actual Voltage is lower than Set Voltage when Xtender starts Discharge Xtender ERROR MESSAGES 85 ...

Страница 86: ...ating Set time in program mode Active Frequency is different from the Set Frequency of Xtender You are requested to confirm your local frequency before Xtender operation There is no activation mode at the Program setting Any mode is not selected for activation Xtender ERROR MESSAGES 86 ...

Страница 87: ...Xtender operation do not exist on SD memory Card or SD Card does not work properly Communication problem in controlling of the inner devices of Xtender No files are in SD memory Card for S W upgrade of Xtender Xtender ERROR MESSAGES 87 ...

Страница 88: ...der ERROR MESSAGES Actual temperature of inner Xtender is over the set temperature Stop Xtender operation When any Error messages show up on screen during operation please make proper adjustments If you need more assist please contact your Local Dealer or the Head Office 88 ...

Страница 89: ...6 Important Information Xtender ALARM MESSAGES In Manual mode Restoration is completed Program Mode is completed In Manual mode Discharge is completed 89 ...

Страница 90: ... be electric power On 3 Check the emergency switch Off Active Voltage or Active Ampere are not displayed 1 Check CP terminal Circuit Breaker of Xtender unit to be On 2 Check the connection with batteries Temperature is not well recognized Check the cable of the thermometer sensor to be well connected with the temperature terminal of Xtender unit 90 ...

Страница 91: ... more information or technical assistance please call us toll free 1 800 333 1194 or visit us online at shop fsip biz Copies of MET certification can be requested by contacting FSIP Posted on machine identification label 91 ...

Отзывы: