Fisher-Price Power Wheels Скачать руководство пользователя страница 15

Troubleshooting • Solución de problemas • Guide de dépannage 

Î

 service.fi sher-price.com

15

BJM25pr

-0720

Rear Wheel

Rueda trasera

Roue arrière

Rear Axle

Eje trasero

Essieu arrière

R

A

2

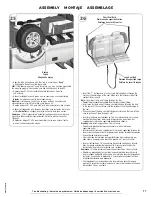
ASSEMBLY     MONTAJE     ASSEMBLAGE

BOTTOM SIDE VIEW

VISTA INFERIOR DEL LADO

VUE LATÉRALE DE DESSOUS

•  Insert four screws into the grille support and tighten.

•  Insertar cuatro tornillos en el soporte de la rejilla y apretarlos.

•  Insérer quatre vis dans le support de la calandre et les serrer.

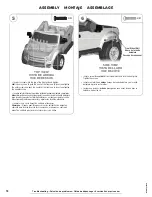
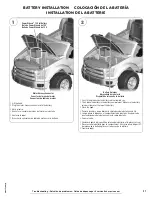
•  Slide a rear wheel onto the rear axle.

Hint:

 Note the number on the inside of the wheel and on the bottom of the 

vehicle near the rear axle. The rear wheel with a 

1

 should match the 

1

 on 

the vehicle and the rear wheel with a 

2

 should match the 

2

 on the vehicle.

•  Introducir una rueda trasera en el eje trasero.

Atención:

 observar el número en el interior de la rueda y en la parte de 

abajo del vehículo, cerca del eje trasero. La rueda trasera con un 

1

 debe 

corresponder con el 

1

 del vehículo y la rueda trasera con el 

2

 debe 

corresponder con el 

2

 del vehículo.

•  Glisser une roue arrière sur l’essieu arrière.

Remarque :

 Repérer les chiffres indiqués sur le côté intérieur de la roue 

et sous le véhicule, à proximité de l’essieu arrière. La roue arrière avec le 

1

 doit correspondre au 

1

 sur le véhicule, et la roue arrière avec le 

2

 doit 

correspondre au 

2

 sur le véhicule.

21

x4

x2

19

20

•  Align the pegs on the underside of the grille support with the posts on 

the vehicle.

•  Insert two screws into the grille support and tighten.

•  Alinear las clavijas de la parte de abajo del soporte de la rejilla con los 

postes del vehículo.

•  Insertar dos tornillos en el soporte de la rejilla y apretarlos.

•  Aligner les chevilles situées sous le support de la calandre sur les tiges 

du véhicule.

•  Insérer deux vis dans le support de la calandre et les serrer.

Содержание Power Wheels

Страница 1: ...rewdriver not included Requiere montaje por un adulto Herramienta necesaria para el montaje desatornillador de cruz no incluido Doit tre assembl par un adulte Outils requis pour l assemblage un tourne...

Страница 2: ...si este est sobrecargado o si las condiciones de manejo son muy severas Despu s de que un fusible se bloquea quitar el pie del pedal y esperar 25 segundos antes de echar a andar el veh culo otra vez...

Страница 3: ...of water to prevent drownings generally level to prevent tipovers away from steps steep inclines cars roads and alleys Riding rules Make sure children know and follow these rules for safe driving and...

Страница 4: ...da os o gasto en exceso no usar el cargador ni la bater a hasta que haya reemplazado la pieza da ada Nunca modificar el sistema el ctrico Las alteraciones podr an causar un incendio Usar solo una bate...

Страница 5: ...n vertical mientras se carga La batterie doit tre debout pendant la charge First plug the charger connector into the battery socket Then plug the charger into a standard wall outlet Use the charger on...

Страница 6: ...rante el env o Limpiar todas las piezas de metal con una toallita de papel para quitar el exceso de lubricante Limpiar la superficie de cada pieza con un pa o limpio y seco para eliminar cualquier suc...

Страница 7: ...PI CES Fasteners Shown Actual Size Los sujetadores se muestran a tama o real l ments de fixation de dimensions r elles For your convenience extra fasteners are included Tighten and loosen all screws...

Страница 8: ...rdes y puntas losas de las piezas individuales del veh culo desmontado as como con piezas el ctricas Tomar las debidas precauciones al sacar las piezas del veh culo y al montar el mismo No permitir qu...

Страница 9: ...cada guardabarros Fixer le devant sur le v hicule comme illustr S assurer que les languettes situ es de chaque c t du devant entrent dans la fente de chaque garde boue Front End Assembly Unidad del e...

Страница 10: ...x screws into the top of the front end and tighten Hint You may need to push the ends of the front end to insert and tighten the outer screws and push the center of the front end to insert and tighten...

Страница 11: ...ior hacia abajo Extr mit courb e vers le bas Wipe the steering column with a paper towel to remove any excess lubricant Position the steering wheel so that the large opening is upright Position the st...

Страница 12: ...correctamente montada en el volante Retirar la clavija y la columna de mando del volante y volver a leer los pasos de montaje 8 y 9 Enclencher la garniture du volant sur le volant Remarque Si la garn...

Страница 13: ...A DE ARRIBA VUE DE DESSUS SIDE VIEW VISTA DEL LADO VUE DE C T Insert a screw up through both rear wheel wells and into the cargo bed Tighten each screw Hint You may need the help of another adult to h...

Страница 14: ...de direction Steering Column Cap Tapa de la columna de mando Capuchon de la colonne de direction BOTTOM FRONT VIEW VISTA INFERIOR DEL FRENTE VUE AVANT DE DESSOUS Fit the wide end of the grille suppor...

Страница 15: ...mero en el interior de la rueda y en la parte de abajo del veh culo cerca del eje trasero La rueda trasera con un 1 debe corresponder con el 1 del veh culo y la rueda trasera con el 2 debe correspond...

Страница 16: ...sure the straight end of the clip is through both holes in the axle Deslizar el clip de modo que el extremo recto entre en el otro orificio del eje Asegurarse de que el extremo recto del clip est ins...

Страница 17: ...inture est orient e vers l int rieur Remarque Il faudra passer seulement une extr mit en T dans la fente R p ter ce proc d pour assembler l autre ceinture de s curit courte Ins rer chaque extr mit d a...

Страница 18: ...illos Ins rer deux vis dans le dossier de la banquette jusque dans le v hicule Serrer les vis Slots Ranuras Fentes Seat Asiento Banquette Fit the long tabs on the hood into the slots in the front end...

Страница 19: ...rechargeable batteries from the radio if used before charging If removable rechargeable batteries are used they are only to be charged under adult supervision Informaci n de seguridad sobre las pilas...

Страница 20: ...ISTA DE ARRIBA VUE DE DESSUS Place the labels exactly as shown in the illustrations For best results avoid repositioning a label once it has been applied to the vehicle Colocar las etiquetas exactamen...

Страница 21: ...the battery in the battery compartment Make sure the battery retainer slides over the top of the battery Close the hood Primero levantar y luego deslizar la abrazadera de la bater a hacia Ud Luego po...

Страница 22: ...hicule Ces r gles doivent galement tre connues de tous les enfants qui conduiront le v hicule Utiliser ce v hicule sur la pelouse l asphalte et autres surfaces dures et SEULEMENT sur des surfaces plan...

Страница 23: ...ph 8 km h maximum Make sure the shifter is in the low speed position Loosen and remove the screw in the shifter box Place the lock out screw into the hole in the top of the shifter handle It can be re...

Страница 24: ...ara subir el volumen al m ximo o bajarlo al m nimo Presiona los botones de m sica o sonidos para escuchar m sica y efectos de sonido Mientras presionas el bot n del micr fono habla en el micr fono Gir...

Страница 25: ...de la charger Avant de ranger le v hicule charger la batterie au moins une fois par mois m me si le v hicule n est pas utilis La charger apr s chaque utilisation quel que soit le temps d utilisation...

Страница 26: ...ty your original sales receipt must be provided This warranty is valid in Canada and the United States of America only P LIZA DE GARANT A Mattel de M xico S A de C V garantiza este producto por un per...

Страница 27: ...hnician for help NOTE Changes or modifications not expressively approved by the manufacturer responsible for compliance could void the user s authority to operate the equipment This device complies wi...

Страница 28: ...pendant 18 heures Charger la batterie imm diatement apr s chaque utilisation Charger la batterie une fois par mois m me si le v hicule n est pas utilis Ne pas retourner le v hicule au magasin Nous po...

Отзывы: