background image


START-UP AND OPERATION INSTRUCTIONS 

ECOMINI


Rev. 000 

18/09/2017 

22/37


4.7.    OPERATION 

 
Scrubbing  operations  are  highly  critical  and  specific  experience  will  help  you  choose  the  right  type  of 
scrubbing brush and detergent and determine whether or not a double cleaning cycle is necessary.  
 
Carry out scrubbing in the following steps: 

  Start the machine; 

  Start brush rotation via the special lever; 

  Start liquid suction via the squeegee; 

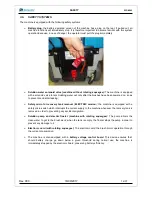
  Lower the squeegee with the special lever (figure 4.9 detail 3); 

 
After completing these steps, the machine will be ready to work. 


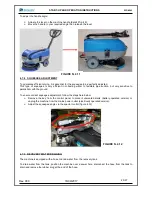
4.7.1    MACHINE PREPARATION AND START-UP 
 

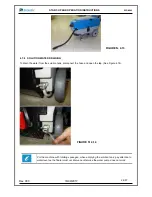
If  your  scrubber  machine  is  powered  off  the  mains  (electrically  powered  version),  it  should  be  unplugged 
from  the  panel;  fill  with  washing  water  by  lifting  the  special  cover  (detail  1  figure  4.10);  if  your  scrubber 
machine  battery  charger  is  plugged  in  (battery-powered  version),  unplug  it  and  connect  the  battery  plug  to 
the machine power outlet (detail 2 figure 4.10). 
The machine can now be started. Scrubbing can now be carried out. 


4.7.2 CHOOSING THE RIGHT DETERGENT 
 

Choosing the right detergent is very important for efficient floor cleaning. Too strong a detergent could cause 
damages. Low-foaming detergents or foam preventing additives should be used to prevent damages to the 
suction motor. If these products cannot be procured, try adding 50cc of common wine vinegar to the recovery 
tank before starting the cleaning cycle. 


Make  sure  that  the  detergent  used  is  suitable  for  the  surface  to clean.  Fiorentini  S.p.A.  will 
not accept any responsibility for damages caused by too aggressive detergents.


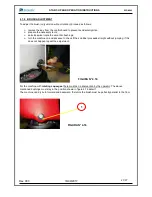
4.7.3    GUIDING HANDLE ADJUSTMENT 


The Ecomini machine is equipped with an adjustable angle handle to better adapt to each operator's height 
and needs. The handle can be bent forwards until it rests on the machine top side to minimise the machine 
footprint when stored (fig. 4.11). 


FIGURE N. 4.10 


Содержание ECOMINI 430

Страница 1: ...ING O FIORENTINI S p A INDUSTRIAL CLEANING MACHINES SCRUBBER MACHINE MOD ECOMINI 430 INSTRUCTIONS FOR USE AND MAINTENANCE Rev 00 ...

Страница 2: ...trol levers 21 4 7 Operation 22 4 7 1 Machine preparation and start up 22 4 7 2 Choosing the right detergent 22 4 7 3 Guiding handle adjustment 22 4 7 4 Squeegee adjustment 23 4 7 5 Recovery water draining 23 4 7 6 Solution water draining 24 4 7 7 a Brush replacement standard versione 25 Congratulations on your choice Thank you for having chosen to purchase a product by FIORENTINI S p A a world le...

Страница 3: ...top ups 30 5 2 3 Charge limits 30 5 2 4 Standby or inactive batteries 30 5 2 5 Battery charger technical characteristics 30 5 2 6 Battery disposal 31 5 3 Motor maintenance 31 5 3 1 Maintenance of the suction motor 31 5 3 2 Brush motor maintenance 32 5 4 Wiring system checks 32 5 5 Inspection summary table 33 5 6 Maintenance log 34 6 TECHNICAL ASSISTANCE 35 6 1 Technical assistance contact informat...

Страница 4: ...igned and built for trouble free use over several years However if any malfunctioning is observed during the warranty period FIORENTINI undertakes to repair or replace free of charge any parts showing breaks and early wear due to faulty materials working defects or incorrect assembly The manufacturer warranty will not cover any parts whose early breaking or wear and tear are caused by This manual ...

Страница 5: ...y personnel and cover FIORENTINI personnel s travelling and accommodation expenses and meals PRODUCT RETURNS In case of parts to be returned for replacement or repairs under the warranty a written authorisation must be obtained in advance from FIORENTINI s Technical Assistance Department All defective parts must be carefully repacked in order to avoid damages during transport Products must be retu...

Страница 6: ...MACHINE CHARACTERISTICS AND TECHNICAL DATA ECOMINI Rev 000 18 09 2017 6 37 ...

Страница 7: ... power plug or a 4 12V x 18Ah battery pack powering all the machine parts and electrical controls The machine is equipped with a rotating brush designed to scrub the floor with water and detergent When the machine moves forwards the squeegee or back brush in contact with the floor takes up any water by suction for its subsequent delivery to the recovery tank Through the control panel all the main ...

Страница 8: ...ngle handle In consideration of recent EU concerns regarding product safety FIORENTINI designed and built this machine in compliance with the safety and health requirements provided by applicable Directives The high quality of the materials used the applied advanced technology and FIORENTINI s long standing experience are a guarantee of the performance and reliability of this machine Each machine ...

Страница 9: ...m h ENGINE MOTOR SPECIFICATIONS Suction motor 1x300 W 24V 1x500 W 230V Brush motor N 1x400W 24V N 1x370W 230V DIMENSIONS AND WEIGHTS Length 700 mm Width 500 mm Height 570 mm Weight without load 45 kg Battery weight 4 x 5 5 Kg Drive Walk behind operator Max gradient at full load 3 Noise level 66 dB The above mentioned specifications are not binding on the manufacturer and may therefore be changed w...

Страница 10: ...ransport for people or other vehicles altering or tampering with safety devices charging batteries at not sufficiently ventilated locations failure to comply with applicable safety standards currently in force fitting equipment devices likely to interfere with machine operation introducing changes or alterations not authorised by FIORENTINI using acid solutions likely to damage the machine failing...

Страница 11: ...ed particularly in regard to safety issues machine operators must have read and become familiar with this manual FIORENTINI declines all responsibility for accidents involving persons or property caused by not adequately skilled unauthorised operators using the machine 3 5 SAFETY AND WARNING DEVICES It is strictly forbidden to tamper with remove or deactivate safety and warning devices while the m...

Страница 12: ...ety micro for recovery tank removal ELECTRIC version the machine is equipped with a safety micro switch which interrupts the current supply to the machine whenever the recovery tank is removed in order to preventing any accidental ignition Solution pump and electric floater machine with rotating squeegee The pump allows the clean water to get to the brush deck when the tank is empty the floater st...

Страница 13: ...rts Special danger pictograms are provided to designate critical points on the machine DANGER OF CRUSHING AND SHEARING Crushing and shearing risks are possible during squeegee adjustment During squeegee adjustment ensure that no one close to the machine is able to operate the device up and down stroke controls DANGER OF OVERTURNING Machine overturning is possible during normal machine operation wh...

Страница 14: ...rbidden to remove or tamper with these signs What is it Danger of crushing during machine recovery tank installation What to do Before handling the recovery tank ensure that it has been completely drained to reduce its weight and make handling easier What is it This sign warns that it is forbidden to remove safety guards from around moving parts What to do During installation maintenance before re...

Страница 15: ... hydrogen What to do During battery charging ensure that the machine is under a suction hood or in a ventilated area and keep it away from heat sources and corrosive substances What is it This sign shows that there is a risk of fire caused by the presence of batteries What to do Be extremely careful during battery charging or tank filling If any signs become damaged the purchaser must replace them...

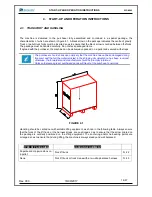
Страница 16: ...ine has not been damaged during transport and that all the material listed in the shipping documentation has been received otherwise the forwarders and manufacturer should be promptly informed Unless otherwise agreed purchased goods will travel at the purchaser s own risk Handling should be carried out with suitable lifting equipment as shown in the following table Always ensure that the forks of ...

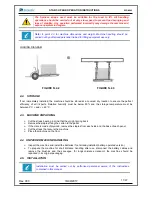
Страница 17: ...ity must be below 80 and the storage temperature must be between 3 C and 45 C 4 3 MACHINE UNPACKING Cut the straps bearing in mind that they might spring back Remove the staples fixing the carton to the pallet If the crate is made of plywood remove the staples from each side and the base of each panel Cut the straps that secure the machine Place the machine on the floor 4 4 UNPACKED MACHINE HANDLI...

Страница 18: ...ed water after charging the batteries Replace the tank on the machine and close back the special fixings 4 5 2 BATTERY CHARGER INSTALLATION Battery powered version The machine is equipped with a built in battery charger To charge the batteries Select a dry ventilated place away from heat sources and corrosive environments Unplug the batteries detail 1 fig 4 5 Plug the battery charger into the main...

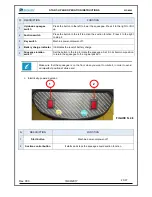
Страница 19: ...th a pictogram uniquely representing the switch function Battery operated version Battery version with rotating squeegee N DESCRIPTION FUNCTION 1 Suction switch If set to its top position it activates the squeegee liquid suction function If set to its bottom position the suction function is deactivated 2 Key switch Machine power on power off 3 Battery charge indicator It indicates the level of bat...

Страница 20: ...o lift it up 2 Suction switch Press the button to the left to action the suction function Press it to the right to stop it 3 Key switch Machine power on power off 4 Battery charge indicator It indicates the level of battery charge 5 Squeegee rotation switch Set the button to the top to rotate the squeegee Set it in its bommom position to return the squeegee to the original position N DESCRIPTION F...

Страница 21: ...ERS Brush control lever detail 1 fig 4 9 by actuating this lever scrubbing brush rotation will be controlled both levers operate the same switch therefore it is enough to control one to actuate the function Handle angle adjustment lever detail 2 fig 4 9 it is used to adjust the machine guiding handle inclination Squeegee lifting lever detail 3 fig 4 9 it is used to lift lower the machine squeegee ...

Страница 22: ...in battery powered version unplug it and connect the battery plug to the machine power outlet detail 2 figure 4 10 The machine can now be started Scrubbing can now be carried out 4 7 2 CHOOSING THE RIGHT DETERGENT Choosing the right detergent is very important for efficient floor cleaning Too strong a detergent could cause damages Low foaming detergents or foam preventing additives should be used ...

Страница 23: ...nsitive to parallelism with the ground To ensure correct squeegee adjustment follow the steps here below Remove the key from the control panel to prevent unwanted starts battery operated version or unplug the machine from the mains power outlet electrically operated version Adjust the squeegee angle via the special control figure 4 12 4 7 5 RECOVERY WATER DRAINING The machine is equipped with a ho...

Страница 24: ...NG To drain the water from the solution tank disconnect the hose and open the tap See Figure 4 14 For the machine with rotating squeegee when emptying the solution tank pay attention to water level as the floater must not intervene otherwise the water pump does not work FIGURE N 4 13 FIGURE N 4 14 ...

Страница 25: ...e from the mains power outlet electrically operated version Empty both tanks to reduce the machine weight as much as possible Lift the machine and release the brush by rotating it clockwise detail 1 fig 4 14 Position the new brush below the connector checking that the brush slots match the machine flange profile and lower the machine again detail 2 fig 4 14 To connect it to the support it is enoug...

Страница 26: ...e the brush Remove the key from the control panel to prevent unwanted starts Empty both tanks to reduce the machine weight as much as possible Lift the machine from the back and release the brush flange by rotating it anti clockwise detail 1 2 and 3 fig 4 15B Position the new brush below the connector and rotate the flange clockwise 1 FIGURE N 4 15 B 2 3 ...

Страница 27: ... rotate the eccentric bushings turn the machine on and advance to check if the scrubber proceeds straight without jumping if this does not happen repeat the adjustment For the machine with rotating squeegee there must be no intervention by the operator The above mentioned bushings must stay in the position shown in figure 4 16 detail 1 The machine can dry both forward and backward therefore the br...

Страница 28: ...event unwanted starts battery operated version or unplug the machine from the mains power outlet electrically operated version Loosen the fixing knobs remove the squeegee from the machine and place it on a work top fig 4 15 Remove the internal and external bolts remove the steel strips and the worn out blades Insert new blades and strips tighten the bolts then adjust the squeegee with the special ...

Страница 29: ...rised water jets Check the cleanness of the suction pipes and squeegee Weekly Checks Check the condition of the squeegee rubber suction blades Check the battery water level Every 2 weeks Check the clean water tank filter Monthly Check and adjust the braking system Every 3 months Check battery cable connections Every 6 months Check the brushes of each motor Yearly Check the safety devices Check the...

Страница 30: ...C If the electrolyte temperature is 10 12 C higher than the environment temperature the batteries could overcharge regardless of the actually reached temperature 5 2 4 STANDBY OR INACTIVE BATTERIES Inactive batteries will lose their charge spontaneously self discharge If a battery inactivity period is expected carry out the following operations Charge the batteries once a month by selecting a char...

Страница 31: ...o prevent rainwater seeping into the storage containers 5 3 MOTOR MAINTENANCE 5 3 1 MAINTENANCE OF THE SUCTION MOTOR The suction motor must be checked and cleaned Every six months the motor brushes should be checked and replaced too if necessary Suction motor maintenance should be carried out as follows Remove the key from the control panel to prevent unwanted starts battery operated version or un...

Страница 32: ...tank to minimise its weight before removing it from the machine Remove the motor grid fixing screw fig 5 2 Remove the motor grid to obtain easy access to the motor brushes fig 5 2 To re assemble all the parts perform the same operations in reverse order 5 4 WIRING SYSTEM CHECKS The machine wiring system should be inspected and examined every 2 years It is very important to immediately correct any ...

Страница 33: ...cian Complete overhauling 5 years FIORENTINI technician MAINTENANCE Recovery tank cleaning Daily operator Suction motor filter Daily operator Clean water tank filter Monthly operator Suction pipe lines cleaning Weekly operator Squeegee cleaning Weekly operator State of blades inspection Weekly operator Battery fluid level inspection Weekly operator Battery cable fixing 6 months Skilled technician ...

Страница 34: ...MAINTENANCE ECOMINI Rev 000 18 09 2017 34 37 5 6 MAINTENANCE LOG DATE MAINTENANCE OPERATOR TYPE OF SERVICE NOTES SIGNATURE ...

Страница 35: ... 0774 357184 378827 PRODUCTION FACTORY 50033 PIANCALDOLI FI Fax 39 055 817144 Via Piancaldoli 1896 Tel 39 055 8173610 Most technical problems can be sorted with minor services Before contacting our Technical Assistance Dept we therefore advise to carefully read this manual If specialist service is required please clearly specify the type and circumstances of the observed defect to help us find the...

Страница 36: ...rked hours Machine work environment Fault Description Code of the faulty component Component name Fault type Short fault description Faulty Mechanical component Faulty operation Wiring system failure Motor Engine failure Missing component Excessively noisy operation Water leak Other Customer remarks Please write below your comments and suggestions regarding the products and services supplied by In...

Страница 37: ...d expédition ING O FIORENTINI S p A THE BEST IN FLOOR MACHINES BRANCH OFFICES 20132 MILAN Fax 39 02 2592779 Via Palmanova 211 a Tel 39 02 27207783 2564810 00012 Guidonia Montecelio ROME Fax 39 0774 353419 353314 Via B Pontecorvo 20 Tel 39 0774 357184 353015 PRODUCTION FACTORY 50033 PIANCALDOLI FI Fax 39 055 817144 Via Piancaldoli 1896 Tel 39 055 8173610 Distributed by ...

Отзывы: