background image

58 


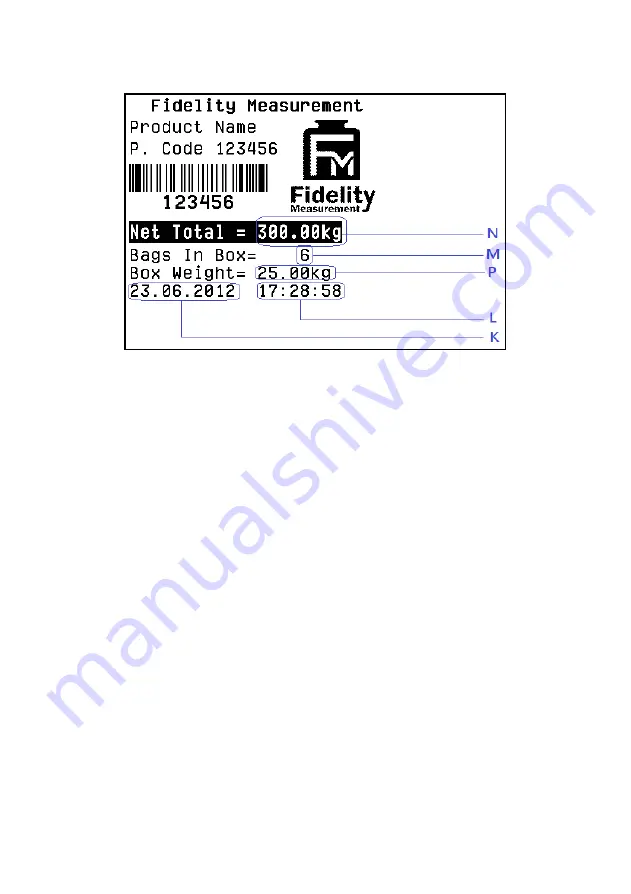
16.2.2.2 Sample label of totalized data (FL2) 


16.3 Quick Access to Label Settings 

If label printer is selected either for Comport 1 or Comport 2, follow the below 
procedures to access quick label settings during operation. 

1. 

Press 

[Set]

2. 

Instrument displays F1. 

3. 

Press 

[Check]

, instrument displays number of copy to generate each 

time.  Press 

[Func] 

or

  [Unit]

  until  the  preferred  parameter  appears 

then press 

[Print/M+] 

to save. 

4. 

Instrument displays label file number (FL1 01 ~ FL1 99) to print 
in label format group 1. Press 

[Func] 

or

 [Unit]

 until the preferred 

label file number appears then press 

[Print/M+] 

to save. 

5. 

Instrument displays label file number (FL2 01 ~ FL2 99) to print 
in label format group 2. Press 

[Func] 

or

 [Unit]

 until the preferred 

label file number appears then press 

[Print/M+] 

to save. 

6. 

At this point, label settings are completed. 


Содержание 19e

Страница 1: ... Multi Function Indicator Operation Manual Full Version PLEASE READ THIS MANUAL VERY CAREFULLY BEFORE OPERATING THIS INSTRUMENT Specifications subject to change without prior notice V107 Rev 001 April 2016 ...

Страница 2: ...2 ...

Страница 3: ...1 Power Adaptor 14 4 2 Built In Rechargeable Battery 14 4 3 Connect with Weighing Platform or Load Cell Junction Box 14 4 3 1 Load cell connector pin assignment 15 4 4 Comports on Instrument 15 4 5 Comports Pin Assignment 15 5 Initial Setup 16 5 1 Internal Functions Settings 16 5 2 How to Enter Select Internal Function 16 5 3 Key Function under Internal Function Mode 17 5 4 Internal Function Table...

Страница 4: ... to Zero when Unloaded 30 6 3 Keyboard Lock 30 6 4 Tare Modes 30 6 4 1 Manual Tare 30 6 4 2 Auto Tare F12 31 6 4 3 Repetitive Tare F13 31 6 4 4 Preset Tare F63 31 6 5 Select the Preferred Function Mode 32 6 6 Weight Units 33 6 6 1 Weight unit gram g 33 6 6 2 Select the preferred weight unit 33 6 7 Memory Accumulation 33 6 7 1 Automatic Accumulation 33 6 7 2 Manual Accumulation 34 6 7 3 When data i...

Страница 5: ...Enhancement Function 40 8 2 Shift among Quantity Average Piece Weight and Weight Info 40 9 Action Tare Memory ATM 41 9 1 Description of ATM Mode 41 9 2 Basic ATM Settings 41 9 3 Start using ATM 41 9 3 1 Weight Check Control for ATM 42 10 Peak Hold Mode 43 10 1 Description of Peak Hold Mode 43 10 2 Comport Settings for Peak Hold Mode 43 10 3 Start Using Peak Hold 44 11 Animal Weighing Mode 44 11 1 ...

Страница 6: ...Print Output Formats 49 14 2 Auto 1 3 Output Formats 49 14 3 PC Output Protocol 49 14 4 Sending Keyboard Commands from Computer 49 14 5 Requesting Operation Results by Computer 49 15 Printing Formats 50 15 1 Lab 1 Print Format 50 15 2 Lab 2 Print Format 51 15 2 1 Weighing ATM mode 51 15 2 2 Piece count mode 51 15 2 3 Peak hold mode 52 15 2 4 Animal weighing mode 52 15 3 Lab 3 Print Format 52 16 La...

Страница 7: ...loading Appendix A to E 61 21 Appendix A Keyboard Commands 62 22 Appendix B PC Output Protocols 63 23 Appendix C Operation Result Commands 66 24 Appendix D TSC Printer Installation Setup Procedures 68 D 1 Before Installation 68 D 1 1 Printer Installation 68 D 1 2 Uploading TCF File to Printer 69 25 Appendix E Create Upload Label to TSC Printer 70 E 1 Selecting the Correct Edition for Bartender Sof...

Страница 8: ...onds before calibration and usage The higher the setup resolution of the scale the longer the warm up period is required In most cases 120 seconds is a safe warm up period for all applications This warm up period is needed to energy all components to reach a stable status b The internal count value is deemed stable when the internal AD count varies less than 3 counts within 2 seconds c To read the...

Страница 9: ...l Interval Load Cell Connection Excitation Voltage 5V DC Support both 4 wire 6 wire Load Cells Maximum Load Cell Connection 12 x 350Ω Load Cells or 24 x 700Ω Load Cells A D Converter Internal Resolution 24 bit Low Noise Delta to Sigma Δ Σ 4 000 000 Counts at 20 mV Minimum input per d 0 05µV Max Tare Range Max or Max1 Subtractive Tare Power Source Built in Rechargeable Battery 6V 4AH External Power...

Страница 10: ... instrument on or off 2 Unit Key1 Press this key to shift among various weight units if weight unit conversation is enable 3 Set Key Press this key When in weighing mode to access internal function setting mode F1 F31 or to prompt introduce an operation 1 Refer to F9 on how to enable disable weight units ...

Страница 11: ...ss this key to tare off the weight of a container 8 Function Key Press this key to shift between weighing piece count auto tare accumulation peak hold and animal weighing4 mode 9 Check Function Key When in operation mode Press this key to start check function and to enter value for LO and HI Limit When in Setting Mode Quick access to label settings 10 CE x10 Key Press this key to clear value enter...

Страница 12: ...t unstable Lit on Weight stable 16 Weight g Stable Indicator Visible when weight unit is g Flashing Weight unstable Lit on Weight stable 17 Weight lb Stable Indicator Visible when weight unit is lb Flashing Weight unstable Lit on Weight stable 18 Count Function Indicator Visible when instrument is in Piece Count mode PCS Indicator only Value being displayed is number of pieces PCS Indicator any We...

Страница 13: ...pply power adaptor to recharge battery immediately otherwise instrument will power off automatically shortly 21 Light Bar6 LO Section Visible when check result is LO 22 Light Bar OK Section Visible when check result is OK 23 Light Bar HI Section Visible when check result is HI 3 2 Connection Points 6 Light Bar is only visible when Check Function is employed ...

Страница 14: ...ith this instrument to avoid un recoverable damages to this instrument 4 2 Built In Rechargeable Battery Before first time use recharge the built in batter for at least 8 hours to ensure the best battery performance 4 3 Connect9 with Weighing Platform or Load Cell Junction Box Connect this instrument with a weighing platform load cell through load cell connector located at the back according to th...

Страница 15: ... There are 2 built in comports on this instrument Comport 1 can be used for serial or TTL communication depends on the jumper setting of the Serial TTL selection jumper Default setting serial Contract your dealer in case TTL output is required for Comport 1 Comport 2 supports only serial communication Both comports support bi directional communication when set as PC and CMD modes Refer to 5 5 for ...

Страница 16: ...oid operation errors Below paragraphs describe those settings related to F1 F31 5 1 Internal Functions Settings Application parameters can be checked and set through internal function Set all preferred operation parameters according to 5 4 5 2 How to Enter Select Internal Function10 Follow the below procedures for internal function setup 1 In weighing function press Set 2 Instrument displays F1 an...

Страница 17: ...nnel only Press 0 to go to F1 5 3 Key Function under Internal Function Mode Key Function in Setup Calibration On Off Quit without saving and power off Unit Go to previous page Set To enter internal function number F1 F31 during weighing mode Print M Enter save and return Zero Quit without saving Tare Set F1 value being shown to zero and to display the net span gain of additional load applied Func ...

Страница 18: ... ADC value being displayed When ADC is more than 3 million Light Bar 3 will appear Actual ADC is 3 million plus the ADC value being displayed Press Zero to quit to F1 F2 All Segment Check All display segments and capacity bars will be lit on Check any segments or LED of bars are missing F3 Capacity Division Default Weight Unit Display basic metrology characteristics capacity division and weight un...

Страница 19: ...f lb On Off F10 Filter Strength 1 2 3 4 5 6 7 8 9 Select 1 strongest filter for bad working environment where vibration wind flow etc affect stable reading 5 for normal environment 9 least filter for very good working environment where wind and vibration have no effect to stable reading F11 Auxiliary Function Cnt Counting On Off AtM Action Tare Memory On Off PEK Peak On Off Ani Animal On Off PCd Q...

Страница 20: ... Buzzer disabled IN Check Buzzer activates when reading is within range ouT Check Buzzer activates when reading is out of range Hi Check Buzzer activates when reading more than Hi limit Lo Check Buzzer activates when reading lower than Lo limit Light Bar Format Li Bar 0 Light Bar off Li Bar 1 Check Result Mode Progress Mode Li Bar 2 Check Result Mode Single Bar Mode Li Bar 3 Capacity Result Mode S...

Страница 21: ...t returns to zero or minus Manual Manual output to printer or computer PC Continuous output CMD Command information request mode Scaner Serial scanner Notes Refer to operation manual for detailed setup information Restart instrument by power off then power on again after F16 and or F17 setting is changed under normal operation status F18 Machine ID and Group Number Machine ID Group Id Machine ID n...

Страница 22: ...t Print Format STD CUSTOM F22 Lab 2 Counting Function Output Print Format STD CUSTOM F23 Reserved F24 Lab 2 Animal Functions Output Print Format STD CUSTOM F25 Reserved F26 Near Zero Weight Value 000000 Near Zero value is useful for dynamic weight check applications to bypass unnecessary LO alarm during uploading and unloading process Notes Value entered valid only when Check function is activated...

Страница 23: ... of calibration F30 Optical Key Assignment Off Key disable Zero Tare Print M F31 Auto Power Saving Off On Off Auto Power Saving disable On Display brightness will switch to minimum when weight remains unchanged for 30 seconds Note Auto Power Saving will be disabled when an energized power adaptor is plugged in 5 5 Setting Comport 1 Comport 2 2 comports are on this instrument Following the below pr...

Страница 24: ...o 5 5 2 for setting details If Manual is selected refer to 5 5 3 for setting details If Auto 1 3 is selected refer to 5 5 4 for setting details If Scanner is selected refer to 5 5 5 for setting details 5 5 1 When comport is set as PC 1 Instrument displays baud rate 8 parameters 1200 115200 are available Press Func or Unit until the preferred parameter appears then press Print M to save 2 Instrumen...

Страница 25: ...ress Print M to save 4 At this point CMD setup is completed 5 5 3 When comport is set as Manual 1 Instrument displays baud rate 8 parameters 1200 115200 are available Press Func or Unit until the preferred parameter appears then press Print M to save 2 Instrument displays Parity 3 parameters None odd even are available Press Func or Unit until the preferred parameter appears then press Print M to ...

Страница 26: ...nction disregarding the stable condition of the weight when Print M is pressed 7 Instrument displays minimum output weight 21 parameters 0d 20d are available Instrument will not generate any output if the actual weight is less than the minimum output weight selected here Press Func or Unit until the preferred parameter appears then press Print M to save 8 Instrument displays print format 5 paramet...

Страница 27: ...s Print M to save b Instrument displays label file number FL1 01 FL1 99 to print in label format group 1 Press Func or Unit until the preferred label file number appears then press Print M to save c Instrument displays label file number FL2 01 FL2 99 to print in label format group 2 Press Func or Unit until the preferred label file number appears then press Print M to save d At this point LP 50 TS...

Страница 28: ...ight 21 parameters 0d 20d are available By default only stable value which is 20d under all auto print modes Press Print M to save 8 Instrument displays print format 4 parameters Lab 1 Lab 2 LP 50 and TSC Instrument will not generate any output if the actual weight is less than the parameter weight selected Press Func or Unit until the preferred parameter appears then press Print M to save Lab 1 O...

Страница 29: ...etting this optical key can be disabled or assigned to simulate as one of the Zero Tare or Print M To disable optical key select Off in F30 6 Basic Operations 6 1 Power On and Power Off To power on press and hold On Off for 0 5 second To power off press and hold On Off After powered on instrument will display 1 Software number 2 Software revision 3 All display segments 4 Calibration count value 5 ...

Страница 30: ...on 5 4 for keyboard lock settings 6 4 Tare Modes Tare function is used to cancel the weight of a box or a container in order to get the net weight result Various tare modes are available Refer to below paragraphs for details 6 4 1 Manual Tare12 1 Remove all loads from platform 2 Make sure that the Zero Indicator is on If not press Zero 3 Place container on platform 4 Press Tare 5 Weight displayed ...

Страница 31: ...ed when container is removed and gross weight is zero When F13 is set to ON this instrument will permit multiple tare operation provided that both of the below requirements are met a The tare operation does not permit a reduction of the value of the tare and b The tare effect can only be cancelled when there is no load on the platform 6 4 4 Preset Tare F63 1516 Preset tare allows a pre determined ...

Страница 32: ... of the instrument This does not affect the accuracy of the subsequent weighing and operation Manual tare is possible when Repetitive Tare F13 is set to On 6 5 Select the Preferred Function Mode17 This instrument supports the below function modes Abbreviation of each function mode is bracketed Weighing Weigh Piece Count Count Action Tare Memory AtM Peak Hold Function Peak Animal Weighing Ani Press...

Страница 33: ...ation20 There are 2 types of memory accumulation a Automatic accumulation mode and b Manual Accumulation mode Maximum accumulation limit is 7 digit e g 99999 9 including decimal point Err 28 appears when maximum accumulation limit is exceeded 6 7 1 Automatic Accumulation21 Automatically accumulation is activated when Auto Accumulation is set to On in Auto 1 Auto 2 Auto 3 or Manual mode is selected...

Страница 34: ...anging weight unit or to another working mode will automatically erase accumulation data stored Follow below procedures to recall and clear accumulation data 1 Press MR to recall total accumulated weight 2 Instrument flashes between A____Y Y means the number of transactions accumulated and total accumulated result 3 At this point Press Zero to quit or Press CE x10 to clear memory After CE x10 is p...

Страница 35: ...nt supports product code entry Maximum code length 18 digits 6 9 1 Enter a product code manually27 a Go to F19 b Instrument display H code followed by 6 digits Enter the first 6 digits of the product code here then press Print M to confirm c Instrument display M code followed by 6 digits Enter the7th 12th digits of the product code here then press Print M to confirm d Instrument display L code fol...

Страница 36: ...low steps to save LO and HI Limit for weight value 1 Select desired operation mode and weight unit then press CHECK 2 Instrument displays Low followed by a 6 digital value Enter the LO weight limit through numeric keys then press PRINT M 3 Instrument displays HIGH followed by a 6 digital value Enter the HI weight limit through numeric keys then press and hold CHECK for 2 seconds 4 Instrument displ...

Страница 37: ...w steps to save LO and HI limits for quantity 1 Go to piece count mode under desired weight unit then press CHECK 2 Instrument displays Low followed by a 6 digital value Enter the LO quantity limit through numeric keys then press PRINT M 3 Instrument displays HIGH followed by a 6 digital value Enter the HI quantity limit through numeric keys then press and hold CHECK for 2 seconds 4 Instrument dis...

Страница 38: ...n press and hold TARE for 2 seconds 3 Instrument displays Save At this point Press the preferred PLU position numeric key 0 9 then press PRINT M to save to that PLU position or Press PRINT M to utilize this preset tare immediately but without saving to PLU or Press ZERO to quit 6 10 3 2 Recall preset tare value from PLU Follow the below steps to recall preset tare value 1 Select desired operation ...

Страница 39: ...ct the desired weight unit 2 If zero weight cannot be obtained when unloaded press Zero After Zero is pressed the Zero Indicator will appear30 3 Always place an object onto platform gently Excessive force shock applied to platform may cause un recoverable damage to the weight sensor inside platform 4 The weight of the object is displayed automatically 5 It is a good practice to remove all loads fr...

Страница 40: ...ent Function is built in the Piece Count mode This function starts automatically when all of the below are met a Unit piece weight is determined by actual sampling method b The quantity added to platter is more than 5 pieces but less than current quantity on scale c The total quantity on scale is less than 10000 pieces When all the above requirements are met a new unit piece weight will be calcula...

Страница 41: ...me is the time interval 00 99 second Between a valid stable weight result is obtained and before it is tare off and accumulated to memory Display time of total accumulated weight result after all loadings are removed and before it is clear from print out memory 5 Enter delay time through numeric keys then press Print M to enter 6 At this point ATM mode is ready for use 9 3 Start using ATM31 1 Appl...

Страница 42: ... for ATM When weight Check Control is in effect only weights within LO and HI limit will be tare off and accumulated 9 3 1 1 Comport settings of weight Check Control for ATM when an external peripheral is connected to instrument a Set F26 near zero value according to application requirement or 00000 to disable near zero value control Refer to 13 1 for more information about F26 near zero function ...

Страница 43: ...nstrument can support is 115200 Baud rate of the peripheral has to be set accordingly b Parity setting Set according to the external peripheral connected Select any if there is no external peripheral is connected c Data length setting Set according to the external peripheral connected Select any if there is no external peripheral is connected d Auto Accumulation setting Select any Instrument will ...

Страница 44: ... 11 1 Description of Animal Weighing Mode Animal weighing mode is used to weigh live animals 11 2 Basic Animal Weighing Settings 1 Refer to 6 6 on how to select the desired weight unit 2 Enter Animal Weighing mode 3 Press Set to select the preferred filter speed by pressing Func or Unit key 5 filter speed are available from FLt 1 FLt 5 FLt 1 Fast Weight value is based on least number sampling data...

Страница 45: ...ed weight will be calculated and displayed35 as above step 2 4 To update the weight reading manually press CE x10 12 Static Check Function36 37 38 39 40 This function is used to compare current weight result with the preset LO and HI Limit The comparison results LO OK HI will then be displayed on the Light Bars with or without buzzer41 Targets of Check mode are Weighing mode weight value 35 Provid...

Страница 46: ...enabled The check result is shown by one of the Light Bar42 12 2 Hints for Entering LO and HI Limits a For normal comparison set both LO and HI Limit b To check only if result is lower than or equal to LO result LO set HI Limit 0 c To check only if result is higher than or equal to HI result HI set LO Limit 0 d To check if result is equal to a specified value set both HI Limit and LO Limit the spe...

Страница 47: ...e check result Number of dots depends on the actual result 12 4 2 Light Bar action when result is negative 2 options are available Off Light bar will be disable when result is negative On Light bar will treat all results as positive and react upon 13 Dynamic Check Mode44 Check function mode also supports dynamic applications which within the below specifications listed a Maximum belt speed 30 mete...

Страница 48: ...LO signal output when load is approaching and leaving the weighing platform HI OK LO comparison will only start when weight reading exceeds the preset near zero value Refer to below diagram for more illustration 13 2 Near Zero Value Illustration Diagram After Hi Lo limits and near zero value have been entered this instrument is ready for dynamic checking ...

Страница 49: ... Appendix B for protocol details 14 4 Sending Keyboard Commands from Computer When Comport 2 is assigned as CMD keyboard commands can be sent by an external device to this instrument Refer to Appendix A for details 14 5 Requesting Operation Results by Computer To obtain operation results and system parameters by computer set F17 to CMD Refer to Appendix C for details to obtain operation results 45...

Страница 50: ...ber is set 00 See below table for print format and explanations Date Date of Printing Time Time of Printing No No of transaction and data type Data Type W Individual Weighing ATM Animal C Counting M memory recall data Net Net result Quantity of pieces for price count mode Weight for all other function Tare Tare Weight Gross Gross Weight 46 Lab 1 format does not support Produce Code ...

Страница 51: ... this transaction is accumulated to memory Product Code if product code is entered Net weight Tare Weight Gross Weight Total accumulated net weight if accumulation function is in effect HI limit If check function is activated LO limit If check function is activated Comparison results If check function is activated 15 2 2 Piece count mode The followings are transmitted under piece count mode Time o...

Страница 52: ... 15 2 4 Animal weighing mode The followings are transmitted under these 2 modes Time of printing Date of printing Transaction sequent number if this transaction is accumulated to memory Product Code if product code is entered Hold weight Total accumulated net weight if accumulation function is in effect 15 3 Lab 3 Print Format48 Current working mode and all related data are sent under this mode Re...

Страница 53: ...weight d13 HI limit Total accumulated piece HI limit Data type d14 LO limit Number of piece without pcs LO limit CR LF d15 Comparison Result Average piece weight without weight unit Comparison Result d16 Data type Weight unit of average piece weight Data type d17 CR LF HI limit CR LF d18 LO limit d19 Comparison Result d20 Data type d21 CR LF Notes a Data Type W Individual Weighing ATM Animal C Cou...

Страница 54: ...allation and setup procedures Refer to Appendix E for detail on how to create and upload label to TSC printer by Bartender Label software Cautions 1 Do not combine data of different working modes on the same label 2 Do not print any labels of non current working mode This will retrieve wrong data of non current working mode 3 Print only label data when the same working mode is in operation 4 Do no...

Страница 55: ...print label file AA99 stored in printer 16 1 2 FL2 Label Format Group 2 100 printout selections 00 99 are available in format group 2 In order to trigger the preferred label to be printed label files stored in printer for this format group 1 must have a file name of BB00 BB02 BB03 BB99 FL2 00 Select this to print label file BB00 stored in printer FL2 01 Select this to print label file BB01 stored ...

Страница 56: ...ime All 8 M No of accumulated transaction Weighing ATM 7 N Total accumulated weight Weighing ATM 9 n Total accumulated weight without unit or decimal Weighing ATM 6 O Net weight All 10 o Net weight without unit or decimal All 6 P Tare weight All 10 p Tare weight without unit or decimal All 6 Q Gross weight All 10 q Gross weight without unit or decimal All 6 49 Prompt commands are case sensitive 50...

Страница 57: ...16 2 2 1 Sample label of current transaction FL1 51 Each working mode has its own HI Limit format weight for weighing auto tare accumulation mode pieces for piece count mode If HI Limit has to be printed set HI Limit value under the preferred working mode 52 Each working mode has its own LO Limit format weight for weighing mode auto tare accumulation pieces for piece count mode If HI Limit has to ...

Страница 58: ... to generate each time Press Func or Unit until the preferred parameter appears then press Print M to save 4 Instrument displays label file number FL1 01 FL1 99 to print in label format group 1 Press Func or Unit until the preferred label file number appears then press Print M to save 5 Instrument displays label file number FL2 01 FL2 99 to print in label format group 2 Press Func or Unit until th...

Страница 59: ...or appears battery level is low Apply power adaptor to recharge battery immediately otherwise instrument will power off automatically shortly Flashing Battery level is low less than 20 Apply power adaptor to recharge battery as soon as possible Lit on Battery level is at extreme low less than 15 To protect the built in rechargeable battery this instrument will be powered off automatically when bat...

Страница 60: ...ArE H Err 11 F25 Mode 3 Container weight is lower than tArE L Err 12 F25 Mode 3 and Mode 4 Actual weight is higher than SP3 Err 13 Exceed maximum power on 5 minutes for OIML and NTEP mode Err 19 Capacity or division setting error Division set is higher than 10000d Err 22 Manual Zero and Tare stability error Err 23 Capacity setting error Capacity 1 Capacity 2 Err 24 Division setting error e1 e2 Err...

Страница 61: ...any harsh abrasive material acetone volatile solvent thinner or alcohol for cleaning 3 Verify the accuracy of this instrument periodically Re calibrate if necessary In some countries calibration requires authorized qualified agent Contact your dealer for more information 4 Store this instrument in a dry and clean place 5 Recharge battery before and every 4 months during long time storage 20 Downlo...

Страница 62: ...o simulate keyboard entries To enable keyboard commands connect the external peripheral which generates keyboard commands to Comport 2 and set Comport 2 to CMD Keyboard Command format as below a Hex code 0D CR then b Hex code 0A LF then c Letter shown on below illustration diagram then d Space Hex code 20 54 Keyboard commands are case sensitive ...

Страница 63: ...63 22 Appendix B PC Output Protocols ...

Страница 64: ...64 ...

Страница 65: ...65 ...

Страница 66: ...f c Command code listed on below command table then d Space Hex code 20 Refer to below table for commands details Operation Result Commands Table Prompt Command56 Description a Peak Value b Product Code c Total accumulated pieces d Machine ID e Machine Group Number J Current status weight and tare weight values K Date L Time M No of accumulated transaction N Total accumulated weight 55 Connect the...

Страница 67: ... unit or decimal P Tare weight p Tare weight without unit or decimal Q Gross weight q Gross weight without unit or decimal R HI limit S LO limit T Comparison Result U Number of piece V Average piece weight Y Weight hold y Weight hold without unit or decimal Z Read internal count AD value ...

Страница 68: ...iagTool_V163 zip 4 TCF file for printer The suitable TCF file can be downloaded at For TDP247 and TDP345 http www fi measurement com upload file TDP345_Replace_Goto zip For TTP247and TTP345 http www fi measurement com upload file TTP345_Replace_Goto zip D 1 1 Printer Installation 1 Turn off the printer connect the appropriate cable and then turn on the printer 2 If the printer supports Plug and Pl...

Страница 69: ...ust be uploaded to printer 1 Connect printer with computer 2 Power on printer 3 Download the correct TCF file point 4 of D 1 4 Unzip the download file and save in to computer 5 Run Diagnostic tool for printer 6 Click on Command Tool 7 Click on Send file 8 Double click on the TCF file and it will be uploaded to printer automatically ...

Страница 70: ...n or Automation then click OK 4 At this point correct Bartender edition is selected E 2 Adding Information from Instrument to Label Uploading to a TSC Printer The below procedures is based on Bartender Label Software If a different label creating software is used contact your label software for more details if in doubt 1 Create the foundation of a label by Bartender All information to be obtained ...

Страница 71: ...tion from instrument for example net gross tare weight and product code to be sent to printer and printed on label 11 Double click on the preferred data source to which variant s has have to add a check the box below External Keyboard then b enter the appropriate command on the Prompt Box refer to 16 2 1 for command detail 12 Select Auto on the Source box under Template Field 13 Repeat point 11 to...

Страница 72: ...72 E 3 Sample Label Sample label for TSC printer on right is available for download at http www fi measurement com upload file A A02 btw ...

Страница 73: ...73 Fidelity Measurement Co Ltd http www fi measurement com e mail info fi measurement com ...

Отзывы: