Ferm FKB-13/650K Скачать руководство пользователя страница 15

Ferm

15

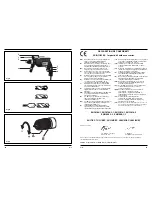
PERCEUSE À PERCUSSION

Les chiffres du texte suivant correspondent

aux illustrations page 2 - 3.

Lisez attentivement ce mode d’emploi

avant d’utiliser la machine. Assurez-

vous d’avoir bien pris connaissance du

fonctionnement de la machine et de

son utilisation. Entretenez la machine

conformément aux instructions afin

qu’elle fonctionne toujours

correctement. Conservez ce mode

d’emploi et la documentation jointe à

proximité de la machine.

Table des matieres

1.  Spécifications de la machine

2.  Consignes de sécurité

3. Montage

4. Utilisation

5.  Service & maintenance  

1. SPÉCIFICATIONS DE LA

MACHINE

Spécifications techniques
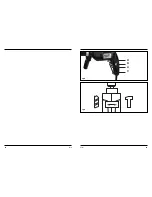
Description

Fig.A

1. Poignée et la règle

2. Le mandrin

3. Interrupteur pour le perçage à percussion

4. Poignée par-dessus

5. l’interrupteur la rotation à gauche

6. Bouton marche/arrêt avec réglage de la

vitesse

7. Bouton de blockage marche/arrêt

Contenu de l’emballage

L’emballage contient : 

1 Perceuse à percussion

75 Accessoires

1 Mode d’emploi

1  Certificat de garantie

Vérifiez si la machine, les pièces détachées et

les accessoires n’ont pas été endommagés au

transport. 

2. CONSIGNES DE SÉCURITÉ

Dans ce mode d’emploi, il est fait usage des

pictogrammes suivants : 

Danger de blessure physique ou de

dommage matériel.

Danger: tension électrique

Contrôle de vitesse variable

Portez des gants de protection

Portez un masque anti-poussière. Le

travail du bois, des métaux et d'autres

matériaux peut produire de la poussière

qui peut s'avérer dangereuse pour la

santé.  Ne travaillez pas avec du

matériel contenant de l'amiante!

Protégez-vous les yeux et les oreilles

Avant l’utilisation de machine

• Contrôlez les points suivants :

• Est-ce que la tension de raccordement du

moteur correspond à la tension duréseau?

• Est-ce que le fil et la fiche-secteur sont en

bon état?

• Evitez l’utilisation de rallonges longues. 

Utilisez des rallonges dont le diamètre du

conducteur est au moins de 1.5 mm

2

et

déroulez entièrement la rallonge avant de

l’utiliser.

Tension

230 V~ 

Fréquence

50 Hz 

Puissance consommée

650 W 

Vitesse à vide

0-2500/min

Vitesse à percussion

0-40000/min

Diamètre de forets max. 

(Bois)

25 mm 

Diamètre de forets max. 

(Béton)

13 mm 

Diamètre de forets max. 

(Métaux)

10 mm 

Poids

2.3 kg 

Lpa (pression sonore)

92.9 dB(A) 

Lwa (puissance sonore)

105.9 dB(A) 

Valeur vibratoire

7.3 m/s

2

F

58

Ferm

Próbnik napięcia

Zastosowanie

•  Odpowiedni dla prądu zmiennego o napięciu

do 250 V.

•  Należy sprawdzić działanie próbnika napięcia

przed samym użyciem.

•  Pod warunkiem właściwej eksploatacji

zaświeci się umieszczona w uchwycie

lampka, gdy napięcie osiągnie wartość 100 -

250 V i będzie obecne uziemienie.

•  Gwarantuje się sprawne funkcjonowanie

próbnika napięcia w temperaturze od -10 °C

do +50 °C oraz dla częstotliwości w

przedziale od 50 do 500 Hz. 

Bezpieczeństwo

•  Wartości napięcia wskazywanego przez

próbnik są wartościami nominalnymi.

•  Próbnik napięcia może być używany do pomiaru

napięcia wyłącznie we wskazanym zakresie.

•  Widzialność światła lampki może być

ograniczona przez czynniki zewnętrzne (na

przykład działanie promieni słonecznych) lub

ze względu na utrudnioną widoczność (na

przykład stojąc na drabinie).

•  Nie udziela się gwarancji rzetelności wskazań

próbnika w przypadku podłóg izolowanych i

instalacji prądu zmiennego bez uziemienia.

•  W razie wystąpienia niekorzystnych warunków

(deszcz, rosa itp.) oraz w miejscach wilgotnych

próbnik napięcia NIE może być używany.

•  W przypadku INSTALACJI POD NAPIĘCIEM

próbnik, służący także jako śrubokręt, NIE

może być używany do żadnych innych celów

niż pomiar napięcia. 

•  NIE używać niesprawnego lub uszkodzonego

próbnika!

4. FUNKCJONOWANIE

Włącznik/ Wyłącznik

Rys. D

•  Urządzenie włączamy poprzez wciśnięcie

przełącznika spustowego (A). Po zwolnieniu

przełącznika spustowego (A) urządzenie

wyłączy się.

Blokada spustu

•  Włącznik / wyłącznik można zablokować

poprzez wciśnięcie przełącznika spustowego

(A) oraz wciśnięcie guzika (B). Zwolnienie

blokady spustu następuje poprzez krótkie

naciśnięcie przełącznika spustowego (A).

Regulacja prędkości obrotów

•  Prędkość obrotów może być regulowana

płynnie pomiędzy 0 a 2500 obrotów na minutę

w pozycji 1 oraz 0 a 40000 obrotów w pozycji

2 (E), poprzez mocniejsze lub lżejsze

wciśnięcie przełącznika spustowego (A).

Regulacja maksymalnej prędkości obrotów

•  Włączyć urządzenie, wciskając przełącznik

spustowy (A).

•  Zablokować przełącznik spustowy (A)

przyciskając guzik (B).

•  Dopasować prędkość przy użyciu małego

pokrętła (C) aż do otrzymania pożądanej

maksymalnej prędkości obrotów.

Przełączanie kierunku obrotów

•  Kierunek obrotów przeciwny do ruchu

wskazówek zegara: przesunąć przełącznik (D)

do pozycji “L”.

•  Kierunek obrotów zgodny z ruchem

wskazówek zegara: przesunąć przełącznik (D)

do pozycji “R”.

Przełączanie w tryb udarowy

Rys. E

Przełącznikiem znajdującym się na górze

urządzenia można przełączać urządzenie tak,

aby funkcjonowało w trybie wiercenia normalnym

lub udarowym.

•  Przesunięcie przełącznika na symbol “Wiertło”

powoduje aktywację trybu normalnego

wiercenia.

•  Przesunięcie przełącznika na symbol „Młotka”

powoduje aktywację trybu wiercenia

udarowego.

5. SERWIS I UTRZVMANIE 

URZŇDZENIA

Przed rozpoczęciem prac

konserwacyjnych silnika należy

upewnić się, że urządzenie nie znajduje

się pod prądem.

Urządzenia zostały zaprojektowane do działania

przez dłuższy okres czasu przy minimalnym

nakładzie pracy związanym z konserwacją.

Zadowalające działanie zależy od odpowiedniego

dbania o urządzenie oraz regularnego

czyszczenia.

PL

Содержание FKB-13/650K

Страница 1: ...uk CZ Zm ny vyhrazeny SLO Predmet sprememb PL Temat do zmiany LT Akeitim objektas LV Var tikt veiktas izmai as EST V imalikud on muudatused RO Cuprinsul poate suferi modific ri RUS Ferm UA GR H Art no...

Страница 2: ...i erkl rer herved udelukkende p eget ansvar at dette produkt opfylder f lgende standarder eller standardiserede dokumenter H Saj t kiz r lagos felel ss g nk tudat ban kijelentj k hogy jelen term k meg...

Страница 3: ...70 Ferm GB Ferm 03 A D B C Fig D Fig E...

Страница 4: ...uctions in this manual Indicates electrical shock hazard Variable speed control Wear protective gloves Wear a dust mask Working with wood metals and other materials may produce dust that is harmful to...

Страница 5: ...HSS Mounting accesories Fig C Prior to mounting an accessory always unplug the tool Placing and removing bits In addition to bits the machine can also hold screw bits with a hexagonal shaft Loosen th...

Страница 6: ...function as it should 1 Excessive sparkling This usely indicates dirt in the motor or worndown carbon brushes Please contact the service address on the warranty card 2 The percussion drill is overhea...

Страница 7: ...amme Bezeichnet Verletzungsgefahr Lebensgefahr oder Gefahr einer Besch digung des Werkzeugs bei Nichtbeachtung der in dieser Anleitung enthaltenen Vorschriften Weist auf Stromschlaggefahr hin Verstell...

Страница 8: ...Die Ader m ssen einen Mindestquerschnitt von 1 5 mm2 haben Befindet das Kabel sich auf einem Haspel mu es v llig abgerollt werden 3 WARTUNGS UND VERSCHLEI TEILE Ben tzen Sie nur sch rfe Bohre vom rich...

Страница 9: ...drehungen pro minute in Position 2 E Durch das tief oder nur ein bischen tief ein drucken der Ein Aus Schalter A kann der Umdreh ungsgeschwindigkeit eingestellt werden Einstellen der maximale Umdrehun...

Страница 10: ...gefeuchtet mit Seifenwasser Verwenden Sie keine L sungsmittel wie Benzin Alkohol Ammonia usw Derartige Stoffe besch digen die Kunststoffteile Schmieren Die Maschine braucht keine zus tzliche Schmierun...

Страница 11: ...t Gevaar voor lichamelijk letsel of materi le schade wanneer de instructies in deze handleiding niet worden opgevolgd Gevaar voor elektrische schok Variabele toerentalregeling Draag beschermende hands...

Страница 12: ...gsnoer dat geschikt is voor het vermogen van de machine De aders moeten een doorsnede hebben van minimaal 1 5 mm2 Wanneer het verlengsnoer op een haspel zit rol het snoer dan helemaal af 3 MONTAGE ACC...

Страница 13: ...oor gewoon boren Druk de schakelaar naar het hamer symbool voor klopboren 5 SERVICE ONDERHOUD Zorg dat de machine niet onder spanning staat wanneer onderhoudswerkzaamheden aan het mechaniek worden uit...

Страница 14: ...cie cz ci nale y skontaktowa si z punktem serwisowym adresy punkt w serwisowych znajduj si na karcie gwarancyjnej Na ko cu niniejszej instrukcji zamieszczony zosta schemat cz ci zamiennych kt re mog b...

Страница 15: ...250 V i b dzie obecne uziemienie Gwarantuje si sprawne funkcjonowanie pr bnika napi cia w temperaturze od 10 C do 50 C oraz dla cz stotliwo ci w przedziale od 50 do 500 Hz Bezpiecze stwo Warto ci napi...

Страница 16: ...urs maximal des accessoires avec le nombre de tours de la perceuse D branchez d abord la fiche secteur avant d introduire ou de remplacer un foret ou un autre accessoire Pendant la mise en service de...

Страница 17: ...En nettoyant r guli rement et correctement la machine vous contribuerez une longue dur e de vie de votre machine Pannes Si la perceuse ne fonctionne pas comme il se doit nous vous donnons ci apr s un...

Страница 18: ...ce indiqu sur la carte de garantie Nettoyage Nettoyez r guli rement le carter au moyen d un chiffon doux de pr f rence l issue de chaque utilisation Veillez ce que les fentes d a ration soient indemne...

Страница 19: ...le za preizku anje napetosti in NE v druge namene Po kodovanih ali okvarjenih merilnikov napetosti NI DOVOLJENO uporabljati 4 DELOVANJE Stikalo On Off Slika D S pritiskom na stikalo pro ilec A orodje...

Страница 20: ...mm2 y s lo cuando el prolongador est completamente desenrollado En caso de bloqueo en la posici n de taladro desconecte la m quina enseguida Antes de trabajar compare siempre el n mero de revoluciones...

Страница 21: ...Utilice la m quina para el trabajo para el que est dise ado Cambie la broca para un ejemplar afilado Afile la broca con una afiladora y un accesorio para afilar brocas La m quina funciona cuando est...

Страница 22: ...i se presenta una aver a por ejemplo por el desgaste de una pieza p ngase en contacto con el proveedor de servicios indicado en la tarjeta de garant a En el dorso de este manual encontrar un amplio re...

Страница 23: ...te pomoc vyp na e A Po uvoln n vyp na e A se stroj vypne Pojistka vyp na e Vyp na m ete zablokovat pomoc kohoutku A a stisknut m knofl ku B Pojistku vyp na e uvoln te spus te stisknut m kohoutku A Re...

Страница 24: ...lize extens es el ctricas de cabos com uma bitola m nima de 1 5 mm2 e apenas quando o cabo de alimenta o j estiver completamente desenrolado Na eventualidade de ocorrer uma obstru o desligue imediatam...

Страница 25: ...ibilidade de seleccionar a perfura o normal ou o trabalho com percuss o Desloque o comutador para o s mbolo Broca para executar uma perfura o normal Desloque o comutador para o s mbolo Martelo para ex...

Страница 26: ...de ventila o est o cobertas de sujidade Contacte o endere o de assist ncia indicado no cart o de garantia O berbequim de percuss o est em sobrecarga Utilize a m quina apenas em trabalhos para os quais...

Страница 27: ...t negat van befoly solhatj k a k rnyez f nyviszonyok p ld ul a k zvetlen napf ny vagy a kedvez tlen megtekint si k r lm nyek p ld ul l tr n llva A jelz s nem garant lt szigetelt padl k s f ldeletlen v...

Страница 28: ...blocco spegnere immediatamente la macchina Confrontare sempre la velocit massima di rotazione degli accessori con la velocit massima del trapano a percussione Scollegare la spina dalla presa prima di...

Страница 29: ...zione a percussione 5 ASSITENZA E MANUTENZIONE Assicurarsi che l apparecchio non sia attivo quando si effettuano lavori di manutenzione sul motore Gli apparecchi sono stati progettati per funzionare d...

Страница 30: ...ingen opl sningsmidler s som benzin alkohol ammoniak osv Den slags stoffer beskadiger kunststofdelene Sm ring Maskinen beh ver ingen ekstra sm ring Fejl Skulle en fejl opst f eks pga slidtage af en en...

Страница 31: ...es i tilf lde af Defekt netstik netledning eller beskadigelse af ledning Defekt kontakt Gnistdannelse i kullene eller ringild i kollektoren R g eller lugt fra sveden isolering Elektrisk sikkerhed Kont...

Страница 32: ...n l ngs sidan T ck aldrig ver maskinens ventilationsh l Stanna omedelbart maskinen n r Maskinen genererar onormalt mycket gnistor fr n kollektorn Elkabel eller kontakter uppvisar n gon som helst defek...

Страница 33: ...takta servicest llet som anges p garantibeviset om ett fel uppst r t ex p grund av en del som r nedsliten S 40 Ferm Bryterl s Sett avtrekkerbryteren fast ved trykke med tommelen p knapp B Koples ut ve...

Страница 34: ...stik N r alle forberedelser er udf rt kan maskinen tilsluttes lysnettet ved at s tte stikket i stikkontakten Kontroller f rst om maskinen skulle v re t ndt og st p h jrerotation Spenningstester Betjen...

Страница 35: ...kg Lpa nenpaine 92 9 dB A Lwa nen tehotaso 105 9 dB A V r htelyarvo 7 3 m s2 FIN 38 Ferm SLAGDRILL Tallene i f lgende tekst viser til bildene p side 2 3 Les denne bruksanvisningen n ye f r maskinen ta...

Страница 36: ...ta FIN 36 Ferm Katkaise porakoneen virta ennen kuin lasket koneen alas l helt kehoasi l peit tuuletusaukkoja Katkaise laitteen virta v litt m sti kun Hiiliharjoista tulee liikaa kipin it ja kokoojassa...

Отзывы: