manualshive.com logo in svg
background image

9


Mi2506 


Mask (solitamente 255.255.255.0) 


GATEWAY: 

utilizzare questo campo per il Gateway di rete. 


PREFERRED  DNS:

  specificare  qui  l'indirizzo  del  DNS 

primario, in funzione del proprio Internet Service Provider. 


ALTERNATE  DNS:

  utilizzare  questo  campo  per  specificare 

l'indirizzo di un DNS alternativo. 

Fare click sul pulsante "Salva" ed attendere che il monitor riavvii il 
servizio di rete prima di riconnettersi con il nuovo indirizzo. 


1) Se il DIP SWITCH 1 o il DIP SWITCH 2 sono in posizione 

ON


la configurazione di rete del monitor è fissa:  
DIP1 ON 

 IP: 192.168.1.230 

DIP 2 ON 

 IP: 192.168.1.231 

Gli altri parametri sono configurati sui valori standard: 
Gateway: 192.168.1.1 
Subnet Mask: 255.255.255.0 
DNS: 192.168.1.1 
La  pagina  web  di  configurazione  "Rete"  mostrerà  un  messaggio 
di  avvertimento  e  non  consentirà  di  modificare  questi  parametri. 
Per  configurare  questi  parametri  liberamente  portare  i  DIP 
SWITCH 1 e 2 in posizione 

OFF

 ed aggiornare la pagina. 

2)  Se  il  DIP  SWITCH1  ed  il  DIP  SWTICH2  sono  entrambi  in 
posizione 

ON

  il  monitor  è  configurato  in  modalità  DHCP.  Per 

conoscere  l'indirizzo  IP  attuale  accedere  al  menù 


IMPOSTAZIONI 

  INFORMAZIONI,  o  utilizzare  il  link 

"http://MonitorName.local/" (in sistemi Windows richiede il servizio 
"bonjour"  installato  o  il  servizio  "Avahi"  in  sistemi  Linux),  dove 

MonitorName

  è  il  nome  completo  del  monitor  configurato  nel 

primo campo di questa pagina. 
3) Solitamente i campi “

Gateway

”, “

Net mask

”, “

DNS primario

” e 

DNS  secondario

”,  possono  essere  configurati  utilizzando  gli 

stessi valori presenti in altri dispositivi installati nella stessa rete. 
In caso di dubbio contattare il proprio amministratore di rete. 


ALTERNATE  DNS:

  use  this  field  for  Secondary  DNS, 

according to ISP. 

Click on "Save" button and wait until monitor restart the network 
service before connecting by the new IP address. 


1)  If  DIP  SWITCH  1  or  DIP  SWITCH  2  is  in 

ON

  position  the 

monitor's network configuration is fixed:  
DIP1 ON 

 IP: 192.168.1.230 

DIP 2 ON 

 IP: 192.168.1.231 

The other parameters are set to general values: 
Gateway: 192.168.1.1 
Subnet Mask: 255.25.255.0  
DNS: 192.168.1.1 
The Network setting web page will show a warning message and 
does  not  allow  to  change  the  parameters.  To  set  Network 
parameters  freely  set  DIP  SWITCH  1  and  2  to 

OFF

  and  reload 

the page. 
2)  If  the  DIP  SWITCH1  and  the  DIP  SWTICH2  are  both  in 

ON


position  the  monitor  will  be  set  in  DHCP  mode.  To  know  the 
actual IP address go to GUI menu 

 SETTINGS 

 INFO, or use 

the  link  "http://MonitorName.local/"  (it  requires  "bonjour"  service 
installed in Windows systems or "Avahi" in Linux systems), where 

MonitorName

 is the name set in the first field of this page. 

3)  Usually  the  fields  “

Default  Gateway

”,  “

Network  mask

”, 

Primary  DNS

”  and  “

Secondary  DNS

”,  can  be  set  as  same 

values  used  on  the  devices  of  the  network.  In  case  of  doubt 
please contact the network administrator. 
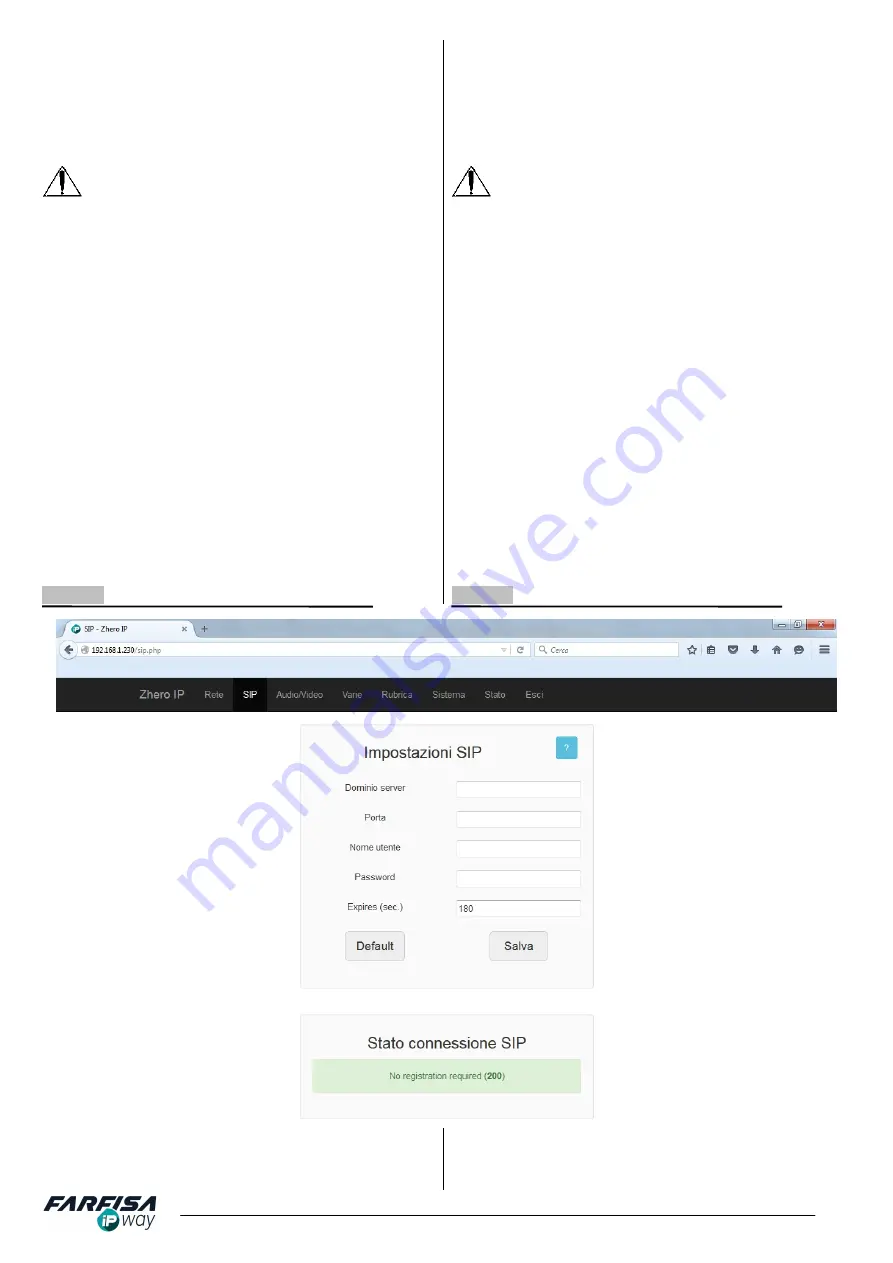
 

2.4.2 SIP  

2.4.2 SIP  


Il  monitor  ZHeroIP  può  essere  chiamato  da  pulsantiere  AgoràIP 
configurate  sia  in  modalità  P2P  che  in  modalità  SIP  server.  La 
modalità SIP server consente l'installazione del monitor in sistemi 
VoIP  dove  sia  presente  un  centralino  compatibile  SIP.  Nella 

The ZHeroIP monitor can be called by AgoràIP door station either 
in P2P mode or in SIP server mode. The SIP server mode allows 
the  installation  of  the  monitor  in  VoIP  systems  where  a  SIP 
compatible  PBX  is  installed.  In  case  of  SIP  server  mode  the 

Содержание ZHeroIP ZH1000IPW

Страница 1: ...ia web semplificata Disponibile nella colorazione bianca o nera Connettore RJ 45 per il collegamento a reti TCP IP Connettori per il collegamento al pulsante per la chiamata di piano ed il rilancio de...

Страница 2: ...ces or devices that produce heat and magnetic fields Do not clean the video intercom with water or chemical solvents use a dry cloth for cleaning This device must be exclusively operated for its inten...

Страница 3: ...meters are fixed to the following values Gateway 192 168 1 1 Subnet Mask 255 255 255 0 DNS 192 168 1 1 DIP SWITCH 2 ON assegna al monitor l indirizzo IP 192 168 1 231 che corrisponde all indirizzo ass...

Страница 4: ...MA DI PRINCIPIO La figura seguente illustra alcune modalit di collegamento del monitor ZHeroIP in un sistema in cui presente una pulsantiera Agor IP ed altri dispositivi per la ricezione della chiamat...

Страница 5: ...ssono essere usati con funzione WHEEL ad esempio ruotando il dito in senso orario per aumentare in valore di un opzione o in senso anti orario per diminuire Mentre il monitor sta squillando durante un...

Страница 6: ...t active touch any button but and to display the user s GUI menu The home page of the main menu has some icons describing the function of each side button Use these side buttons to select the desired...

Страница 7: ...olazione del volume dei toni di sistema o INFORMAZIONI mostra l indirizzo IP del monitor gli eventuali dettagli dell account SIP il nome del dispositivo ed il numero di serie ESCI esce dal men princip...

Страница 8: ...tting page allow to set the network configuration to connect the monitor to LAN network These fields can be edited only if DIP SWITCH 1 2 and 3 are all in OFF position Compilare i campi in funzione de...

Страница 9: ...caso di dubbio contattare il proprio amministratore di rete ALTERNATE DNS use this field for Secondary DNS according to ISP Click on Save button and wait until monitor restart the network service bef...

Страница 10: ...rver if empty 5060 will be used USERNAME registered account name on the SIP server PASSWORD SIP account s password SIP EXPIRES time to refresh the SIP registration Clicking on SAVE button the page wil...

Страница 11: ...udio quality In case it is required to adjust them make always small changes and retry The parameter RINGING TIMING allows to set the duration of playing the call melody VIDEO SETTINGS in this section...

Страница 12: ...nect ZHeroIP monitor can connect to other monitors or SIP phones section Intercom of the GUI menu even to devices installed in remote sites or to Agor IP door stations section Cameras of menu for moni...

Страница 13: ...ere nella sezione ATOACCENSIONE Fare click sul pulsante ELIMINA per cancellare un dispositivo precedentemente memorizzato nella Rubrica Fare click sul pulsante CANCELLA per non salvare le modifiche si...

Страница 14: ...CONTROLLA il monitor si connetter automaticamente al server FARFISA per verificare se siano disponibili nuovi pacchetti Se sono disponibili nuovi pacchetti verranno elencati nel box UPGRADING FROM REM...

Страница 15: ...ownload per salvare un file di log per il servizio tecnico a scopo diagnostico REGISTRO DI RETE fare click su Avvia per iniziare la cattura dei pacchetti di rete a scopo diagnostico sino al successivo...

Страница 16: ...dispositivo secondo quanto prescritto dalle norme per la tutela dell ambiente Dispose of the device according to local rules for environment protection M527053900 CERTIFICATO DI GARANZIA condizioni v...

Отзывы: