manualshive.com logo in svg
background image

8


Mi2506 


2.4 CONFIGURAZIONE WEB  

E'  possibile  accedere  agli  altri  parametri  di  configurazione  del 
monitor attraverso il browser web ed i seguenti dettagli: 
 

http://192.168.1.230 

Nome utente:

 admin 

Password:

 1234 


-  Utilizzare  i  pulsanti  nella  parte  bassa  della  pagina  di  accesso 
per selezionare la lingua di visualizzazione. 
-  La  pagina  web  di  configurazione  può  essere  visualizzata 
attraverso  PC,  tablet  o  dispositivi  Smart  Phone.  La  pagina verrà 
automaticamente adattata in funzione del dispositivo utilizzato. Le 
schermate  riportate  in  questo  manuale  fanno  riferimento  alla 
configurazione attraverso PC. 

-  Fare  click  sui  pulsanti 

  che  appaiono  in  ogni  pagina  per 

aprire  una  breve  guida  in  linea  con  suggerimenti  per  la 
configurazione. 
 

2.4 WEB CONFIGURATION 

It  is  possible  to  access  other  monitor's  configuration  details  via 
web browser by the following login: 
 

http://192.168.1.230 

User name:

 admin 

Password:

 1234 


-  Use  the  buttons  on  the  bottom  part  of  the  page  to  select  the 
page's language. 
- The internal web page can be displayed via browser using PC, 
tablet  or  Smart  phone  devices.  The  page  will  be  resized 
automatically according to the device used. The pictures showed 
in this manual are related to the configuration through PC. 

-  Click  on 

  buttons  to  open  a  brief  guide  with  some  tips  to 

help configuring the various options on the page. 
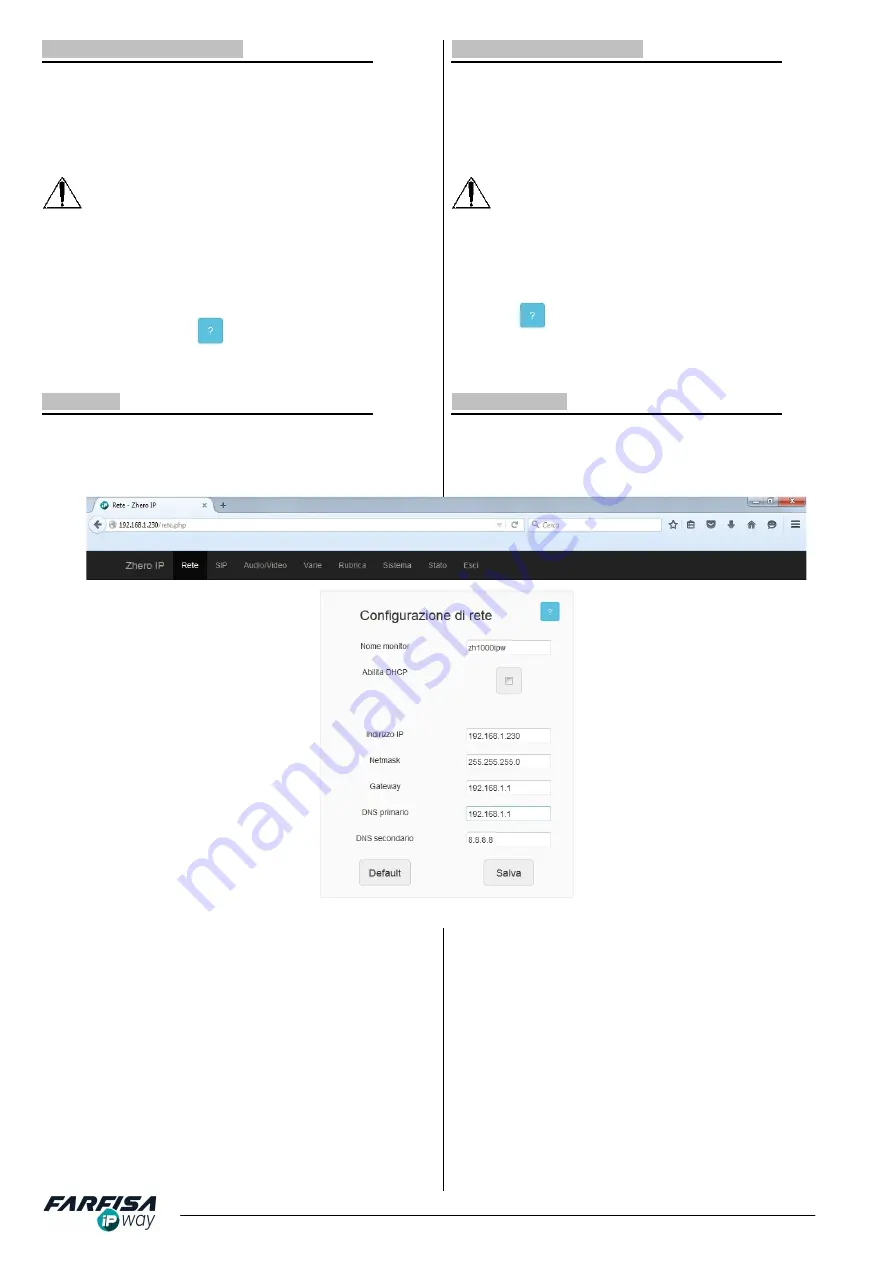
 

2.4.1 RETE 

I  campi  della  pagina  "Rete"  consentono  la  configurazione  dei 
parametri  per  connettere  il  monitor  alla  propria  LAN.  Questi 
campi possono essere modificati solo se i DIP SWITCH 1, 2 e 3 
sono in posizione OFF. 
 

2.4.1 NETWORK  

The  fields  on  "Network  setting"  page  allow  to  set  the  network 
configuration to connect the monitor to LAN network. These fields 
can  be  edited  only  if  DIP  SWITCH  1,  2  and  3  are  all  in  OFF 
position. 


Compilare  i  campi  in  funzione  della  configurazione  della  propria 
rete LAN come segue: 


NOME  MONITOR:

  introdurre  in  questo  campo  un  nome 

alfanumerico che consenta di identificare facilmente il monitor 
all'interno della rete. Il valore predefinito per questo campo è 
pari  a  "ZH1000IPnumero_di_serie".  Questo  nome  viene 
visualizzato 

anche 

nel 

menù 

IMPOSTAZIONI 


INFORMAZIONI. 


ABILITA  DHCP: 

spuntare


questa  casella  per  abilitare  la 

funzione  DHCP  per  l'assegnazione  automatica  dell'indirizzo 
IP.  Una  volta  che  la  funzione  DHCP  è  abilita,  è  campi 
successivi    (IP  address,  Gateway,...)  verranno  oscurati.  Il 
monitor  mostra  l'indirizzo  IP  attuale  nella  sezione  del  menù 
IMPOSTAZIONI 

 INFORMAZIONI. 


IP  ADDRESS:

  inserire  qui  l'indirizzo  IP  da  assegnare  al 

monitor. 


NETMASK: 

utilizzare questo campo per impostare la Subnet 

Fill in the fields according to own LAN network as follows: 


MONITOR  NAME:

  input  on  this  field  an  alphanumeric  name 

which  allow  to  easily  identify  the  monitor  within  the  network. 
The default setting for this option is "ZH1000IPserialnumber". 
This name is shown also on menu SETTINGS 

 INFO. 


ENABLE DHCP: 

check this box to enable DHCP function for 

automatic IP address assignment. Once the function DHCP is 
enabled,  it  is  not  possible  to  change  the  below  fields  (IP 
address,  Gateway,...).  The  monitor  shows  the  actual  IP 
address on menu  SETTINGS 

 INFO. 


IP  ADDRESS:

  use  this  field  to  set  here  the  monitor's  IP 

address. 


NETMASK: 

use  this  field  to  set  the  monitor's  Subnet  Mask 

(usually 255.255.255.0) 


GATEWAY: 

use this field for network Gateway IP address. 


PREFERRED DNS: 

use this field for Primary DNS, according 

to the Internet Service Provider. 

Содержание ZHeroIP ZH1000IPW

Страница 1: ...ia web semplificata Disponibile nella colorazione bianca o nera Connettore RJ 45 per il collegamento a reti TCP IP Connettori per il collegamento al pulsante per la chiamata di piano ed il rilancio de...

Страница 2: ...ces or devices that produce heat and magnetic fields Do not clean the video intercom with water or chemical solvents use a dry cloth for cleaning This device must be exclusively operated for its inten...

Страница 3: ...meters are fixed to the following values Gateway 192 168 1 1 Subnet Mask 255 255 255 0 DNS 192 168 1 1 DIP SWITCH 2 ON assegna al monitor l indirizzo IP 192 168 1 231 che corrisponde all indirizzo ass...

Страница 4: ...MA DI PRINCIPIO La figura seguente illustra alcune modalit di collegamento del monitor ZHeroIP in un sistema in cui presente una pulsantiera Agor IP ed altri dispositivi per la ricezione della chiamat...

Страница 5: ...ssono essere usati con funzione WHEEL ad esempio ruotando il dito in senso orario per aumentare in valore di un opzione o in senso anti orario per diminuire Mentre il monitor sta squillando durante un...

Страница 6: ...t active touch any button but and to display the user s GUI menu The home page of the main menu has some icons describing the function of each side button Use these side buttons to select the desired...

Страница 7: ...olazione del volume dei toni di sistema o INFORMAZIONI mostra l indirizzo IP del monitor gli eventuali dettagli dell account SIP il nome del dispositivo ed il numero di serie ESCI esce dal men princip...

Страница 8: ...tting page allow to set the network configuration to connect the monitor to LAN network These fields can be edited only if DIP SWITCH 1 2 and 3 are all in OFF position Compilare i campi in funzione de...

Страница 9: ...caso di dubbio contattare il proprio amministratore di rete ALTERNATE DNS use this field for Secondary DNS according to ISP Click on Save button and wait until monitor restart the network service bef...

Страница 10: ...rver if empty 5060 will be used USERNAME registered account name on the SIP server PASSWORD SIP account s password SIP EXPIRES time to refresh the SIP registration Clicking on SAVE button the page wil...

Страница 11: ...udio quality In case it is required to adjust them make always small changes and retry The parameter RINGING TIMING allows to set the duration of playing the call melody VIDEO SETTINGS in this section...

Страница 12: ...nect ZHeroIP monitor can connect to other monitors or SIP phones section Intercom of the GUI menu even to devices installed in remote sites or to Agor IP door stations section Cameras of menu for moni...

Страница 13: ...ere nella sezione ATOACCENSIONE Fare click sul pulsante ELIMINA per cancellare un dispositivo precedentemente memorizzato nella Rubrica Fare click sul pulsante CANCELLA per non salvare le modifiche si...

Страница 14: ...CONTROLLA il monitor si connetter automaticamente al server FARFISA per verificare se siano disponibili nuovi pacchetti Se sono disponibili nuovi pacchetti verranno elencati nel box UPGRADING FROM REM...

Страница 15: ...ownload per salvare un file di log per il servizio tecnico a scopo diagnostico REGISTRO DI RETE fare click su Avvia per iniziare la cattura dei pacchetti di rete a scopo diagnostico sino al successivo...

Страница 16: ...dispositivo secondo quanto prescritto dalle norme per la tutela dell ambiente Dispose of the device according to local rules for environment protection M527053900 CERTIFICATO DI GARANZIA condizioni v...

Отзывы: