background image

15

ENGLISH

tHe remote Control

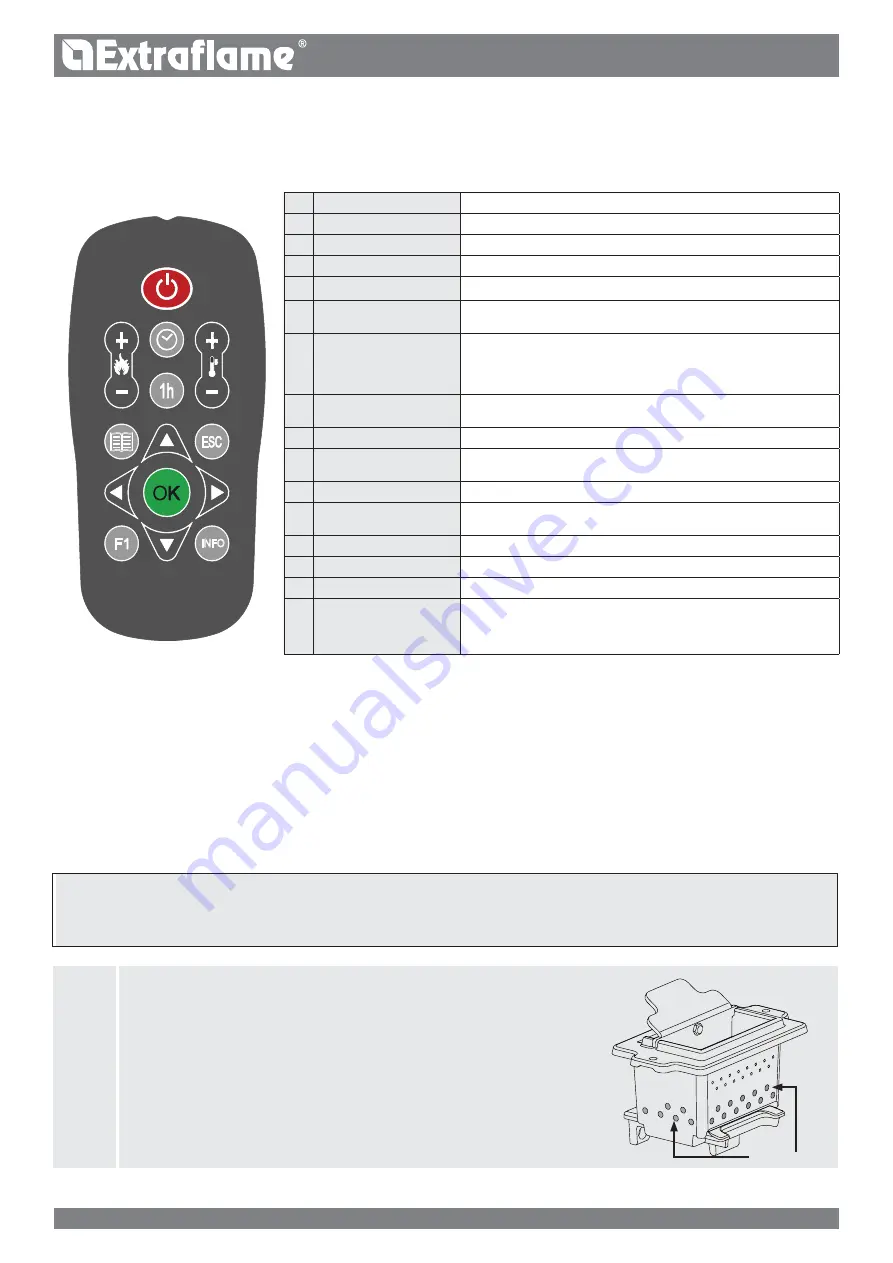
all that can normally be implemented through the lCD can be adjusted using the remote control.

The table below provides a detailed description of the various functions:

INFO

1

2

3

4

5

6

7

8

9

10

11

12

13

14

15

16

1

on / off

pressing the key for three seconds, the stove will switch on or off

2

power inCrease

pressing the key will increase the operating power

3

power DeCrease

pressing the key will decrease the operating power

4

t° inCrease

The temperature setting can be increased by pressing this key

5

t° DeCrease

The set temperature can be decreased by pressing this key

6

enable / Disable 

CHrono

pressing the key once will enable or disable the chrono

7

enable DelayeD 
switCH-off

The delayed switch-off can be set by pressing this key. 

For example, if the stove is set to switch-off in an hour, it shall switch-off 

automatically once the set time elapses, displaying the countdown every 

minute for delayed automatic shutdown.

8

menu

This key allows the user to access the user and technical menu (the 

technical menu is reserved for assistance)

9

inCrease

The temperature setting can be increased by pressing this key

10 esC key

The key allows the user to exit any program or display and returns to the 

main menu without saving the data

11 baCk

The key returns to the display of the various menus

12 Confirmation key

This key confirms the adjustments made during the user menu 

programming phase

13 forwarD

The key allows the user to go forward in the various menus

14 enable funCtion f1

pre-set key for future applications

15 DeCrease

The key decreases the value to be set

16 stove status

pressing this key will display the general status of the stove

type anD replaCement of batteries

The batteries are housed in the lower part of the remote control. 

To replace it, you need to take out the battery holder, remove or insert the battery following the symbols on the remote control and on the 

battery.

For operation, 1 Cr2025, 3v lithium buffer battery is required.

The batteries used contain metals harmful for the environment. They must therefore be disposed of separately in appropriate containers.

important note: the numbers shown on the remote control are purely indicative and are not present on the remote control supplied with the product. 

if tHe remote Control is off beCause it Has no batteries, tHe stove Can be ControlleD from tHe Control 

panel on top of it. wHile replaCinG tHe battery, pay attention to tHe polarity by observinG tHe symbol on 

tHe insiDe Compartment of tHe remote Control.

J

all Clean CHeCk up

sHoulD tHe "all Clean CHeCk up" alarm be triGGereD, make sure 

tHat tHe bottom of tHe burn pot is free of resiDues or sCales. 

tHe Holes at tHe bottom must be Completely free to Guarantee 

CorreCt Combustion. one Can use tHe funCtion to aDjust 

Combustion baseD on tHe DesCribeD requirements. if tHe alarm 

persists anD tHe above listeD ConDitions Have been CHeCkeD, 

ContaCt tHe qualifieD after-sales assistanCe Centre.

BUrN pOT HOles

Содержание DIADEMA ACS IDRO

Страница 1: ...MADE IN ITALY design production DIADEMA ACS 004276529 Rev 010 UK THERMO PRODUCTS USER MANUAL ...

Страница 2: ...2 ...

Страница 3: ...tional thermostat functioning with stby deactivated 19 Additional thermostat installation 19 Set power 20 TEMPERATURE set 20 Set boiler temperature 20 Set puffer temperature 20 USER MENU 20 Burn pot cleaning 20 reset 21 low 21 SET CHRONO 21 STATUS 22 Settings 22 set clock 22 Adjusting language 22 Display 22 stand by 23 aux 23 Season 24 Set boiler 24 enable boiler timer 24 boiler chrono 24 Cleaning...

Страница 4: ... well as the instructions contained in this manual The Manufacturer cannot be held responsible for the failure to comply with such precautions After removing the packaging ensure that the content is intact and com plete Otherwise contact the dealer where the appliance was purchased All electric components that make up the product must be replaced with original spare parts exclusively by an authori...

Страница 5: ...pply cable so that it does not come into contact with hot parts ofthe appliance The power supply plug must be accessible after installation Do not close or reducethe dimensions ofthe airingvents in the place of installation The airing vents are essential for correct combustion Do not leave the packaging elements within reach of children or unassisted disabled persons The hearth door must always be...

Страница 6: ...quid is used the latter could penetrate inside the crackles highlighting them SINCE THE PRODUCT CAN TURN ON AUTOMATICALLY THANKS TO THE TIMER OR REMOTELY USING THE DEDICATED APPLICATIONS IT IS STRICTLY FORBIDDEN TO LEAVE ANY COMBUSTIBLE OBJECT WITHIN THE SAFETY DISTANCES INDICATED ON THE TECHNICAL DATA PLATE internal combustion chamber parts can be subject to extetical warn it doesn t affect the f...

Страница 7: ... and inspection of correct functioning must be carried out perfectly in full compliance with Standards in force national regional and municipal as well as these instructions For Italy installation must be carried out by professionally qualified staff Ministerial Decree dated 22 01 08 n 37 Extraflame S p A declines all responsibility for damage to objects and or persons caused by the system Type of...

Страница 8: ... This is to prevent unexpected power increases The flue fitting can be mounted between the boiler and the flue only after this inspection An inspection of the connections with pre existing flues is recommended ANTI CONDENSATION DEVICE MANDATORY Make sure a suitable anti condensate circuit has been realised which guarantees an appliance return temperature of at least 55 C The automatic thermostatic...

Страница 9: ...ater content of the thermo product heat exchanger l 21 Volume of expansion vessel integrated in the thermo product l 8 3 bar safety valve integrated in the thermo product SI Minimum and maximum pressure switch integrated into the thermo product SI Pump integrated into the thermo product SI Pump max head m 6 Envision a possible additional expansion vessel depending on the system water content REARM...

Страница 10: ...domestichotwaterproductionandinadjacentandcommunicating rooms 3 where the depression measured in situ between the external and internal environment is greater than 4 Pa N B Watertight appliances can also be installed in the cases indicated in points 1 2 and 3 of this paragraph Installations in bathrooms bedrooms and studio flats Installation in bathrooms bedrooms and studio flats is only allowed f...

Страница 11: ...ction If the exhaust is not inserted in an existing flue a vertical section with a windproof end piece is required UNI 10683 The vertical duct can be inside or outside the building If the smoke duct is inserted in an existing flue it must be certified for solid fuel If the smoke duct is outside the building it must always be insulated The smoke ducts must have at least one airtight inlet for flue ...

Страница 12: ...roducts pellet STORAGE In order to ensure problem free combustion pellets must be stored in a dry place Open the tank lid and load the pellets using a scoop CHECKS AND PRECAUTIONS FOR FIRST IGNITION IMPORTANT IN ORDER FOR THE GENERATOR TO WORK PROPERLY THE HYDRAULIC SYSTEM S PRESSURE MUST BE BETWEEN 0 6 AND 2 5 BAR If the pressure detected by the digital pressure switch is below 0 6 or above 2 5 b...

Страница 13: ...abled Flashing with contact closed the contact of the external additional thermostat is closed and the STBY function is activated Flashing with contact open the contact of the external additional thermostat is open and the STBY function is activated It indicates fumes motor operation Off fumes motor disabled On fumes motor active Flashing breakdown contact technical after sales service It indicate...

Страница 14: ...ilate the room well If present remove any majolica parts from the top of the product Activate the product at the maximum power and temperature Avoid remaining in the room for a long time Do not touch the surfaces of the product Notes The process is completed after a few heating cooling cycles Do not use for the combustion of elements or substances other than those indicated in the manual Before tu...

Страница 15: ... during the user menu programming phase 13 Forward The key allows the user to go forward in the various menus 14 Enable function F1 Pre set key for future applications 15 Decrease The key decreases the value to be set 16 Stove status Pressing this key will display the general status of the stove Type and replacement of batteries The batteries are housed in the lower part of the remote control To r...

Страница 16: ...y for 15 minutes 30 seconds the pumps will be powered alternating with 30 seconds of downtime To activate the function With the stove OFF press keys 1 and 4 at the same time enter the password 77 using keys 4 and 5 and confirm with key 6 Cut the power to interrupt FIRST LOAD This function allows the user to activate the pellet feeding motor reducer for continuous functioning To activate the functi...

Страница 17: ...ically bringing itself to the minimum power If the temperature increases beyond the set point it will automatically switch off indicating H off and will automatically go back on when the temperature drops below the set point Switch off Press key 1 for three seconds When the operation has been performed the appliance automatically enters the switch off phase blocking the supply of pellets The flue ...

Страница 18: ...nt of the plate heat exchanger in the event of excessive fouling it not covered by the warranty The kit for the production of domestic hot water plate heat exchanger motorised diverter valve and flow switch is controlled by a board integrated in the stove system expansion board kit which allows various hydraulic configurations up to a maximum of four heating zones a puffer and an auxiliary boiler ...

Страница 19: ...ctivated When the STBY function is disabled the LED is fixed When the contact or external thermostat is satisfied open contact temperature reached the stove will go to minimum As soon as the contact or external thermostat switches to the not satisfied status closed contact temperature to be reached the stove will start to work again at the pre set power N B stove operation depends on the temperatu...

Страница 20: ...inimum power 1 maximum power 5 Controls procedure Press key 6 Confirm using key 6 SET POWER Use keys 4 or 5 to set the power Press key 1 several times to confirm and exit the menu TEMPERATURE set The following menu allows you to set The boiler temperature from 65 80 C Controls procedure Press key 6 Proceed by pressing key 2 until temperature set is displayed Confirm using key 6 Use keys 4 or 5 to ...

Страница 21: ...to be performed is in percentages Therefore changing this parameter will lead to a proportional variation of all stove feeding speeds Feeding is from 30 to 20 Controls procedure Press key 6 Proceed by pressing key 2 untilUSER MENU is displayed Confirm using key 6 Press key 2 until pellet is displayed Use keys 4 5 to increase 4 or decrease 5 the load during the WORK stage Press key 1 several times ...

Страница 22: ...sable the days of PRG2 Set prg2 65 80 c PRG2 boiler temperature Start prg3 OFF 00 00 23 50 PRG3 ignition time Stop prg3 OFF 00 00 23 50 PR3 switch off time Monday Sunday On off Enable disable the days of PRG3 Set prg3 65 80 c PRG3 boiler temperature Start prg4 OFF 00 00 23 50 PRG4 ignition time Stop prg4 OFF 00 00 23 50 PRG4 switch off time Monday Sunday On off Enable disable the days of PRG4 Set ...

Страница 23: ...s key 1 several times to confirm and exit the menu OFF OFF Key lock The menu allows the user to lock the display keys like with mobile phones Controls procedure Press key 6 Proceed by pressing key 2 until settings is displayed Confirm using key 6 Press key 2 until display is shown Confirm using key 6 Key lock will appear confirm with key 6 Use keys 4 5 to enable ON disable OFF Press key 1 several ...

Страница 24: ...ess key 1 several times to confirm and exit the menu enable boiler timer boiler chrono CANNOT be activated N B Diadema ACS features an instantaneous heat exchanger for the production of domestic hot water and it is not possible to set the Boiler timer Season In SUMMER mode the room thermostats relative to the heating system are satisfied In addition to the areas the request by a puffer is inhibite...

Страница 25: ...described in this use and maintenance manual CLEANING THE SURFACES AND COVERING Never use abrasive or chemically aggressive detergents for cleaning The surface cleaning must take place when both the generator and the coating are completely cold For the maintenance of surfaces and metal parts simply use a damp cloth with water or mild soap and water Failure to observe the instructions may damage th...

Страница 26: ... to ensure constant heat output over time This type of maintenance must be performed at least once a day To do this just use the relevant scrapers positioned in the upper part of the generator making the upward movements and vice versa several times EVERY MONTH Cleaning the deflector The fumes deflector located in the upper part of the combustion chamber must be removed on a monthly basis see figu...

Страница 27: ...e cleaning intervals dedicated to the user described in the use and maintenance manual will guarantee the correct combustion by the generator over time avoiding any malfunctioning and or failures which could require further intervention by the technician Routine maintenance requests are not covered by the product guarantee DOOR GASKETS ASH DRAWER AND BURN POT Gaskets guarantee the hermetic seal of...

Страница 28: ...nd flue duct and t new silicone in the dedicated points B Inspection of gaskets ash drawer and door replace and apply silicone where envisaged C Combustion chamber and heat exchanger full cleaning including ignition plug pipe cleaning D Tank complete emptying and cleaning E Air intake pipe check and cleaning of the flow sensor where necessary 28 ...

Страница 29: ...set T amb Displays room temperature in the models designed for it T OFF Generator off waiting for re ignition as all the requests have been satisfied Stand by Black out The generator is cooling after a power cut Once cooling is completed it will re start automatically Anti freeze The anti freeze function is in progress as the H2O t is below the factory set threshold the pump is active until the wa...

Страница 30: ...rculation Lack of or inadequate safety zone The water in the stove has exceeded 95 C Possible circulator anomaly If the problem persists the reset operations must be carried out by an authorised technician TRAPDOOR FAULTY The automatic burn pot cleaning is blocked Burn pot dirty or clogged The door is not closed correctly Check closure of the door Check that the burn pot is clear and clean The aut...

Страница 31: ...ability to use the product and wrong maintenance by the consumer with respect to what is reported and recommended by the instructions manual of the product which is part of the sales contract this guarantee will be void Damage to the product that cannot be related to manufacturing defects are also not included in this guarantee Similarly are excluded defects related to incorrect operation of the f...

Страница 32: ...faults in the electrical insulation This can cause electric shocks Installations not complying with the regulations in force as well as incorrect use and failure to comply with the maintenance scheduled by the manufacturer will invalidate the guarantee Disposal Information for management of electric and electronic appliance waste containing batteries or accumulators This symbol which is used on th...

Страница 33: ...33 ENGLISH ...

Страница 34: ...34 ENGLISH ...

Страница 35: ...35 ENGLISH ...

Страница 36: ...traflame it www lanordica extraflame com TO FIND THE SERVICE CENTRE NEAREST TO YOU CONTACT YOUR DEALER OR CONSULT THE SITE WWW LANORDICA EXTRAFLAME COM The manufacturer reserves the right to vary the characteristics and the data reported in this pamphlet at any moment and without notice in order to improve its products This manual therefore cannot be regarded as a contract towards other parties ...

Отзывы: