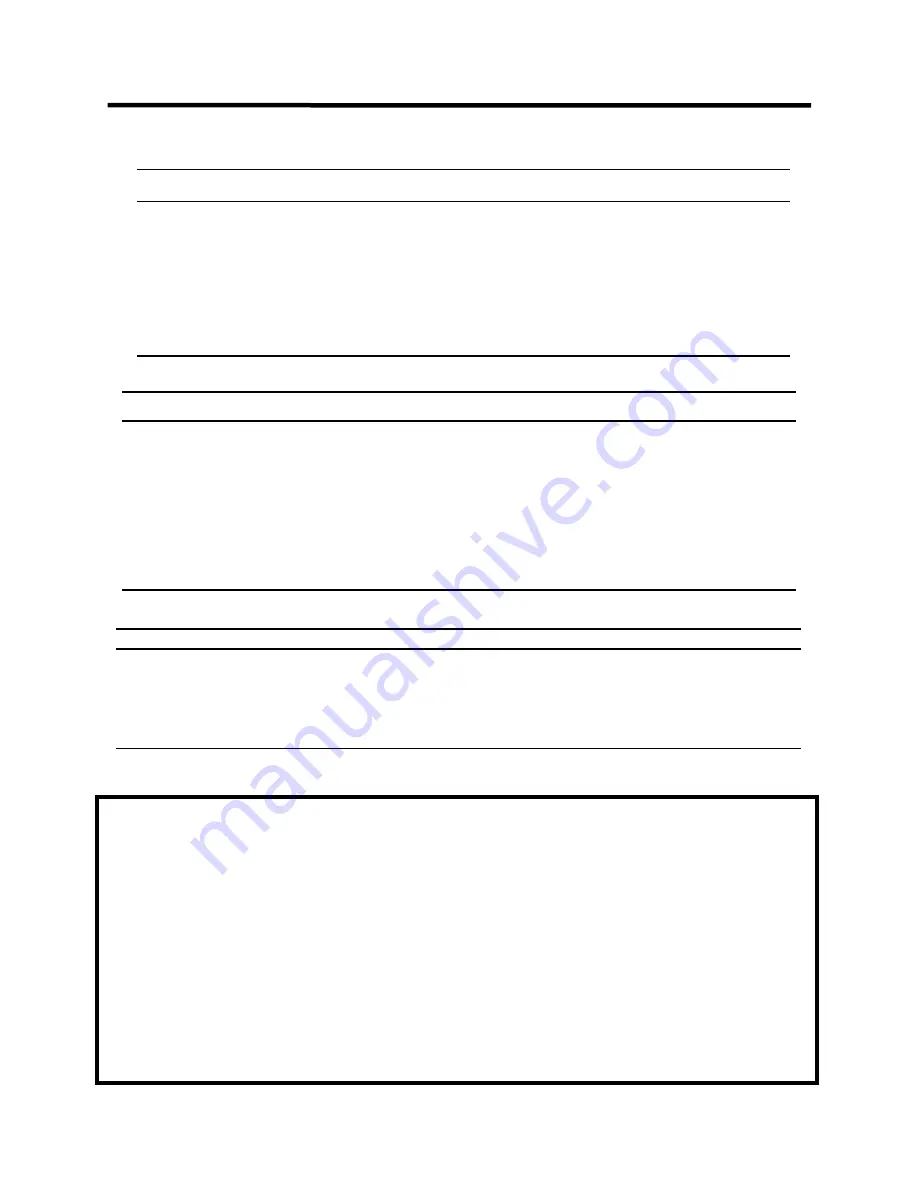
Everlast POWER MTS 221STi Скачать руководство пользователя страница 24

24


PROCESS


TORCH POLARITY


WORK POLARITY


MIG (GMAW)


+


FLUX CORE (FCAW)


-


+


STICK (SMAW)


+


TIG (GTAW)


+ /AC


Table 1


GENERAL POLARITY RECOMMENDATIONS*


*Consult the manufacturer of the filler material recommendations concerning polarity .


PROCESS


GAS


 MIG (GMAW) STEEL


80/20 Ar/CO2 or 75/25 Ar/CO2  or 100% CO2 for short Circuit MIG


80% or higher Argon content (recommend:  90/10 CO2 ) or similar content for 
true Axial Spray Transfer.  See below for  basic flow rates.


MIG (GMAW) STAINLESS


98/2 Ar/O2 , 98/2 Ar/CO2, or TriMix/ StainMIX with Helium (20

-

35 CFH)


MIG DUAL SHIELDED


Follow wire manufacturer

s recommendations in product literature.


MIG (GMAW) ALUMINUM


100% Argon (35 to 40CFH is usually needed for  cleaner welds)


TIG (GTAW)  STEEL/STAINLESS


100% Argon (10

-

30 CFH depending upon cup size and welding environment)


TYPICAL GAS SELECTION AND SETTING  GUIDE


Table 2


WIRE DIAMETER 


WELDING AMPS (A)


PLATE THICKNESS


GAS FLOW RATE 


.023” (0.6 

mm) 


25

-

110


.040”

-

.063” (1.0

-

1.6)


15

-

20 CFH /7

-

10 lpm


.030” (0.8 

mm))


35

-

200


.040”

-

.128” (1.0

-

3.2)


20

-

25 CFH/ 10

-

14 lpm


.035” (0.9 

mm)


45

-

200 +


.040”

-

.128”.(1.0

-

3.2)


20

-

25CFH/ 10

-

14 lpm


.040” (1.0 

mm)


45

-

200+


.050”

-

.25”+(1.2

-

6.0+)


25+ CFH/ 14+ lpm


.045” (1.2 

mm)


60

-

200+


.25”+ (6.0+)


25+ CFH/ 14+ lpm


MIG (GMAW) CURRENT/WIRE/SINGLE PASS THICKNESS GENERAL SUGGESTIONS


Table 3


IMPORTANT:  

Use the synergic function of the welder if you are unsure of the best volt and wire feed/amp settings to use.  

This feature 

automatically sets a generally useable volt/amp ratio for you.  

After this is selected and wire type and diameter of the wire is selected it is 

a simple matter of turning the amps up or down until the arc is stable and the sound of the arc is a crisp frying sound.  If no workable setting is 

obtained, the volt setting may be selected and adjusted up or down while in synergic mode. Adjusting the volts will reset the volt/amp ratio and 

create a whole new range of adjustment capability.  Deviating from the standard the shielding gas mix for the metal/wire in MIG mode will 

affect how accurate the volt/amp ratio is.  The synergic mode provides much better results in general than a chart can provide. 

Please note 

that in synergic mode, the unit display defaults to read in Amps, not the actual wire feed speed (IPM) while adjusting. This is not 

denoted by a separate LED light. Also, note that the unit will default to a relatively low amp setting.  This is intentional as the welder 

does not compute the thickness of the metal being welded.  You will need to adjust the Amps to match the metal thickness yourself.  

Displaying in Amps in synergic mode is a more accurate method since the wire diameter and type is entered and actual amps can be pre

-

computed before the gun trigger is activated.  While actively welding in manual or synergic modes, both the volt meter and the wire feed/amp 

meter will display actual, real time output.  There will be some variation in the reading as arc length, angle and even metal cleanliness con-

stantly fluctuate. 

Keep in mind that wire feed speed controls amps, but the same wire feed speed feed setting on different diameter 

wires will change the amount of amps delivered at the same set feed rate.

  Many wire manufacturers provide a range of amps and or 

wire speed feed, and volts  for their wire type in the printed material in their brochures, packaging information, or in their online information.  

Actual suggested wire feed speed/amp and volt ranges may differ somewhat from brand to brand. MIG inductance settings will also affect final 

preferred settings. You'll find that settings will vary according to the welding position and joint type. Any recommendation will not be 100% 

accurate and can vary widely.  For additional help with manual or synergic setup, consider downloading one of the numerous welding apps 

available online.  

Before adjustment of volts and amps begins, set the inductance to approximately 65

-

75%, then fine tune the induct-

ance only after all fine tuning of volts and amps has been completed.  Stainless will usually require around 90 to 100% setting for 

inductance for proper wet

-

in of the puddle but that also will vary a little based upon wire class and gas mix.  Generally, in spray 

mode inductance is not much of a factor, but leave the setting at the recommended settings for short circuit transfer.


Setup Guide and Component Identification


Section 2


Содержание POWER MTS 221STi

Страница 1: ...tions and Accessories subject to change without notice 329 Littlefield Ave South San Francisco CA 94080 USA Operator s Manual for the PowerMTS 221STi Safety Setup and General Use Guide A Digitally Con...

Страница 2: ...ntrol Panel Control Panel Item Description and Explanation Side View Side View Item Description and Explanation Rear View Back Panel Rear Panel Item Description and Explanation Basic Theory and Functi...

Страница 3: ...teract with each other Tech nical advisors are active on the forum daily We also divide our support into two divisions technical and welding performance Should you have an issue or question concerning...

Страница 4: ...rators com forums index php Main toll free number 1 877 755 WELD 9353 9am 5pm PST M F 11am 4pm PST Sat FAX 1 650 588 8817 Everlast Canada Everlast consumer satisfaction email sales everlastwelders ca...

Страница 5: ...roughly familiar with its safe and proper operation If you feel you need more information please contact Everlast The warranty does not cover improper use maintenance or consumables Accessories such a...

Страница 6: ...damage unprotected eyes Always wear hearing protection because welding and cutting can be extremely noisy Ear protec tion is necessary to prevent hearing loss Even prolonged low levels of noise has be...

Страница 7: ...y burning of the eyes nose or throat are signs that you need to increase ventilation Stop immediately and relocate work if necessary until adequate ventilation is obtained Stop work completely and see...

Страница 8: ...p all combustible materials including rags and spare clothing away from area Keep all flammable fuels and liquids stored separately from work area Visually inspect work area when job is completed for...

Страница 9: ...of all MIG functions with no factory programmed settings MIG Burn Back Timer Control 0 2 seconds Inductance Arc Force Control 0 100 TIG Output Type AC DC with Pulse Control and Wave Form Selection Adv...

Страница 10: ...nts Regular disassembly and cleaning with dry com pressed air is highly recommended Damage failures resulting from metal dust buildup is not covered by the warranty MODEL PowerMTS 221STi Serial No EN...

Страница 11: ...allows the unit to pulse up to 150 times a second between two selected amp values The TIG pro cess also features High Frequency HF start which is another industry first to allow contactless starting...

Страница 12: ...lding session until the process is changed or until the Synergic mode is deselected The machine has three synergic modes one for standard MIG operation one for standard Spool gun operation and one for...

Страница 13: ...ycle rating is the amount of time expressed as a percent age out of 10 minutes the unit can weld without a rest For MIG the unit is capable of welding 3 minutes out of every 10 minutes at the maximum...

Страница 14: ...and will tight en up once proper pressure has been achieved If hoses show sign of leaks tighten the clamps with a pair of side cutters or end nippers Simply squeeze the clamp tighter until the leak s...

Страница 15: ...If the cylinder will not seal the threads may be worn on the valve or mating surfaces scarred If hoses show sign of leaks tighten the clamps with a pair of side cutters or end nippers Gently squeeze t...

Страница 16: ...provide AC output Even if you switch the machine to AC you will still need to move the work clamp ca ble to the AC output terminal connector The TIG torch will always remain in the negative connect o...

Страница 17: ...nent Identification Section 2 CONNECTIONS AND POLARITY MIG GMAW GUN WORK The feeder connection located under the spool cover must be located on the positive terminal MIG requires that the gun be used...

Страница 18: ...re F CAW GUN WORK The feeder connection located under the spool cover must be located on the negative terminal Flux Core wire requires that the gun be used electrode negative EN in most cases Consult...

Страница 19: ...cover must be located on the posi tive terminal MIG requires that the gun be used with a positive polarity Keep in mind that if the gun is used with steel flux core wire the work connection must be po...

Страница 20: ...r cooled torches handle 200 amps or less contact Everlast for a full range of Everlast and NOVA torches WORK TORCH PEDAL TO CONTROL SWITCH TO COOLER GAS FROM COOLER Note Pictured Water Cooled Setup Al...

Страница 21: ...ater coming out of the torch head For an air cooled torch alternative all air cooled torches handle 200 amps or less contact Everlast for a full range of Everlast and NOVA torches TORCH CONTROL PEDAL...

Страница 22: ...tup for stick welding Most all welding electrodes use electrode posi tive as the preferred polarity Some will run electrode negative EN if needed Most will not perform well in EN Consult the electrode...

Страница 23: ...he wire through the gun liner is smooth and easy Press the gun trigger to feed wire until the wire exits the end of the torch Reinstall the contact tip over the wire over the wire and tighten it 8 To...

Страница 24: ...chart can provide Please note that in synergic mode the unit display defaults to read in Amps not the actual wire feed speed IPM while adjusting This is not denoted by a separate LED light Also note t...

Страница 25: ...Red AC DC YES Great for all purpose welding Most eco nomical Best for DC Good for AC Excellent arc starting Ceriated 2 Ceria Orange AC DC YES Good for low amp use Good for AC and DC Some fade out in...

Страница 26: ...26 AC CONTROL GAS OUTLET Setup Guide and Component Identification Section 2 FRONT VIEW CONNECTION PANEL POWER i MIG 221STi 1 2 3 4 5 6 7...

Страница 27: ...initiate the arc The control knob on side of the gun is used to change welding wire delivery speed thereby regulating the amps The Gun trigger signals the welder to start feed ing the wire and to init...

Страница 28: ...28 Setup Guide and Component Identification Section 2 FRONT VIEW CONTROL PANEL POWER i MIG 221STi 6 7 3 1 4 2 5 8 9 10 11 12 13 14 12...

Страница 29: ...s up machine output will cease and an error code will be generated in the display Wire feeding may continue if the Stop indicator is on but welding output will cease If an error code is generated look...

Страница 30: ...follows Due to the Ampacity the current carrying capability of a specific wire because of its diameter and metal type of differ ent available wires each change of wire diameter and type creates a dif...

Страница 31: ...rod such as E6011 more arc force will be needed Begin at 50 and work up to 70 to maintain best arc per formance If E6010 is required though not recom mended due to possible arc stability questions set...

Страница 32: ...on in the sequencer chart Pressing the right button will move the highlighted LED to the next applicable function in the sequencer chart Depending upon the process selected some LED s will be skipped...

Страница 33: ...lding position or con dition change This control is primarily useful for short circuit welding and has limited value in Axial Spray While using many types of flux core or dual shield manufacturers wil...

Страница 34: ...the wire run in ramp up speed to help soften or increase the run in effect The run in works similar to MIG hot start and has a similar effect helping to reduce porosity at the beginning of the weld F...

Страница 35: ...increased up to 200 Hz The helps shape the arc cone width and affects wet in penetration and provides superior arc stability over 60Hz transformer models For more info see the related section later in...

Страница 36: ...36 SIDE VIEW POWER MTS 221STi Note Image scale is compressed horizontally to fit this format Setup Guide and Component Identification Section 2 1 2 4 5 3...

Страница 37: ...nsioner These numbers are a reference point to help properly tension the wire so that the drive roller will not slip Do not over tension the wire because it can create a condition known as birds nesti...

Страница 38: ...38 REAR VIEW BACK PANEL POWERMTS 221STi Setup Guide and Component Identification Section 2 1 2 4 3 1x220V 6 5...

Страница 39: ...eled as clean power and provide less than 5 THD Consult your generator manufacturer for information regarding the clean power rating on specific units Everlast does not pro vide a list of approved gen...

Страница 40: ...ome people it may not even close However nothing can substi tute for watching the arc and listening to the sound of the arc A crisp steady sound frequently re ferred to as a Bacon frying sound should...

Страница 41: ...elp ful when pure CO2 is used 4 The arc force can improve weldability of thinner metals without having to step down a size in wire While ultimately there are limits to what any given wire can weld on...

Страница 42: ...the vertical position with no more than 5 de grees lean in either side to side direction Holding the wire too far off from the metal will result in rough starting and too long of wire stick out Once...

Страница 43: ...or serious injury may occur A MIG wire such as ER70S 6 or ER70S 2 includes a sufficient level of deoxidizers such as silicone and copper that are formulated to allow it to handle mi nor to moderate a...

Страница 44: ...44 MIG OPERATION where porosity and inclusions can be introduced Basic Theory and Function Section 3...

Страница 45: ...n open root can be used as a backer plate adds to the time and labor involved A knife edge is also acceptable so long as the joint is fully penetrated when the weld is completed Open root gaps without...

Страница 46: ...on both sides of the joint and keeps the bead centered Don t confuse this with push or pull angle in the travel direction Correct Technique The gun is angled toward the back of the weld when traveling...

Страница 47: ...age slow down to fill joint more Use push technique Characteristics Large convex weld with bulging at toes weld legs exceed thickness of the metal being welded Possible Causes Not enough voltage too m...

Страница 48: ...ecom mended and it is possible But when more CO2 is added the rust resistance of stainless goes down due to the added car bon content Ideally there are several Tri gas mixes out there that are well su...

Страница 49: ...work Part time or occasional Flux core use with the standard MIG gun is acceptable as long as the nozzle is kept free of spatter 5 When running this unit on a generator the manufacturer of the generat...

Страница 50: ...MIG Volts TIG Amps no finger con tact with the switch is required Following the graphic lines below you can visually trace the activity and function of each part of the welding cycle In either 2T or...

Страница 51: ...he arc force for cellulose based flux welding rods is helpful Lowering the Arc force setting is generally desirable for rods iron powder Titania based flux Too much arc force will create overheating o...

Страница 52: ...arc starting and tung sten preparation Welding If you are new to TIG welding it s important that you understand that TIG weld ing is much slower than MIG or Stick welding It requires patience and ste...

Страница 53: ...erformed correctly If you cannot see the puddle or your helmet flashes auto darkening types you need to change your settings Practice feeding the filler wire without actually welding Manipulating the...

Страница 54: ...torch switch or press the foot pedal Wait for the Pre flow to start Make sure pre flow is set for less than 4 seconds or start will be noticeably delayed 2 Quickly rotate cup so that the tungsten com...

Страница 55: ...owly without much pressure 4 Rotate the Tungsten quickly as it is being ground to keep the point even and symmetrical Do not grind the Tungsten parallel to wheel face or an unstable arc will result Us...

Страница 56: ...where penetration can be achieved without overheating the metal par ticularly on metals that are prone to structur al deterioration or burn through In effect you are creating an average of amps This w...

Страница 57: ...with variations in Pulse Time On and a narrow wider ratio can be used to prevent burn through and speed up welding on thin materials It can also help maintain a proper bead profile on a thin edge weld...

Страница 58: ...200 Hz The AC output is formed by rapidly alter AC TIG operation is a new and unique feature for compact MIG TIG Stick multi process units With that said this welder is a well developed machine with b...

Страница 59: ...p the heaviest oxide layer so less EP is needed and better penetration can be achieved Even if the aluminum has a mirror like shine it is still oxidized nating polarity between electrode negative and...

Страница 60: ...ot to AC operation However to reduce tungsten contamination with aluminum you should only operate the AC mode with the HF start selected Lift start is recommend ed only for DC or for AC when a copper...

Страница 61: ...PERATION Metal Thickness Tungsten Size Type Filler Diameter Gas Flow Rate Type Welding Amps Peak Amps If Applicable Base Amps If Applicable Pulse Frequency If Applicable Pulse Time On If Applicable PG...

Страница 62: ...ION Metal Thickness Tungsten Size Type Filler Diameter Gas Flow Rate Type Welding Amps Peak Amps If Applicable Base Amps If Applicable Pulse Frequency If Applicable Pulse Time On If Applicable PGM TIG...

Страница 63: ...ness Tungsten Size Type Filler Diameter Gas Flow Rate Type Welding Amps Pulse Peak Amps If Applicable Pulse Base Amps If Applicable Pulse Frequency Hz If Applicable Pulse Time On If Applicable PGM AC...

Страница 64: ...s the PowerMTS unit with some of the most prov en torches in history Numerous manufacturers all over the world make and use interchangeable variations of these torches including Binzel and Trafimet Mo...

Страница 65: ...to en sure tightness Do not overtighten any fittings or stripping of the threads may result The MIG torch liner may eventually become worn and will need to be replaced When welding aluminum with the m...

Страница 66: ...66 24 SERIES MIG TORCH OPT Expanded View Basic Theory and Function Section 3...

Страница 67: ...ly available from Everlast In the left column are the OEM part numbers Trafimet and Binzel part numbers are listed as a reference where similar or interchangeable You can also find the list of stocked...

Страница 68: ...Cable 1 10 Torch Handle Blue ergo handle std not pictured 1 11 Torch Switch Built into ergo handle separate on straight handle 1 12 Torch Switch Connector 1 13 9mm 1 8 b quick connect coupling male Wa...

Страница 69: ...air or Replace it Control board damaged Check the circuit 9 Intermittent Arc Wandering arc Work Clamp is not secure or it is damaged Too windy breezy Check and or Work Clamp change position of clamp a...

Страница 70: ...han 1 4 Increase cup size or use gas lens Clean metal thoroughly with approved metal cleaner or use acetone and a rag to clean metal Low flow rate of shielding gas High flow rate of shielding gas Tung...

Страница 71: ...ng E02 Over Current Operating machine on too small of a conductor Internal machine fault E04 Over Temperature Duty Cycle exceeded Blocked cooling Fans not operating properly E05 Stuck Switch Gun switc...

Страница 72: ...72...

Отзывы: