


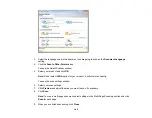


Color Restoration
Restores the colors in faded photos automatically.
Backlight Correction
Removes shadows from photos that have too much background light.
Dust Removal
Removes dust marks from your originals automatically.
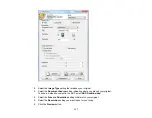
Auto Exposure
Automatically adjusts the image exposure settings when you click the
Auto Exposure icon. To
automatically adjust image exposure settings continuously, click the
Configuration
button, click the
Color
tab, and select
Continuous auto exposure
. You can adjust the level of exposure adjustment
using a slider.
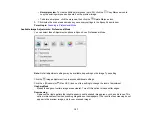
Histogram Adjustment
Provides a graphical interface for adjusting highlight, shadow, and gamma levels individually. (For
advanced users only.) Click the
histogram icon to access the settings.
Tone Correction
Provides a graphical interface for adjusting tone levels individually. (For advanced users only.) Click
the
tone correction icon to access the settings.
Brightness
Adjusts the overall lightness and darkness of the scanned image.
Contrast
Adjusts the difference between the light and dark areas of the overall scanned image.
Saturation
Adjusts the density of colors in the overall image.
Color Balance
Adjusts the balance of colors in the overall image.
Color Palette
Provides a graphical interface for adjusting mid-tone levels, such as skin tones, without affecting the
highlight and shadow areas of the image. (For advanced users only.) Click the
Color Palette icon
to access the settings.
Threshold
Adjusts the level at which black areas in text and line art are delineated, improving text recognition in
OCR (Optical Character Recognition) programs.
Parent topic:
128
Содержание WorkForce Pro WP-4530
Страница 1: ...WorkForce Pro WP 4530 User s Guide ...
Страница 2: ......
Страница 12: ......
Страница 13: ...WorkForce Pro WP 4530 User s Guide Welcome to the WorkForce Pro WP 4530 User s Guide 13 ...
Страница 20: ...Printer Parts Inside 1 Ink cartridge slots 2 Front cover 3 Print head Parent topic Product Parts Locations 20 ...
Страница 28: ...4 Load a stack of paper printable side down in the cassette as shown 28 ...
Страница 32: ...2 Pull up the rear MP tray 3 Flip the feeder guard forward then slide the edge guides outward 32 ...
Страница 35: ...2 Pull up the rear MP tray 3 Flip the feeder guard forward then slide the edge guides outward 35 ...
Страница 50: ...Parent topic Placing Originals on the Product 50 ...
Страница 51: ...Related topics Copying Scanning Faxing 51 ...
Страница 111: ... Normal preview Click the Auto Locate icon to create a marquee dotted line on the preview image 111 ...
Страница 115: ...3 Adjust the scan area as necessary 115 ...
Страница 122: ...122 ...
Страница 130: ...3 Adjust the scan area as necessary 130 ...
Страница 176: ...5 Select Fax Settings for Printer You see this window 176 ...
Страница 177: ...6 Select your product 7 Select Speed Dial Group Dial List You see this window 177 ...
Страница 215: ...215 ...
Страница 220: ...220 ...
Страница 225: ...Parent topic Cleaning and Transporting Your Product Related concepts Print Head Cleaning Print Head Alignment 225 ...
Страница 240: ...3 Remove any jammed paper inside the cassette 4 Remove any paper jammed inside the paper cassette slot 240 ...
Страница 242: ...3 Carefully remove the jammed paper 4 If paper is jammed in the duplexer remove the paper as shown 242 ...
Страница 246: ...6 Lower the document cover 7 Raise the ADF input tray 8 Carefully remove the jammed pages 246 ...