


80
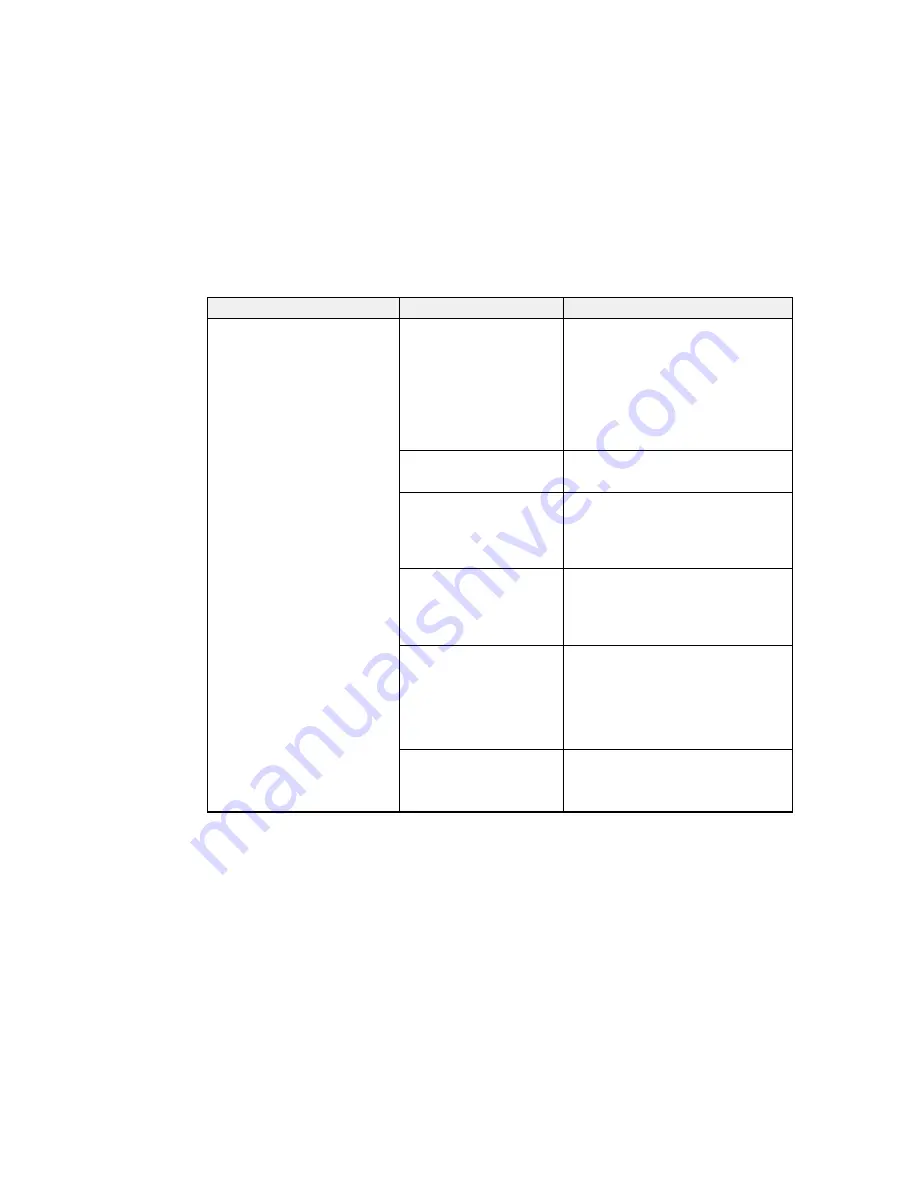
Setting
Options
Description
Other maintenance
Ink Circulation
(SC-S80600 only)
The printer automatically circulates the
White and Metallic Silver ink to help
prevent sedimentation. However, when
printing multiple copies of a large print
job, you may notice a difference in
color in your printouts if the ink is
circulated in between copies. To avoid
this problem, select
Ink Circulation
before printing.
Ink Refresh
(SC-S80600 only)
Select this option if your printouts have
an uneven tint.
Head Washing
Select this option if the nozzles are still
clogged after performing all other print
head cleaning options. Cleaning
cartridges (not included) are required
to use this feature.
Pre-Storage Maint.
Select this option if you plan to turn off
the printer and not use it for an
extended period of time; click the link
below to the pre-storage maintenance
section for more information.
Change Color Mode
(SC-S80600 only)
Select
10 Color (WH)
to use White ink,
10 Color (MS)
to use Metallic Silver
ink, or
9 Color
if you plan on not using
either White or Metallic Silver ink for an
extended period of time; click the link
below to the change color mode
section for more information.
Grease Carriage Rod
Lets you apply grease to the carriage
rod; click the link below to the carriage
rod grease section for more
information.
Parent topic:
Using the Control Panel Menus
Содержание SureColor S40600
Страница 1: ...Epson SureColor S40600 S60600 S80600 User s Guide ...
Страница 2: ......
Страница 28: ...28 Printable side in 8 On the left side of the product raise the lift lever to lift the media into position ...
Страница 30: ...30 11 Push the right roll holder into the roll media then lower the lift lever ...
Страница 32: ...32 13 Fully tighten the knob on the roll holder ...
Страница 44: ...44 2 Pull the other end of the tape straight down and attach it to the roll core using adhesive tape as shown ...
Страница 45: ...45 3 Set the Auto switch to the position 4 Lower the tension bar until it lightly touches the paper tape ...
Страница 47: ...47 2 Pull the other end of the tape straight down and attach it to the roll core using adhesive tape as shown ...
Страница 48: ...48 3 Set the Auto switch to the position 4 Lower the tension bar until it lightly touches the paper tape ...
Страница 67: ...67 1 3 6 inches 92 mm Parent topic Media Handling Related references Printer Setup Menu Settings ...
Страница 98: ...98 4 Use the flat side of the cleaning stick to clean the outside of each cap ...
Страница 100: ...100 6 If a film of ink remains after cleaning with the cleaning stick use tweezers to remove it ...
Страница 101: ...101 7 Remove any lint or dust from the inside of the caps using the tip of a cleaning stick or tweezers ...
Страница 111: ...111 8 Place the new wiper unit in the printer as shown and press it down until it clicks into place ...
Страница 116: ...116 5 Remove the left media edge plate then remove the right media edge plate in the same manner ...
Страница 117: ...117 6 Align the white line on a new media edge plate with the edge of the platen ...


