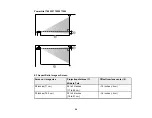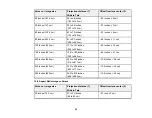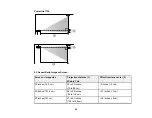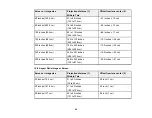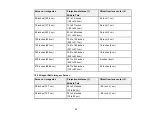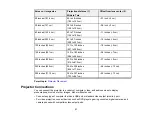
Screen or image size
Projection distance (1)
Offset from lens center (2)
Wide to Tele
40 inches (101.6 cm)
40 to 48 inches
–0.7 inch (–2 cm)
(102 to 123 cm)
50 inches (127 cm)
50 to 60 inches
–0.9 inch (–2 cm)
(128 to 154 cm)
60 inches (152.4 cm)
60 to 73 inches
–1.1 inches (–3 cm)
(154 to 185 cm)
80 inches (203.2 cm)
81 to 97 inches
–1.5 inches (–4 cm)
(205 to 247 cm)
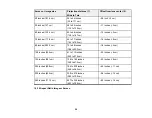
100 inches (254 cm)
101 to 122 inches
–1.9 inches (–5 cm)
(257 to 309 cm)
150 inches (381 cm)
152 to 183 inches
–2.8 inches (–7 cm)
(386 to 464 cm)
200 inches (508 cm)
203 to 244 inches
–3.7 inches (–9 cm)
(516 to 619 cm)
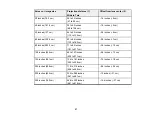
250 inches (635 cm)
254 to 305 inches
–4.6 inches (–12 cm)
(654 to 774 cm)
280 inches (711.2 cm)
284 to 341 inches
–5.2 inches (–13 cm)
(723 to 867 cm)
Parent topic:
Projector Connections
You can connect the projector to a variety of computer, video, and audio sources to display
presentations, movies, or other images, with or without sound.
• Connect any type of computer that has a USB port or standard video output (monitor) port.
• For video projection, connect devices such as DVD players, gaming consoles, digital cameras, and
camera phones with compatible video output ports.
31
Содержание PowerLite 1750
Страница 1: ...PowerLite 1750 1760W 1770W 1775W Projector User s Guide ...
Страница 2: ......
Страница 8: ......
Страница 22: ...Front Rear Ceiling 22 ...
Страница 47: ...3 Remove the wireless LAN module cover 4 Insert the wireless LAN module into the port 47 ...
Страница 62: ...1 Open the projector s lens cover 2 Connect the power cord to the projector s power inlet 62 ...
Страница 110: ...Component video input source Composite video input source HDMI input source PowerLite 1760W 1770W 1775W 110 ...
Страница 120: ...Video input source USB or LAN input source 120 ...
Страница 131: ...4 Slide the lamp cover out and lift it off 5 Lift up the metal bar securing the lamp 131 ...
Страница 160: ... Wide resolution only Parent topic Technical Specifications 160 ...


