


Maintenance 7. Arm #3
104
LS20 Rev.4
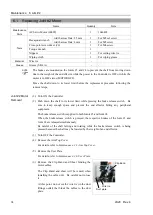
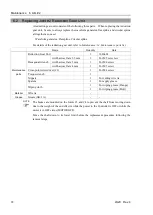
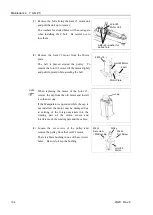
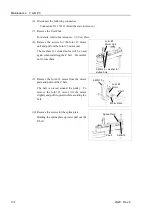
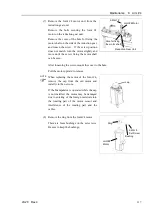
(7) Remove the bolts fixing the Joint #3 motor unit
and pull the unit up to remove.
The washers for slotted holes will be used again
when installing the Z belt. Be careful not to
lose them.
Joint #3
Motor Unit
3-M5
×
20
+
washer for
slotted hole
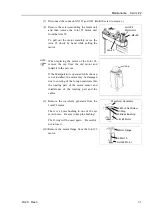
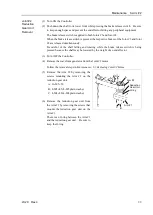
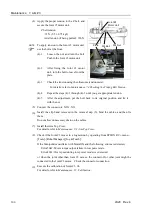
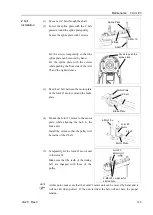
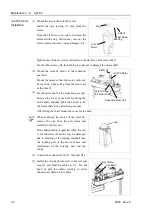
(8) Remove the Joint #3 motor from the Motor
plate.
The belt is placed around the pulley. To
remove the Joint #3 motor, tilt the motor slightly
and pull it upward while avoiding the belt.
Joint #3 Motor
Motor Plate
4-M5
×
15
Z belt
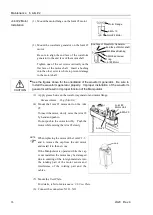
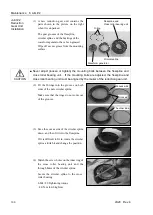
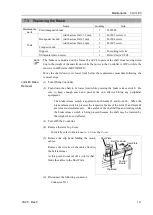
When replacing the motor of the Joint #3,
remove the cap from the old motor and install
it to the new one.
If the Manipulator is operated while the cap is
not installed, the motor may be damaged due
to entering of the foreign materials into the
rotating part of the motor sensor and
interference of the rotating part and the cables.
cap
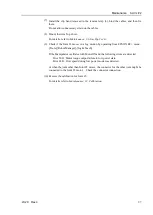
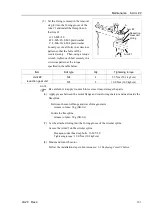
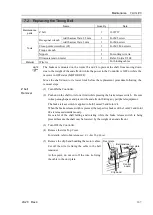
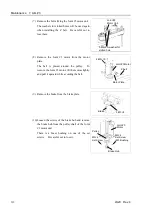
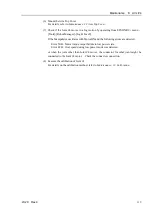
(9) Loosen the set screws of the pulley and
remove the pulley from the Joint #3 motor.
There is a brass bushing in one of the set screw
holes. Be sure to keep the bushing.
M4x6
Set Screw
M4×4
Set screw
+M4 Bushing
Joint #3
Motor
Pulley
NOTE
Содержание LS20
Страница 1: ...Rev 4 EM179R3533F SCARA ROBOT LS20 series MANIPULATOR MANUAL ...
Страница 2: ...MANIPULATOR MANUAL LS20 series Rev 4 ...
Страница 8: ...vi LS20 Rev 4 ...
Страница 12: ...TABLE OF CONTENTS x LS20 Rev 4 ...
Страница 14: ......
Страница 29: ...Setup Operation 2 Specifications LS20 Rev 4 17 LS20 804S Standard Model ...
Страница 31: ...Setup Operation 2 Specifications LS20 Rev 4 19 LS20 804C Cleanroom Model ...
Страница 33: ...Setup Operation 2 Specifications LS20 Rev 4 21 LS20 A04S Standard Model ...
Страница 35: ...Setup Operation 2 Specifications LS20 Rev 4 23 LS20 A04C Cleanroom Model ...
Страница 71: ...Maintenance This volume contains maintenance procedures with safety precautions for LS20 series Manipulators ...
Страница 72: ......
Страница 92: ...Maintenance 4 Cable 80 LS20 Rev 4 4 2 Wiring Diagrams 4 2 1 Signal Cable ...
Страница 176: ...Maintenance 14 Maintenance Parts List 164 LS20 Rev 4 ...