2. Installation
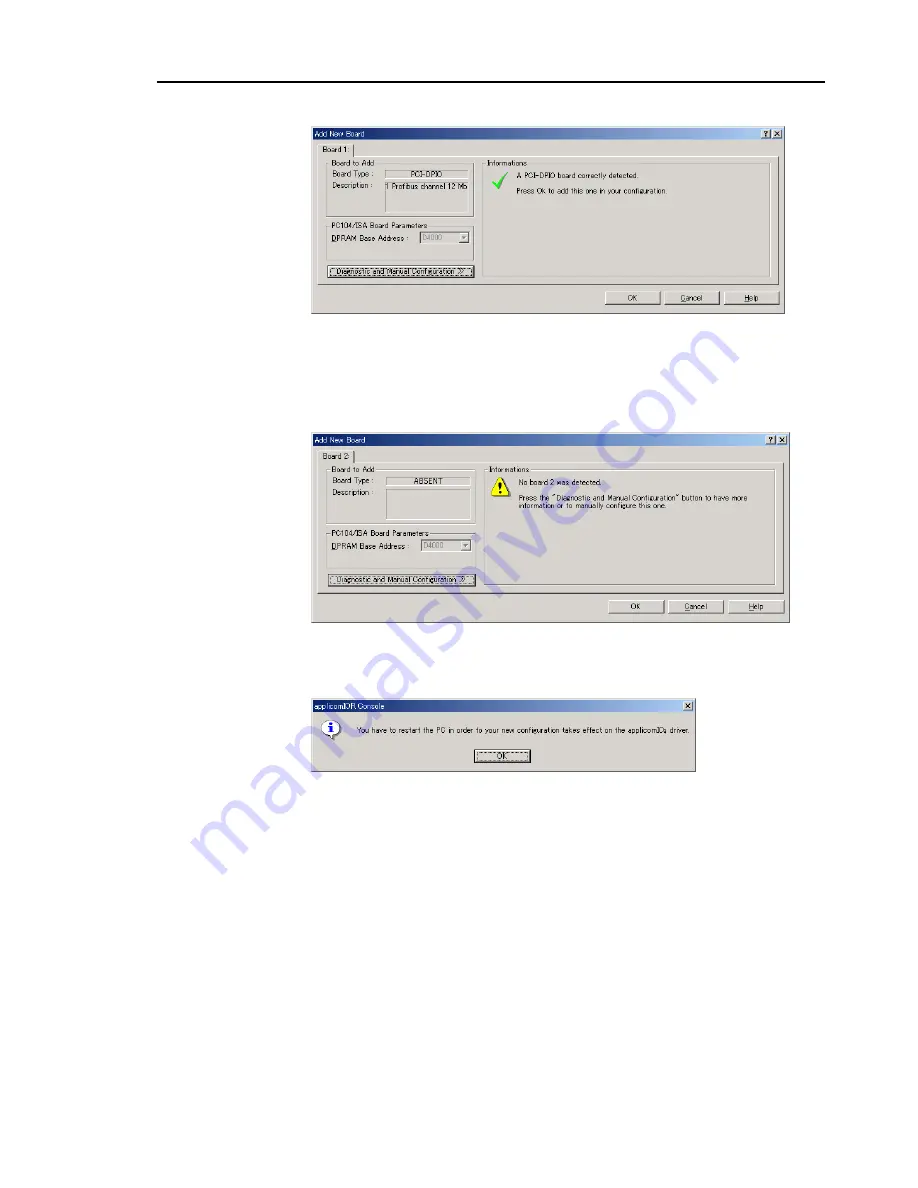
(8) The following dialog will appear.
Check that “PCI-DPIO” or “PCU-DPIO” (“PCI-DVNIO” in case of DeviceNet) is
shown in the
Board Type:
box. Then, click the
OK
button.
When installing more than two fieldbus boards in the system, add all the boards
using this dialog.
The following dialog will appear when no board is detected. Ensure that the board is
correctly inserted and that the board configuration is correct.
(9) After all the boards are added, the system should be restarted.
Close the applicomIO Console application and click the
OK
button on the
Save
modification
dialog. Click the
OK
button on the following dialog to restart
Windows.
(10) After restarting the system, continue with the following
2.6.5 Master Mode
or
2.6.6
Slave Mode
sections.
Fieldbus I/O Rev.6
45
Содержание EM07ZS1647F
Страница 1: ...Rev 6 EM07ZS1647F EPSON RC Option Fieldbus I O ...
Страница 2: ...E PSON RC Option Fieldbus I O Rev 6 ...
Страница 8: ...vi Fieldbus I O Rev 6 ...
Страница 11: ...Table of Contents 5 Maintenance Parts List 151 Appendix A applicomIO Upgrade 153 Fieldbus I O Rev 6 ix ...
Страница 12: ...Table of Contents x Fieldbus I O Rev 6 ...
Страница 80: ...2 Installation 68 Fieldbus I O Rev 6 ...
Страница 88: ...3 Operation 76 Fieldbus I O Rev 6 ...
Страница 164: ...5 Maintenance Parts List 152 Fieldbus I O Rev 6 ...
Страница 168: ...Appendix A applicomIO Upgrade 156 Fieldbus I O Rev 6 ...


