EPSON Stylus COLOR 900/900N
Chapter 4 Disassembly and Assembly
107
C H E C K
P O I N T
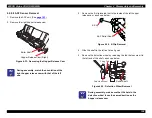
When installing the roller assemblies, note that
the white one goes on the left and the black one
goes on the right.
Also, make sure that the groove on the back of
each roller assembly mates with the ASF frame
rib as shown below:
Figure 4-31. Roller Assembly Installation
A S F F r a m e
P a p e r L o a d i n g
A s s e m b l y
A S F F r a m e R i b s
Roller
Assembly
Rib
C H E C K
P O I N T
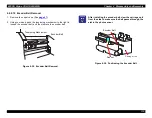
Make sure the left edge of the roller assembly
fits into the slot in the paper guide.
Figure 4-32. Assembling the ASF
H o p p e r A s s e m b l y G u i d e
L e f t F r a m e i n t h e
L e f t P a p e r L o a d i n g A s s e m b l y
B u s h i n g F i x i n g t h e S h a f t
Paper Guide (blue)
Left edge of Roller Assembly
Содержание 900N
Страница 1: ...EPSONStylusCOLOR900 900N Color ink jet printer TM SC900 N 6 59 0 18 ...
Страница 8: ... 37 5 PRODUCTDESCRIPTION ...
Страница 37: ... 37 5 OPERATINGPRINCIPLES ...
Страница 67: ... 37 5 TROUBLESHOOTING ...
Страница 89: ... 37 5 DISASSEMBLYANDASSEMBLY ...
Страница 121: ... 37 5 ADJUSTMENTS ...
Страница 156: ... 37 5 MAINTENANCE ...
Страница 169: ... 37 5 APPENDIX ...
Страница 178: ...EPSON Stylus COLOR 900 900N Chapter 7 Appendix 175 7 3 Component Layout Figure 7 2 C265 Main Board Component side ...
Страница 179: ...EPSON Stylus COLOR 900 900N Chapter 7 Appendix 176 Figure 7 3 C265 Main Board Soldering side ...
Страница 180: ...EPSON Stylus COLOR 900 900N Chapter 7 Appendix 177 Figure 7 4 C265 PSB Board Figure 7 5 C265 PSE Board ...
Страница 181: ...EPSON Stylus COLOR 900 900N Chapter 7 Appendix 178 Figure 7 6 C265 PNL Board ...
Страница 195: ...06 03 01 02 for S E ASIA 03 03 05 03 04 EPSON STYLUS COLOR 900 No 7 10056 Rev 01 ...
Страница 197: ......
Страница 198: ......
Страница 199: ......
Страница 200: ......
Страница 201: ......


