20
Initial Installation
WARNING:
Operation of this heater when not connected to a properly installed and maintained
venting system can result in carbon monoxide (CO) poisoning and possible death.
c
LeaRances
to
c
ombustibLes
:
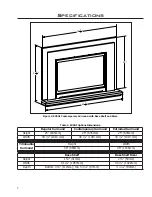
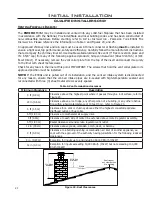
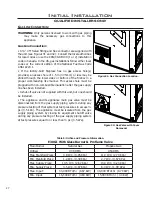
Figure 22: Mantle width and height.
Maintain sufficient clearances for operation, service and
maintenance.
• A minimum distance of 21” (533 mm) is required from
the centerline of the unit to the sidewalls.
• Minimum clearance for any combustible facing is 30”
(762 mm) from the bottom of the unit.
• A 12” (305 mm) wide mantel can be mounted at a
minimum height of 36” (914 mm) from the bottom of
unit.
• If installed at floor level there must be a minimum of
16” (406 mm) of non-combustible material in front of
the unit.
• Unit can be installed with combustible material
underneath, as long as it is raised 2 ¼” off the floor.
• Minimum ceiling clearance is 54” from bottom of unit.
m
inimum
f
iRepLace
s
ize
:
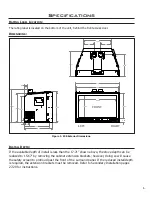
Table 3: Minimum dimensions of fireplace for E30GI to be installed into.
Width At Front
Width At Back
Height
Depth
Fireplace Dimensions
28” (711 mm)
18
1
/
2
” (470 mm)
20” (508 mm)
14
1
/
4
” (368 mm)
NOTE: Space must be provided for gas line on left side of unit for servicing purposes.
36"
(914 mm)
minimum
to bottom
of unit
12" (305mm) Mantel
30"
(762 mm)
minimum
to bottom
of unit
Combustible
Facing
D
iRect
V
ent
:
WARNING: This appliance has been designed to draw room air for proper heat circulation
from the sides and bottom of the unit, and out the top front. Blocking or modifying these
openings in any way can create hazardous situations.
The vent length for the E30GI must be between 8ft (2.44 m) and 30ft (9.14 m).
This model is vented with a 3” intake and a 3” exhaust aluminum or stainless steel flex vent leading into
a vertical termination cap. The flue collars of this model will fit inside of a standard 3” vent and must be
fastened directly to the vent with three screws.. The exhaust vent and air intake are both located on the
top of the unit.
Check periodically that the vents are unrestricted. Also ensure that all direct vent pipes have been
properly sealed and installed after routine inspection or cleaning. The air intake and exhaust pipes must
be installed in the correct locations on the top of the E30GI.
Содержание E30GI
Страница 26: ...26 Initial Installation QUALIFIED INSTALLERS ONLY 5 of 10 Figure 30 Wiring Schematic ...
Страница 44: ...44 Parts Diagram Components 1 15 2 13 3 4 16 6 7 12 5 14 19 8 20 18 17 11 10 9 ...
Страница 45: ...45 Parts Diagram Options 22 26 23 24 27 25 28 21 29 ...
Страница 46: ...46 NOTES ...

