


Mounting the Switch
2-14 Installation
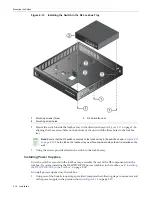
5.
Using
the
hook
&
loop
strap
provided,
thread
the
strap
through
the
mounting
tray
and
over
the
power
supply
in
the
following
order:
a.
Up
through
the
mounting
tray
bracket
at
the
side
of
the
power
supply
b. Through
the
opening
in
the
mounting
tray
flange
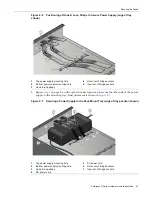
6.
Fasten
the
ends
of
the
hook
&
loop
strap
securely
around
the
power
supply.
Repeat
Step 5
and
Step 6
to
secure
a
second
power
supply.
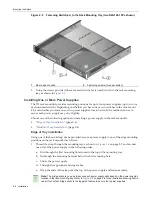
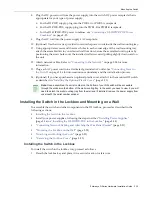
7.
(Optional)
If
mounting
a
D2
‐
HIPWR
‐
POE
to
the
wall
mounting
tray,
refer
to
Figure 2
‐
12
and
proceed
as
follows:
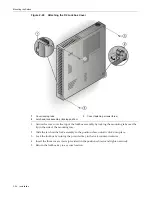
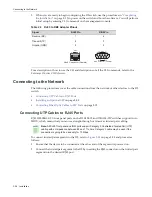
Figure 2-12 Mounting the D2-HIPWR-POE to the Wall Mounting Tray
‘‘
a.
With
the
hook
and
loop
sides
attached
together,
peel
back
the
adhesive
covering
on
one
side
of
each
hook
&
loop
fastener
and
apply
to
opposite
corners
on
the
bottom
of
the
D2
‐
HIPWR
‐
POE.
b. Once
the
hook
&
loop
fasteners
are
adhered
to
the
bottom
of
the
D2
‐
HIPWR
‐
POE,
remove
the
adhesive
covering
on
the
other
side
of
both
hook
&
loop
fasteners
and
adhere
to
the
table
mounting
tray.
c.
Firmly
press
the
D2
‐
HIPWR
‐
POE
against
the
table
mounting
tray
and
hold
together
for
a
few
seconds.
1
Hook & loop fasteners with adhesive
Содержание D2G124-12
Страница 1: ...Enterasys D Series Ethernet Switch D2G124 12 D2G124 12P Hardware Installation Guide P N 9034395 02 ...
Страница 2: ......
Страница 12: ...x ...
Страница 16: ...xiv ...
Страница 20: ...Getting Help xviii About This Guide ...
Страница 26: ...PoE Power over Ethernet Support 1 6 Introduction ...
Страница 66: ...Resetting the D2 HIPWR POE 3 4 Troubleshooting ...
Страница 74: ...Regulatory Compliance A 8 Specifications ...
Страница 76: ...Index 2 ...


