


Mounting the Switch
2-10 Installation
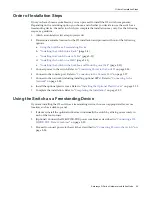
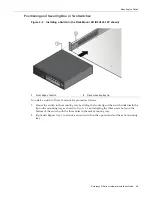
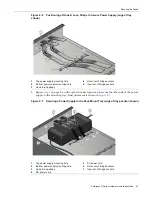
Installing the Switch Under a Table
To
install
the
switch
in
the
table
mount
kit
and
then
install
it
under
a
table,
refer
to
Figure 2
‐
9
and
proceed
as
follows:
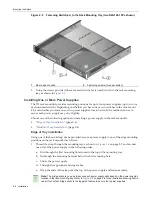
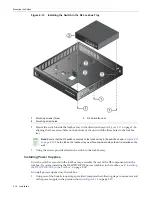
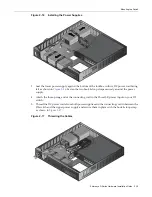
Figure 2-9 Installing the Switch in the Table Mount Kit (shown with one D2-PWR supply)
1.
Ensure
that
you
have
appropriate
screws
for
securing
the
assembled
table
mount
kit
to
your
table
location.
These
four
screws
are
required
and
are
not
provided
in
the
table
mount
kit.
Caution:
The table location and rack mounting screws/anchoring method that the installer selects
for mounting the D2 switch must be capable of supporting 60 lbs (27.2kg).
Advertencia:
La ubicación de la mesa y el método de anclaje o los tornillos de montaje del estante
que el instalador seleccione para montar el interruptor D2 deberán ser capaces de soportar un peso
de 60 lbs (27.2 kg).
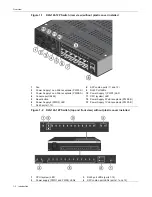
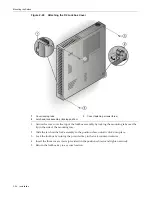
1
Table mounting screw holes (four)
6
Serial number access window
2
Switch mounting screw holes (three)
7
Power supply (D2-PWR shown)
3
AC power receptacle
8
AC power cord
4
Power supply hook & loop strap
9
Hook & loop strap through power supply mounting
holes
5
DC power cord
10
Hook & loop strap through bridge anchor
Содержание D2G124-12
Страница 1: ...Enterasys D Series Ethernet Switch D2G124 12 D2G124 12P Hardware Installation Guide P N 9034395 02 ...
Страница 2: ......
Страница 12: ...x ...
Страница 16: ...xiv ...
Страница 20: ...Getting Help xviii About This Guide ...
Страница 26: ...PoE Power over Ethernet Support 1 6 Introduction ...
Страница 66: ...Resetting the D2 HIPWR POE 3 4 Troubleshooting ...
Страница 74: ...Regulatory Compliance A 8 Specifications ...
Страница 76: ...Index 2 ...


