background image

- 27 -

Auto-run (YELLOW)

Mode

Auto-run 

(YELLOW)

EN

DE

FR

IT

ES

PL

TW

CN

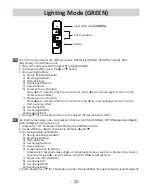
1. Press “M” un�l you reach Auto-run (YELLOW).

2. In Auto-run Mode all 10 pre-set light effects run in a loop.

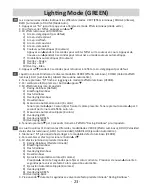
1. Drücken Sie "M", bis Sie den Auto-Run-Modus (GELB) erreichen.

2. Im Auto-Run-Modus laufen alle 10 voreingestellten Lichteffekte in einer Schleife.

1. Appuyez sur “M” jusqu’à ce que vous a�eigniez le mode auto-run (diode jaune).

2. Dans ce mode, les 10 effets lumineux prédéfinis tournent en boucle.

1. Premere “M” finchè si raggiunge la modalità Esecuzione Automa�ca (GIALLO).

2. Nella modalità Esecuzione Automa�ca tu� i 10 effe� pre-imposta� scorrono in un ciclo.

1. Presionar “M” hasta llegar a la modalidad Ejecución Automá�ca (AMARILLO).

2. En la modalidad Ejecución Automá�ca los 10 efectos predeterminados se alternan en un ciclo.

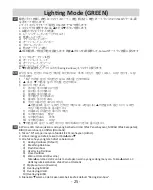
1. W trybie automatycznego uruchamiania, 10 wstępnie ustawionych efektów światła, będzie  

uruchamianych kolejno w pętli.

2. Naciśnij "M" w celu przełączenia na inne 3 tryby (efekt, szybkość i podświetlenie).

1.

自動模式下

指示燈亮黃燈

此時燈型會從當下的燈型做

10

段燈型循環變換

2.

M

鍵可切換到其他模式

1.

自动模式下

指示灯亮黄灯

此时灯型会从当下的灯型做

10

段灯型循环变换

2.

M

键可切换到其它模式

1. 

オートラン(黄色)になるまで「

M

」を押します。

2. 

オートランモードでは、

10

種のプリセットされたライトエフェクトがすべてループ内で実行されます。

1. “

M

버튼을


눌러


자동변환

(Auto-run) 

모드

(

노랑

)


선택하세요

.

2. 

자동변환

(Auto-run) 

모드에서는

10

가지


색상효과가


실행됩니다

.

1. Tekan “M” sampai menyala Mode Otoma�s (KUNING).

2. Dalam Mode Otoma�s, semua 10 efek cahaya yang telah diset sebelumnya berjalan dalam satu 

lingkaran.

JP

KR

ID

Содержание LIQFUSION 240

Страница 1: ...A l l I N O N E L I Q U I D C P U C O O L E R...

Страница 2: ...Limited Warranty Speci ca on Part list Intel Installa on Motherboard Sync RGB Control Box Re lling Coolant 1 2 3 5 16 20 30 Index...

Страница 3: ...epaid and if inspec on reveals that the product is defec ve Please present the proof of purchase for reques ng RMA Charges for removing or installing the product are excluded under the terms of this w...

Страница 4: ...00 mm 120 x 120 x 25 mm 500 2000 RPM 10 12V 0 15A 0 8A 13 71 62 1 CFM 0 19 2 95 mm H2O 14 28 dBA 4 Pin PWM 3 Pin RGB W extension adapter Dow Corning TC 5121C Radiator Tube Weight W O fan Compa bility...

Страница 5: ...ntroller Power cable SATA x 1 O 24P Power Adaptor x 1 S GIGABYTE RGB adapter x 1 P RGB Control Box x 1 J Washer x 4 L Molex Adaptor x 1 M Scraper x 1 I Set Screw x 4 D Posi on Plate x 1 Maintenance Ki...

Страница 6: ...H Fan Screw x 12 G Case Screw x 12 K PWM 3 to 1 cable x 1 N Thermal Grease x 1 J Washer x 4 L Molex Adaptor x 1 M Scraper x 1 I Set Screw x 4 D Posi on Plate x 1 Maintenance Kit Please re ll the coola...

Страница 7: ...Installation 5 A l l I N O N E L I Q U I D C P U C O O L E R...

Страница 8: ...Sie den L er und den Radiator am Geh use fest Fixez le ven lateur et le radiateur sur le ch ssis Fissare la ventola e il radiatore al case Fijar el ven lador y el radiador a la caja Zamontuj wentylato...

Страница 9: ...el LGA 2011 2011 3 2066 si prega di andare dire amente allo step 2 B Colocar los tornillos de posici n en los agujeros adecuados para el z calo de su CPU en el back plate si la plataforma de su CPU es...

Страница 10: ...z les avec les crous F boulons Installare il back plate nella parte posteriore della scheda madre posizionare le rondelle sulle vi di posizione e ssarle con i distanziali Instalar el back plate en la...

Страница 11: ...r les crous F boulons et u lisez les vis I pour les xer Collocare la piastra di posizione sui distanziali e u lizzare le vi per ssare Colocar la placa de posici n en los separadores y usar los tornill...

Страница 12: ...Collocare la piastra di posizione sui distanziali e u lizzare le vi per ssare il Socket LGA 2011 2011 3 2066 non necessita del back plate Colocar la placa de posici n en los separadores y usar los tor...

Страница 13: ...une couche uniforme de p te thermique sur la surface du CPU Applicare in modo uniforme la pasta termica sulla super cie della CPU Aplicar de forma uniforme la pasta t rmica en la super cie de la CPU N...

Страница 14: ...ie von der K hlpla e der Pumpe Re rez le lm protecteur de la plaque froide Rimuovere la pellicola di protezione dalla piastra di ra reddamento Quite la pel cula de protecci n del bloque de refrigeraci...

Страница 15: ...den Schrauben fest Placez la waterblock sur le CPU et serrez les 2 vis Posizionare il waterblock sulla CPU e avvitare le due vi Posicionar el bloque de refrigeraci n en la CPU y jar los dos tornillos...

Страница 16: ...madre Avviso se notate che il socket PWM o il socket per la ventola della CPU non forniscono un tensione su ciente per alimentare la pompa si prega di u lizzare l ada atore Molex a 4 pin in dotazione...

Страница 17: ...s am Mainboard an Branchez le connecteur du ven lateur la carte m re Collegare il conne ore della ventola alla scheda madre Conecte el conector del ven lador a la placa madre Pod cz wtyczk 4 pin PWM w...

Страница 18: ...Motherboard Sync 16...

Страница 19: ...la scheda madre fornita di conne ori RGB compa bili collegare il cavo RGB Sync alla scheda madre Si su placa base est equipada con conectores RGB compa bles conecte el cable RGB Sync a la placa base...

Страница 20: ...SION Par cons quent lorsque vous installez le refroidisseur air sur la carte m re vous devrez connecter le c ble RGB Sync l adaptateur les deux c bles sont inclus avec le LIQFUSION Connectez ensuite l...

Страница 21: ...GB Sync adapter GIGABYTE 5V RGB GIGABYTE Addressable RGB LED V D G GIGABYTE Addressable RGB LED LIQFUSION LIQFUSION RGB Sync RGB Sync adapter RGB Sync adapter GIGABYTE 5V RGB GIGABYTE Addressable RGB...

Страница 22: ...RGB Control Box 20 For non addressable RGB motherboard...

Страница 23: ...Power Supply When you install the cooler onto the motherboard please connect the RGB Sync cable to the water block and then connect the power connectors to RGB control box Meanwhile connect the SATA p...

Страница 24: ...ying RED 9 Overlaying GREEN 10 Overlaying BLUE 4 Pressing for 3 seconds will return to the default Racing Rainbow e ect Die 4 LED Farben zeigen die verschiedenen Modi an GR N Lichte ekt ROT E ektgesch...

Страница 25: ...0 e e luminosi pre imposta i 1 Racing Rainbow Default 2 Breathing Rainbow 3 Flash Rainbow 4 Overlaying Rainbow 5 Flow Rainbow 6 Esecuzione Automa ca colori 8 colori Tenere premuto per 3 secondi per ss...

Страница 26: ...nie ustawionych efekt w wiat a 1 T czowe wy cig domy lny 2 T czowe oddychaj ce 3 T czowe migaj ce 4 T czowe nak adka 5 T czowe przep yw 6 Automatyczne uruchamianie kolor w 8 kolor w Przytrzymaj przez...

Страница 27: ...ek Pencahayaan HIJAU 2 Untuk menggan efek tekan tombol atau 3 10 efek cahaya yang telah diset sebelumnya 1 Racing Rainbow Default 2 Breathing Rainbow 3 Flash Rainbow 4 Overlaying Rainbow 5 Flow Rainbo...

Страница 28: ...uyez sur ou 1 Premere M nch si raggiunge la modalit velocit e e luminosi ROSSO 2 Per cambiare la velocit degli e e luminosi premere I bo oni o 1 Presionar M hasta llegar a la modalidad Velocidad Efect...

Страница 29: ...odalit Esecuzione Automa ca GIALLO 2 Nella modalit Esecuzione Automa ca tu i 10 e e pre imposta scorrono in un ciclo 1 Presionar M hasta llegar a la modalidad Ejecuci n Autom ca AMARILLO 2 En la modal...

Страница 30: ...s pour teindre la lumi re Appuyez de nouveau sur M pour allumer la lumi re et reprendre avec l e et lumineux pr c dent 1 Premere M nch si raggiunge la modalit luminosit BLU 2 Per regolare la luminosit...

Страница 31: ...3 M M 1 M 2 3 M 3 M 1 M 2 3 M 3 M 1 Tekan M sampai menyala Mode Kecerahan BIRU 2 Untuk menyesuaikan kecerahan tekan tombol atau 3 Tekan M dalam mode apapun selama 3 de k untuk mema kan lampu Tekan M l...

Страница 32: ...Refilling Coolant 30 A l l I N O N E L I Q U I D C P U C O O L E R...

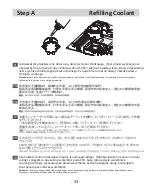
Страница 33: ...nzia Se il misuratore del usso non ruota Ogni danno causato da un uso improprio del prodo o o dall incapacit di eseguire corre amente le istruzioni del manuale non coperto da garanzia Si prega di comp...

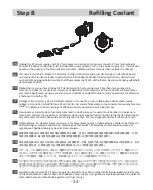
Страница 34: ...aterblock Remplissez le liquide de refroidissement ad quat dans le waterblock Apr s le remplissage fermez fermement le bouchon de remplissage du waterblock Aver ssement Si le bouchon de remplissage n...

Страница 35: ...Iuszkodzenie element w systemu Uszkodzenia tego typu nie s obj te gwarancj CPU Jika indikator aliran dak dapat diputar isi ulang pendingin Silahkan lakukan operasi ini di luar casing Longgarkan dua s...

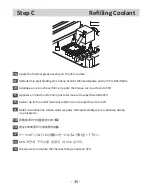
Страница 36: ...alimentatore e il conne ore a 4 pin della pompa dalla scheda madre Collegare I conne ori all ada atore a 24 pin fornito Accendere l alimentatore che alimenter la pompa facendo ruotare l indicatore di...

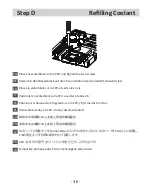
Страница 37: ...e couche uniforme de p te thermique sur la surface du CPU Applicare in modo uniforme la pasta termica sulla super cie della CPU Aplicar de forma uniforme la pasta t rmica en la super cie de la CPU Na...

Страница 38: ...n Schrauben fest Placez la waterblock sur le CPU et serrez les 2 vis Posizionare il waterblock sulla CPU e avvitare le due vi Posicionar el bloque de refrigeraci n en la CPU y jar los dos tornillos Us...

Страница 39: ...adre Avviso se notate che il socket PWM o il socket per la ventola della CPU non forniscono un tensione su ciente per alimentare la pompa si prega di u lizzare l ada atore Molex a 4 pin in dotazione e...

Страница 40: ...2020 Enermax Technology Corporation All rights reserved Technical changes printing errors and mistakes excepted...

Отзывы: