EMU SHADE PRO Скачать руководство пользователя страница 4

LINEE GUIDA PER INSTALLAZIONE DELL'OMBRELLONE SHADE

Per assicurare longevità all'ombrellone, una corretta installazione dell'ombrellone è essenziale. Ci sono due opzioni di 
installazione standard che forniscono una buona stabilità all'ombrellone SHADE PRO:
1. Installazione su BASAMENTO.
2. Installazione su BASAMENTO fissato a terra/pavimento. 

INSTALLAZIONE SU BASAMENTO

ATTENZIONE! 
Nel caso in cui si voglia installare il KIT LUCI LED ART.999. seguire esclusivamente le indicazioni 
riportate nelle istruzioni di montaggio del KIT LUCI LED ART.999.

Si raccomanda di tenere l'ombrellone legato con l'apposito laccio, per evitare che si apra durante la fase di montaggio. 
Verificare che l'ombrellone venga installato in una zona libera da ostacoli che possano impedire il suo utilizzo.
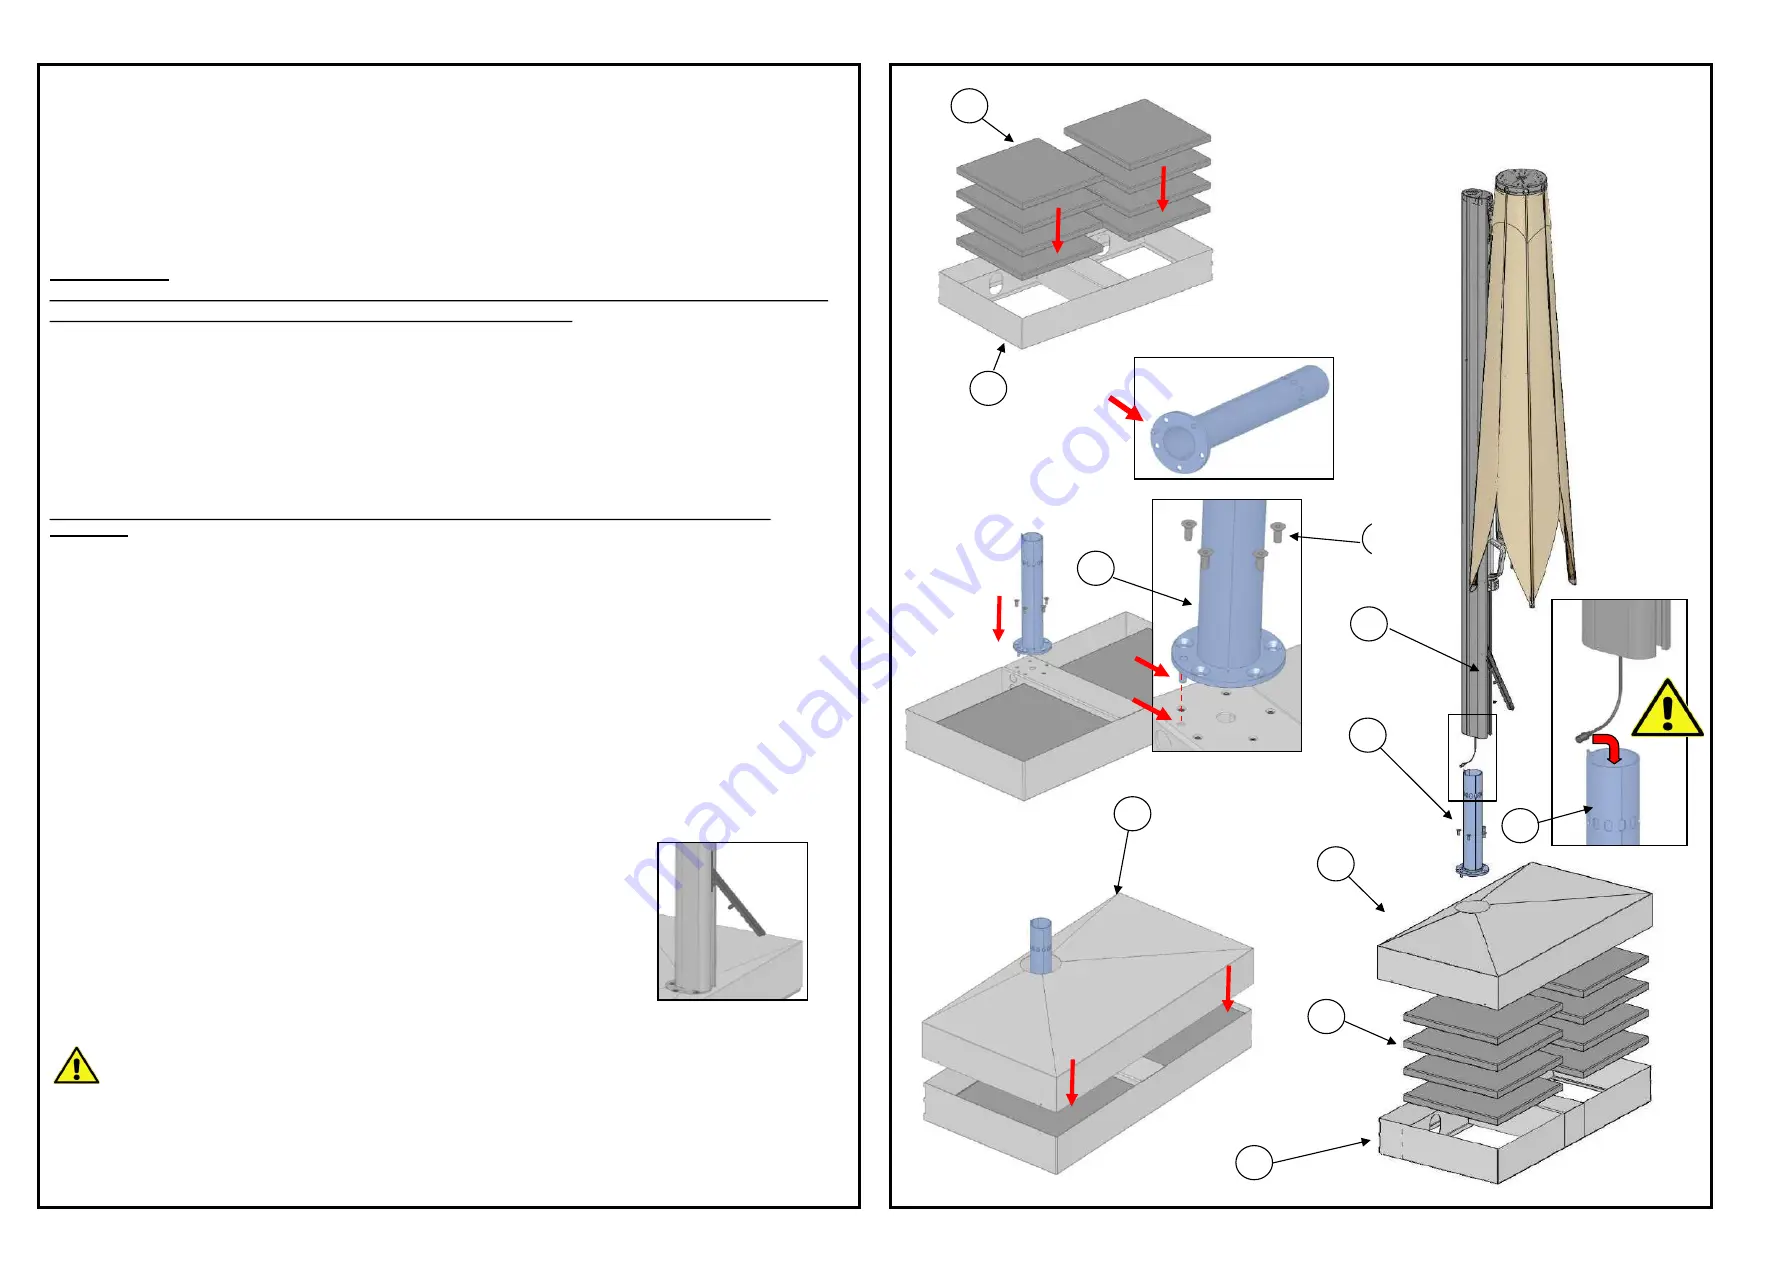
Il BASAMENTO (D) ha 5 fori filettati. Prima di assemblare l'ombrellone al BASAMENTO (D), è necessario collocare le 
MATTONELLE (C) all'interno del BASAMENTO (D) come zavorra (il numero di mattonelle consigliato per gli ombrelloni 
SHADE PRO è 8). 
I cinque fori del SUPPORTO OMBRELLONE (A) devono essere allineati ai cinque fori filettati del BASAMENTO (D). 
Fare attenzione ad assemblare il SUPPORTO OMBRELLONE (A), in modo tale da infilare il perno sul corrispondente 
foro presente nel BASAMENTO (D), come indicato in figura 2.
Successivamete procedere con il posizionamento del COVER BASAMENTO (E), calzando lo stesso attravero il 
SUPPORTO OMBRELLONE (A).
Per maggiori dettagli: consultare le istruzioni di montaggio del basamento che si trovano nella confezione del 
basamento.

INSTALLAZIONE SU BASAMENTO FISSATO A TERRA / PAVIMENTO

E' possibile fissare il basamento a TERRA, tramite dei picchetti (non inclusi nella confezione), da assemblare in 
corrispondenza dei n.4 fori presenti sulla parte inferiore del basamento. I picchetti possono essere reperiti nei negozi di 
ferramenta o specializzati nel settore.
Procedere prima nel posizionamento del basamento e nel fissaggio di n.4 picchetti, successivamente seguire le 
indicazioni sopra esposte. 

E' possibile fissare il basamento su PAVIMENTO (cemento, gres, legno, etc.), utilizzando n.4 tasselli (non inclusi nella 
confezione) la cui tipologia dipende dal tipo di materiale del pavimento stesso. E' necessario farsi consigliare presso un 
rivenditore specializzato. 
Procedere prima nel posizionamento del basamento e nel fissaggio di n.4 tasselli, successivamente seguire le 
indicazioni come sopra. 

Una volta che l'ombrellone è ben sistemato sul SUPPORTO OMBRELLONE (A), lasciare la MANIGLIA ROTAZIONE 
(4), che va a bloccare l'ombrellone sul SUPPORTO OMBRELLONE (A) stesso. 

6

5

1

3

2

D

E

A

B

C

A

B

4

E

C

D

ASSEMBLAGGIO OMBRELLONE SU BASAMENTO

Una volta installato il BASAMENTO (D) e il SUPPORTO OMBRELLONE (A), dopo aver 
serrato le VITI (B), è possibile installare l'ombrellone, infilando il PALO LATERALE (2) 
sul SUPPORTO OMBRELLONE (A). 
Durante questa operazione è NECESSARIO tenere sollevata la MANIGLIA 
ROTAZIONE (4), altrimenti non è possibile inserire il PALO LATERALE (2) sul 
SUPPORTO OMBRELLONE (A). 

Fare attenzione ad inserire il cavo elettrico che fuoriesce dal PALO LATERALE (2) dentro al SUPPORTO 
OMBRELLONE (A), in modo tale da non danneggiarlo durante l'inserimento del PALO LATERALE (2) sul 
SUPPORTO OMBRELLONE (A). Il cavo elettrico in questione è fa parte del circuito elettrico del Kit Luci 
LED art.999, e va utilizzato esclusivamente per l'installazione del Kit Luci LED art.999. 

Содержание SHADE PRO

Страница 1: ...ASSEMBLY USE INSTRUCTIONS SHADE PRO UMBRELLA ART 995 996 IST 558 EMU Group S p A 06055 Marsciano Perugia ITALY Tel 075 874021 Fax 075 8743903 e mail info emu it www emu it...

Страница 2: ...uisto del prodotto ed necessario esibire lo scontrino in originale del prodotto La garanzia non applicabile al prodotto che stato conservato o montato in modo non corretto usato in modo non adeguato c...

Страница 3: ...rellone SHADE PRO assicurarsi che si siano ricevuti tutti i componenti Se qualcosa manca o danneggiato contattare il rivenditore Fare attenzione a non danneggiare l ombrellone in fase di montaggio Uti...

Страница 4: ...PAVIMENTO E possibile fissare il basamento a TERRA tramite dei picchetti non inclusi nella confezione da assemblare in corrispondenza dei n 4 fori presenti sulla parte inferiore del basamento I picche...

Страница 5: ...i ruotare intorno al SUPPORTO OMBRELLONE A 2 Ruotare l ombrellone ruotando la MANIGLIA ROTAZIONE 4 in senso orario o antiorario ATTENZIONE Il PALO LATERALE 2 non pu ruotare per 360 per un verso di rot...

Страница 6: ...s valid from the date of purchase of the product and you must show the original receipt of the product The warranty does not apply to products that have been stored or assembled incorrectly used incor...

Страница 7: ...received your SHADE PRO umbrella make sure you have received all the components If something is missing or damaged contact your dealer Take care not to damage the umbrella during assembly Use the pack...

Страница 8: ...GROUND FLOOR It is possible to fix the base to the GROUND by means of stakes not included in the package to be assembled in correspondence with the n 4 holes on the lower part of the base Pickets can...

Страница 9: ...OTATION HANDLE 4 now the umbrella is free to rotate around the UMBRELLA SUPPORT A 2 Turn the umbrella by turning the ROTATING HANDLE 4 clockwise or counterclockwise WARNING The SIDE POST 2 cannot rota...

Страница 10: ...pr senter le re u original du produit La garantie ne s applique pas aux produits qui ont t stock s ou assembl s incorrectement utilis s de mani re incorrecte alt r s modifi s ou nettoy s l aide de pro...

Страница 11: ...Si quelque chose manque ou est endommag contactez votre revendeur Veillez ne pas endommager le parasol lors du montage Utiliser les cartons de l emballage pour viter d endommager le parasol durant le...

Страница 12: ...CHER Il est possible de fixer le socle au sol au moyen de piquets non inclus dans le paquet assembler en correspondance avec les 4 trous de la partie inf rieure du socle On peut trouver des piquets da...

Страница 13: ...ant le parasol est libre de tourner autour du SUPPORT DU PARASOL A 2 Tournez le parasol en tournant la POIGN E DE ROTATION 4 dans le sens horaire ou antihoraire ATTENTION Le M T LAT RAL 2 ne peut pas...

Страница 14: ...e Garantie ist ab dem Kaufdatum des Produkts g ltig und kann nach Vorlage des Original Kaufbelegs des Produkts in Anspruch genommen werden Die Garantie gilt nicht f r Produkte die falsch gelagert oder...

Страница 15: ...Sonnenschirms SHADE PRO dass alle Bauteile vorhanden sind Wenden Sie sich wenn etwas fehlt oder besch digt ist an Ihren H ndler Achten Sie darauf den Sonnenschirm w hrend der Montage nicht zu besch d...

Страница 16: ...UF DEM AM BODEN FUSSBODEN BEFESTIGTEN SCHIRMSOCKEL Der Schirmsockel kann mit Hilfe von Bodend beln nicht im Lieferumfang enthalten am Boden befestigt werden Diese Bodend bel sind in bereinstimmung mit...

Страница 17: ...Sonnenschirm frei um die SCHIRMH LSE A drehen 2 Den Sonnenschirm drehen indem der DREHGRIFF 4 im oder gegen den Uhrzeigersinn gedreht wird WARNUNG Der SEITENMAST 2 kann sich aus Sicherheitsgr nden nic...

Страница 18: ...s v lida a partir de la fecha de compra del producto y debe mostrar el recibo original del producto La garant a no se aplica a los productos que han sido almacenados o montados incorrectamente utiliza...

Страница 19: ...e que ha recibido todos los componentes Si algo falta o est da ado contacte con su distribuidor Tenga cuidado de no da ar la sombrilla durante el montaje Use los cartones del embalaje para evitar da o...

Страница 20: ...jar la base al SUELO por medio de estacas no incluidas en el paquete para ser ensambladas en correspondencia con los n 4 agujeros de la parte inferior de la base Las estacas se pueden encontrar en las...

Страница 21: ...ahora la sombrilla es libre de girar alrededor del SOPORTE PARA SOMBRILLA A 2 Gire la sombrilla girando el MANGO GIRATORIO 4 en el sentido de las agujas del reloj o en sentido contrario ADVERTENCIA El...

Страница 22: ......

Страница 23: ......

Страница 24: ...are one...

Страница 25: ...nelle...

Страница 26: ......

Страница 27: ......

Страница 28: ......

Страница 29: ...145...

Страница 30: ......

Страница 31: ...14...

Страница 32: ...16 ges duit...

Страница 33: ......

Страница 34: ......

Страница 35: ...22...

Страница 36: ...24 des ert uss...

Страница 37: ......

Страница 38: ......

Страница 39: ......

Страница 40: ...32 RO tas...

Страница 41: ......

Страница 42: ......

Страница 43: ......

Страница 44: ......

Отзывы: