Remo KNX
Remote Control
Item number 70746
EN
Installation and Ad justment
Страница 1: ...Remo KNX Remote Control Item number 70746 EN Installation and Adjustment ...
Страница 2: ......
Страница 3: ...ating drives and devices 6 3 3 1 Moving drives Up Down 6 3 3 2 Switching devices on off 7 3 3 3 Dimming 7 3 3 4 Changing temperature 7 3 3 5 Scenes 8 4 Care and maintenance 8 4 1 Troubleshooting 8 5 Channel setting in the ETS 9 5 1 Transfer protocol 9 5 2 Channel activation 11 5 3 Channel 1 8 11 5 3 0 1 Switching 12 5 3 0 2 Dimming 12 5 3 0 3 Shutter 12 5 3 0 4 Blinds awnings 13 5 3 0 5 Window 13 ...
Страница 4: ...leshooting of the device must only be carried out by a competent electrician Safety advice Safety advice for working on electrical connections components etc DANGER indicates an immediately hazardous situation which will lead to death or severe injuries if it is not avoided WARNING indicates a potentially hazardous situation which may lead to death or severe injuries if it is not avoided CAUTION i...
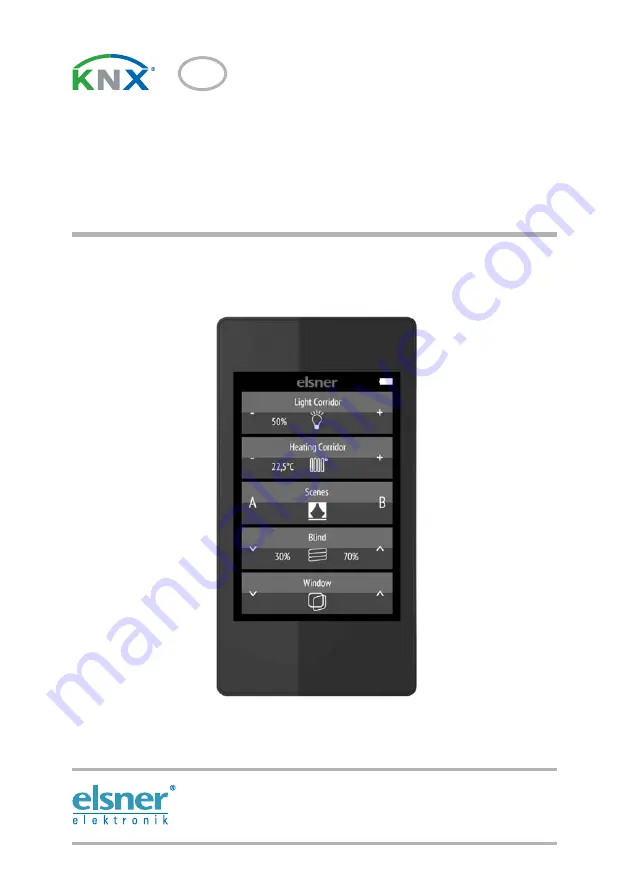
Страница 5: ...buttons can be named individually directly on the device or in the ETS The display sequence can be changed directly on the device Configuration is made using the KNX software ETS 5 The product file can be downloaded from the ETS online catalogue and the Elsner Elektronik website on www elsner elektro nik de in the Service menu If communication with wired KNX devices KNX TP is necessary a media cou...
Страница 6: ...ng Metal surfaces next to the wireless participants e g aluminium construction of a conservatory Other wireless devices and powerful local transmitters e g wireless headphones which transmit on the same frequency 868 2 MHz Please maintain a minimum distance of 30 cm between wireless transmitters for that reason Housing Plastic Colour black Protection category IP 40 Dimensions approx 64 x 122 x 11 ...
Страница 7: ...tivated within the System menu see manual chapter System The battery of the device cannot be removed or replaced When disposing of the device observe the guidelines for disposing of devices with an integrated battery 2 2 Protective film Remove the protective film from the display 2 3 Set up procedure 1 Required Configuration of the channels in the ETS version 5 and later See manual chapter Setting...
Страница 8: ... channel configuration Change channel order menu see manual Chapter Change channel order If more than five drives devices are taught the display uses several pages to show them Use the Up down arrow buttons to change page 3 3 Operating drives and devices 3 3 1 Moving drives Up Down Shutter blind awning or window Tap on the up or down arrow to position the drive The reaction of the buttons to the s...
Страница 9: ...he key the brightness stops changing The time interval between short and long and other parameters are set in the ETS If the Feedback setting is activated in the ETS the status reported by the bus on yellow symbol or off grey symbol is displayed Otherwise there is no feedback for the status The dimming percentage is shown in the button left of the symbol if the Feedback setting was activated in th...
Страница 10: ...Troubleshooting Problem The display is off the remote control does not react Problem The display is on the device drive does not react to button presses Cause Procedure Transport block active Please connect the remote control to the power supply using a charging cable This deactivates the lock Battery not charged Please connect the remote control to the power supply using a charging cable to charg...
Страница 11: ...ting in the ETS Remote control Remo KNX RF Version 14 02 2018 Technical changes and errors excepted 5 Channel setting in the ETS 5 1 Transfer protocol Abbreviations R Read W Write C Communication T Transfer U Update ...
Страница 12: ...mming Feedback Brightness Input WCTU 5 1 DPT_Scaling 1 Byte 5 17 29 41 53 65 77 89 101 113 Channel Long time Output CT 1 8 DPT_UpDown 1 Bit 6 18 30 42 54 66 78 90 102 114 Channel Short time Output CT 1 10 DPT_Start 1 Bit 7 19 31 43 55 67 79 91 103 115 Channel Position feed back Input WCTU 5 1 DPT_Scaling 1 Byte 8 20 32 44 56 68 80 92 104 116 Channel Slat feedback Input WCTU 5 1 DPT_Scaling 1 Byte ...
Страница 13: ... their as signment more recognisable in the ETS With Label for display the name that is shown on the display of the remote control can be set On the display itself however a custom name can be set at any time and the ETS name can be hidden see Wireless channel configuration 7 2 1 Changing channel name Seite 18 Object No Channel Object No Channel 121 132 11 253 264 22 133 144 12 265 276 23 145 156 ...
Страница 14: ...ould be sent to the remote control Then set the time interval between switching and dimming if desired set the repeat inter val and the percentage value for long button press Shutter If the channel should be used to control a shutter select the Shutter function and set whether after completing a movement command feedback for the movement and or slat position should be sent to the remote control Fu...
Страница 15: ...ng op tions for the individual control modes can be found in chapter 5 3 1 Control modes for drive control Seite 15 Window If the channel should be used to control a window select the Window function and set whether after completing a movement command feedback for the movement position should be sent to the remote control Set the control mode and apply the appropriate settings A description of the...
Страница 16: ...et temperature value can be sent Scene If the channel should be used to call and save scenes choose the Scene function Each channel can control two scenes one with the left button half and one with the right button half For the scene control a group address for scenes must be filed in the KNX system With this group address the output object Channel X scene A B is linked to Remo KNX RF When calling...
Страница 17: ...n comfort mode short tapping holding the button slightly longer and holding it for a long time trigger different reactions from the drive The time intervals are configured individual ly Short tap shorter than Time 1 The drive is positioned step wise and stopped Holding it slightly longer longer than Time 1 but shorter than Time 1 2 Drive running Drive stops when the button is released Long holding...
Страница 18: ...g the button beginning of Time 1 Release before Time 1 runs out Step or stop if the drive is moving Time point 1 End of Time 1 beginning of Time 2 Movement command Release after Time 1 runs out but before Time 2 is expired Stop Release after Time 1 2 runs out Movement to the end position Control mode Comfort mode Behaviour when a button is operated Push button is pressed and released before expiry...
Страница 19: ...emains on automatic switch off inactive Tap Back at the bottom edge to return to the previous settings menu Swipe from the bot tom edge upwards to close the settings menu 7 Remote control set up 7 1 Display Custom adjustment of display brightness key tone volume and automatic switch off of the display 2 30 seconds Menu Display 1 Swipe the screen from the top edge downwards to open the settings men...
Страница 20: ...he setting that you would like to adjust Carry out the adjustments as shown later in Chapters 7 2 1 Changing channel name 7 2 2 Changing channel order 7 2 2 Changing channel order and Tap Back at the bottom edge to return to the previous settings menu Swipe from the bot tom edge upwards to close the settings menu A channel can only be deactivated in the ETS The symbol is shown automatically appro ...
Страница 21: ...ange the name using the keyboard If the box Use the name from ETS download is checked the name entered in the ETS will be used Tap Cancel to leave the name changing screen without saving Tap OK to save and return to the channel name overview 7 2 2 Changing channel order Changing the display sequence of the channels Menu Wireless channel configuration Change channel order 4 Tap the Up or Down arrow...
Страница 22: ...y defaults ATTENTION Resetting to factory defaults deletes all custom settings Channel names are reset to the name specified in the ETS The configurations introduced in the ETS are permanent Channels and their functions can only be deactivated in the ETS Reprogramming Hold down Reset to factory defaults for at least 5 seconds to delete the settings saved on the remote control Transport block Hold ...
Страница 23: ...21 Remote control set up Remote control Remo KNX RF Version 14 02 2018 Technical changes and errors excepted ...
Страница 24: ...mbH Control and Automation Engineering Sohlengrund 16 75395 Ostelsheim Phone 49 0 70 33 30 945 0 info elsner elektronik de Germany Fax 49 0 70 33 30 945 20 www elsner elektronik de Technical support 49 0 70 33 30 945 250 ...