


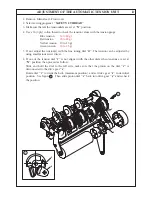


ADJUSTMENT OF THE AUTOMATIC TENSION UNIT
D
d
B
B
r
s
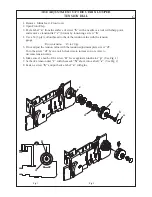
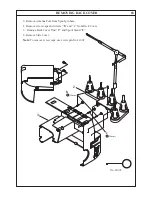
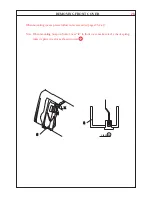
1. Remove: Mains lead - Front cover.
2. Select sewing program 1
"SAFETY 4 THREAD"
3. Make sure that all the tensiondials are set at
"N"
position
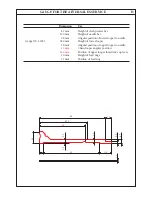
4. Use a 50 (3ply) cotton thread to check the tension values with the tension gauge.
Blue tension :
50 to 60 gr.
Red tension
:
35 to 45 gr.
Yellow tension : 10 to 15 gr.
Green tension :
20 to 25 gr.
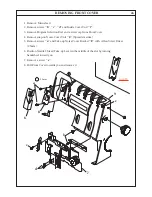
5. If not, adjust the tension(s) with the fine tuning dial
"d"
. The tension can be adjusted by
using small minus screw driver.
6. If one of the tension dial
"r"
is not aligned with the other dials when tensions are set at
"N"
position, then proceed as follow:
Slide and hold the dial to the left side, make sure that the pinion on the dial
"r"
is
disconnected to the drive gear
"s"
.
Rotate dial
"r"
towards the back (maximum position), and set drive gear
"s"
in its initial
position. See figure
B
. Then slide pinion dial
"r"
back into drive gear
"s"
and recheck
the position.
+
-
s
r
Содержание 745 -
Страница 1: ...745 845 SERVICE MANUAL 2 2 5 5 1 3 5 NA 6 0 B 1 2 1 T P T P...
Страница 12: ...1a REMOVING MACHINE BASE COVER 1 Remove Mains lead 2 Remove Machine base Unit 1 by loosening screws a a 1 a a...
Страница 18: ...a HEIGHT AND ALIGNMENT OF CLOTH PRESSER BAR 4a 5 b c 4 7mm...
Страница 24: ...TIMING OF LOWER LOOPER 8a A B C D b a 5 2mm R1 Fig 1 Fig 2 Fig 3...
Страница 35: ...MOVING CUTTER AND VERTICAL FEED TIMING 14a R1 A a B d c Fig 2 Fig 4 Fig 3 Fig 1 2mm 0 5 0 5mm 1 0 1 5mm...
Страница 51: ...ANNEX SETTING POSITIONS OF SL DF DIALS b c f d g e 2 1 C B A...
Страница 53: ...d ANNEX SETTING POSITIONS OF SL DF DIALS h i Z k j p SL Dial DF Dial Fig 3 Fig 4 i A n k a Fig 2 view Z view Z...
Страница 61: ...M E M O...


