11e
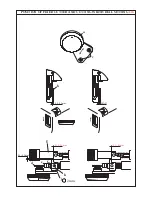
LOWER LOOPER & CHAIN LOOPER AUTOMATIC ENGAGEMENT
h
Lower Looper
Chain Looper
Washer
0.5
‘
2.0
h
b
b
a
A
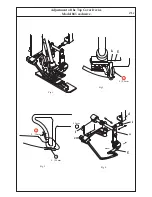
7. Lower Looper:
Turn handwheel towards you to bring lower looper to its far right position. Press lever
"a"
downwards. Turn handwheel towards you again and check if lever
"a"
returns automatically
to its initial position. If not, loosen screw
"h"
and insert a washer under the plate
"b"
to get
the gap 0.5
~
2.0 as shown in Fig. 12.
Chain Looper:
Turn handwheel towards you to bring needle bar to its lowerst position. Lift up lever
"A"
to
disengage chain looper. Turn handwheel towards you again and check if chain looper is
automatically engaged. If not, loosen screw
"h"
and slide the plate
"b"
right or left to get the
gap 0.5
~
2.0mm as shown in Fig. 13.
Note: If either lower looper or chain looper is set apart from the plate
"b"
so far or if either of
two touches the plate
"b"
, handwheel is blocked and can not be turned.
Fig.10
Fig.12
Fig.11
0.5
‘
2.0
Fig.13
Содержание 745 -
Страница 1: ...745 845 SERVICE MANUAL 2 2 5 5 1 3 5 NA 6 0 B 1 2 1 T P T P...
Страница 12: ...1a REMOVING MACHINE BASE COVER 1 Remove Mains lead 2 Remove Machine base Unit 1 by loosening screws a a 1 a a...
Страница 18: ...a HEIGHT AND ALIGNMENT OF CLOTH PRESSER BAR 4a 5 b c 4 7mm...
Страница 24: ...TIMING OF LOWER LOOPER 8a A B C D b a 5 2mm R1 Fig 1 Fig 2 Fig 3...
Страница 35: ...MOVING CUTTER AND VERTICAL FEED TIMING 14a R1 A a B d c Fig 2 Fig 4 Fig 3 Fig 1 2mm 0 5 0 5mm 1 0 1 5mm...
Страница 51: ...ANNEX SETTING POSITIONS OF SL DF DIALS b c f d g e 2 1 C B A...
Страница 53: ...d ANNEX SETTING POSITIONS OF SL DF DIALS h i Z k j p SL Dial DF Dial Fig 3 Fig 4 i A n k a Fig 2 view Z view Z...
Страница 61: ...M E M O...


