BUNDLED
ITEMS
ADV
ANCED
OPERA
TIONS
BASIC
TROUBLE SHOOTING
SPECIFICA
9,68$/35(6(17(5
L-12F / TT-12F
INSTRUCTION MANUAL
Please read this instruction manual carefully
before using this product and keep it for future
reference.
Страница 1: ...NCED OPERATIONS BASIC OPERATIONS TROUBLE SHOOTING SPECIFICA TIONS 9 68 35 6 17 5 L 12F TT 12F INSTRUCTION MANUAL Please read this instruction manual carefully before using this product and keep it for...
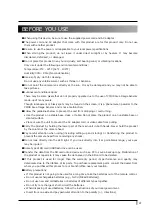
Страница 2: ...t basement or near a swimming pool and the like Placement Do not place this product on an unstable cart stand tripod bracket or table The product may fall causing serious injury to a child or adult an...
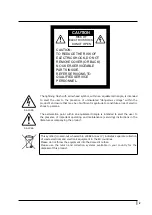
Страница 3: ...t defeat the safety purpose of the grounding type plug Power Cord Protection Power supply cords should be routed so that they are not likely to be walked on or pinched by items placed upon or against...
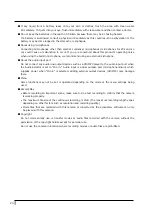
Страница 4: ...rols may result in damage and will often require extensive work by a qualified technician to restore the product to its normal operation If the product has been dropped or damaged in any way When the...
Страница 5: ...t operating and maintenance servicing instructions in the literature accompanying the product This symbol crossed out wheeled bin WEEE Annex IV indicates separate collection of waste electrical and el...
Страница 6: ...vironment This equipment generates uses and can radiate radio frequency energy and if not installed and used in accordance with the instruction manual may cause harmful interference to radio communica...
Страница 7: ...nstable base or slanted surface Place or wire the unit to prevent the AC adapter cord or video cable from pulling Carry the product by holding the lower part of the main unit in both hands Never hold...
Страница 8: ...h as a CD MP3 player to the audio input port when the Audio Selector is set to Mic in Audio input is a dual purpose port microphone line in which supplies power when Mic in is selected adding external...
Страница 9: ...viii...
Страница 10: ...e 12 2 3 Shooting images 14 Setting up the product 14 Connecting the power cord 14 Connecting the video cable 15 Turn on off the power 15 Adjusting the size 16 Adjusting the brightness 17 Turning on o...
Страница 11: ...erations of the pen tablet 49 Selecting how to use the pen tablet from the tablet menu 51 Connection with the portable IWB 52 Basic operations of the portable IWB 53 Using the pen tablet or portable I...
Страница 12: ...able fixture 2 USB3 0 cable for Connecting to PC AC cord P 14 AC adapter P 7 Cable tie 2 RC VL Quick Start Guide Quick Start Guide 3S Service Registration Form 3S Service Registration Form 1 3S Servic...
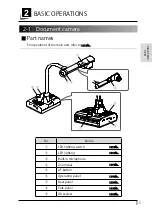
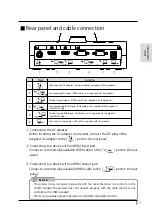
Страница 13: ...1 Document camera Part names For operations of the main unit refer to P 14 No Name LED lighting switch P 18 LED lighting P 18 Built in microphone Zoom dial P 16 AF button Operating panel P 6 Rear pan...
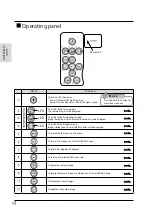
Страница 14: ...played LED To switch to the Playback mode Images stored in an SD card USB flash drive will be displayed To show hide the menu on the screen P 20 To save a still image on an SD card USB flash drive P 3...
Страница 15: ...plied with the product Connecting the AC adapter Before inserting the AC adapter in an outlet connect the DC plug of the supplied AC adapter to the port on the rear panel Connecting to a device with a...
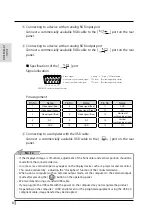
Страница 16: ...3 Horizontal synchronizing signal 4 N C 9 N C 14 Vertical synchronizing signal 5 GND 10 GND 15 N C Connecting to a computer with the USB cable Connect a commercially available USB cable to the port on...
Страница 17: ...rcially available electret condenser microphone To insert an SD card commercially available Push the card again to remove the SD card To connect the wireless pen tablet sold separately or a USB flash...
Страница 18: ...10 BASIC OPERATIONS Moving parts of the document camera The product can be moved as shown below...
Страница 19: ...button Receivable range Distance Within approx 7m from the front of the IR receiver Angle Within 45 up down left and right of the IR receiver RC VLH RC VLH RC VLH 4 5 45 45 45 45 4 5 45 45 45 Use a c...
Страница 20: ...to the HDMI port remove the screw above the HDMI port Attach the fixture and tighten the screw Pass the cable tie through the fixture and tie it around the plug of the HDMI cable Fixture For HDMI cabl...
Страница 21: ...ie around the root of the cable and pull it tight Remove the screw above the HDMI port and connect the HDMI cable Attach the fixture and tighten the screw Caution Depending on the shape of the plug th...
Страница 22: ...own in the figure above Then connect the product to a projector or a monitor and turn on the power of the product P 15 Connecting the power cord Connect the power cord and the AC adapter Then connect...
Страница 23: ...n on the power The Power LED will flash blue first Then it will turn blue after several seconds Press the button on the operating panel or the button on the remote control to turn off the power You ne...
Страница 24: ...on the remote control Zoom dial Zoom 287 smaller Zoom 1 larger AF button RC VL Zoom ratio 24x Optical zoom 12x Sensor zoom 2x Digital zoom 12x Total 288x zoom The sensor zoom does not work when the o...
Страница 25: ...VV RI WKH LPDJH LV GLIIHUHQW To reset the brightness setting to factory default setting press the buttons on the operating panel at the same time In places where the object is exposed to bright sunlig...
Страница 26: ...f people set the LED lighting switch to off Make sure that the light from the LED lighting does not shine directly into the eyes This product is equipped with a high brightness LED You can safely use...
Страница 27: ...ing a computer with an external output mode set the computer to the external output mode after pressing the button on the operating panel or the button on the remote control When the button on the ope...
Страница 28: ...3 separate menus displayed on the screen Settings menu System Setting Image Quality Setting etc Support Function menu Highlight Mask etc Hide display menu icon Settings Move the cursor on the menu sc...
Страница 29: ...ing environment is too bright The flickering may be reduced OFF Sound switch Built in mic To set the audio source to the built in microphone monaural External mic To set the audio source to the extern...
Страница 30: ...sion type to H 264 HEVC To set the video compression type to H 265 Video mode NORMAL rec To continuously record the video Time lapse rec To create a video by combining multiple photos taken at certain...
Страница 31: ...window will be displayed asking if you want to restart the product NO Format SD YES To perform a quick format of an SD card If Yes is selected a confirmation window will be displayed asking if you wa...
Страница 32: ...y Save To record a still image on the internal memory Tap Save to record Play Auto wake up ON When this setting is set to ON the product automatically starts up after the AC power is supplied OFF Defa...
Страница 33: ...The white balance is adjusted automatically to ensure a more natural color according to the characteristics of the object One push To automatically adjust the white balance only once when this settin...
Страница 34: ...ame Selection item Function Camera Information Product Name To display the product name Serial Number To display the serial number of the product Procuct Version To display the version of the firmware...
Страница 35: ...mage together in one screen A still image saved in an SD card or USB flash drive is displayed on the left side of the screen and the camera image on the right Hide menu To hide the menu Press the MENU...
Страница 36: ...ght Hide menu To hide menu icons Press the MENU button to display menu icons again Return To finish the mask function Microscope mode Icon Name Function Hide menu To hide the menu icons Press the MENU...
Страница 37: ...ck mode is displayed the highlight function works The highlight function can be cancelled by selecting the button Setting operations By using Expansion and Shrink in the menu you can change the size o...
Страница 38: ...de is displayed the mask effect is applied You can move the masked area by pressing the Enter button on the operating panel or button on the remote control after moving the cursor to the left or to th...
Страница 39: ...ive camera images Compare Picture operations When Compare Picture in the menu displayed by pressing the MENU button either on the remote control or the operating panel is pressed while the camera imag...
Страница 40: ...itched by selecting the MENU button The compare picture function can be cancelled by selecting Return in the menu and the list of still images is displayed again The compare picture function cannot be...
Страница 41: ...drive internal memory For video recording an SD card with class10 speed or above is required You can select the video compression method HEVC H 265 H 264 from the System Setting About SD card The SDX...
Страница 42: ...ayed Select Yes to execute formatting Select No if you do not want to execute formatting N o t e Recording Still image Basic operations Press the button on the operating panel or the button on the rem...
Страница 43: ...nel or the button on the remote control Make sure that the menu is not displayed on the screen and press the button on the operating panel or the button on the remote control If the menu is displayed...
Страница 44: ...menu if necessary When recording a video use a memory card SD card or USB flash drive with a faster read write speeds in case of SD card Class 10 or above or the image quality may deteriorate How to...
Страница 45: ...select the media and file type SD still image SD video USB still image Select the desired media and file type to display the thumbnails list of still images videos How to move the cursor 1 You can mo...
Страница 46: ...previous thumbnail page Next Page To move to the next thumbnail page Delete To delete all the files selected Tap the Prev Menu icon to exit the File delete mode It is possible to select files across...
Страница 47: ...ls Full screen image Basic operations Display the list of thumbnails in the Thumbnail menu From the USB SD menu select SD still image or USB still image to display the list of thumbnails Each menu wil...
Страница 48: ...want to hide the menu press the MENU button on the remote control or the operating panel The image to be displayed can be switched by pressing the button after selecting the image by using the Previou...
Страница 49: ...e display menu Icon Name Function Previous To display the previous still image Next To display the next still image Delete If this icon is selected a confirmation window will be displayed asking if yo...
Страница 50: ...ENU button to display the menu Return Mask Icon Name Function Left To move the mask left This icon will be displayed when the mask is in horizontal position Right To move the mask right This icon will...
Страница 51: ...Full screen image Basic operations Display the list of thumbnails in the Thumbnail menu From the USB SD menu select SD video to display the list of thumbnails The Thumbnail menu will also be displaye...
Страница 52: ...ll screen Press the button on the operating panel or the button on the remote control The product will start to play the selected video automatically To return to the thumbnail display press the butto...
Страница 53: ...he button on the operating panel or the button on the remote control and confirm with the button Menu descriptions Video playback menu Icon Name Function Play To play pause the video Pause Up To set t...
Страница 54: ...s other than DCF system compliant files and file structures Video files that have the file name other than MOV_ MP4 cannot be displayed should be numbers Many but not all images taken by other digital...
Страница 55: ...cause a malfunction We recommend using a USB 3 0 compliant USB cable When you display the UVC video stream it may take a while before the image is displayed Be sure not to turn off the power of the p...
Страница 56: ...camera images directly You can also directly perform such operations as zooming in out with the product Connection with the wireless pen tablet LUHOHVV SHQ WDEOHW VROG VHSDUDWHO Set up the product as...
Страница 57: ...rsor 3 Select a menu button Drawing If or is selected the pen will draw a line Use this function to draw or erase lines Keep pressed down Keep pressed down Moving the cursor Move the pen slightly abov...
Страница 58: ...ouch once Caution Press the tablet lightly with the pen do not press hard Hold the pen as upright as possible holding the pen at an angle may result in a failure of the tablet to recognize the pen If...
Страница 59: ...e Function Write to work with camera images Camera mode To display the document camera image as a background and draw on it with the pen tablet P 56 Write on a white screen Whiteboard mode To display...
Страница 60: ...t up the product as shown in the figure above and connect to the projector and then turn on the power Connect the special wireless adapter supplied with the portable IWB to the product For information...
Страница 61: ...LQ WKH SHQ 3HQ 7LS HIW PRXVH EXWWRQ XWWRQ 5LJKW PRXVH EXWWRQ XWWRQ DQFHO GXULQJ FDOLEUDWLRQHO Recognition of the write range calibration Hold down Button 1 on the pen for three seconds or more near th...
Страница 62: ...is no pen operation for more than 30 seconds during the calibration N o t e Drawing Touch the pen to the portable IWB installed whiteboard and move it When is selected a line is drawn along with the...
Страница 63: ...icon in the menu Caution Touch the whiteboard lightly with the pen Do not press hard on the whiteboard Holding the pen at an extreme angle may result in a failure of the whiteboard to recognize the po...
Страница 64: ...n tablet or portable IWB to draw on the camera image You can draw on camera images Menu descriptions The menu changes each time is pressed If you want to hide the menu press the MENU button on the rem...
Страница 65: ...the Erase button of the pen Setting To configure the settings for Pen and Eraser Next To go to Main menu2 Main menu2 Icon Name Function Camera mode To display the document camera image as a backgroun...
Страница 66: ...ick To increase the pen thickness Pen2 Color Red To set the pen color to red Blue To set the pen color to blue Black To set the pen color to black Pen2 Thickness Thin To decrease the pen thickness Med...
Страница 67: ...microscope P 31 Compare Picture To display the selected images together in one screen Max 4 images can be selected The USB SD screen is displayed Select the images to be displayed in split screen P 3...
Страница 68: ...ear Screen To erase anything drawn on the screen If you need to erase a part of a drawing move the cursor to the section to be erased and touch the section with the pen while pressing the Erase button...
Страница 69: ...the pen thickness to medium width Thick To increase the pen thickness Pen2 Color Red To set the pen color to red Blue To set the pen color to blue Black To set the pen color to black Pen2 Thickness Th...
Страница 70: ...lens GMXVW GMXVW 0LFURVFRSH DWWDFKPHQW OHQV VROG VHSDUDWHO Microscope mode operations When the Microscope icon in the menu displayed by pressing the MENU button on the remote control or the operating...
Страница 71: ...the focus and brightness Attach the microscope attachment lens Attach the microscope attachment lens to the eyepiece Match the centers of the microscope attachment lens and eyepiece and use the three...
Страница 72: ...each other Adjust the brightness Adjust the brightness with the mirror or the light on the microscope Adjust the display range Adjust the display range Adjust the focus Focus a camera Exiting the Micr...
Страница 73: ...ing a WF type eyepiece If you do not use a WF type we recommend using an eyepiece of 10x or less You can use the microscope attachment lens when the external diameter of the eyepiece is 20 to 28mm Use...
Страница 74: ...AUTO This works when the resolution setting is set to AUTO If you turn the power ON immediately after turning it OFF the product may not start Wait for several seconds after turning the power OFF and...
Страница 75: ...puter Second format the card using the product Drawing speed of the tablet is too slow Drawing speed may become slow depending on the resolution setting of the unit This is not a malfunction UVC image...
Страница 76: ...has significantly diminished consult the dealer from whom you purchased this product or our nearest branch office for replacement About long term usage of this product Due to the lifetime of its part...
Страница 77: ...IR receiver function of the remote control Check the performance in advance Depending on the type and length of the cable used there may be distortion of the image Check the performance in advance We...
Страница 78: ...female x 1 HDMI output terminal x 1 Line out terminal 3 5mm stereo minijack x 1 Input terminal RGB input Mini Dsub 15P connector female x 1 HDMI input terminal x 1 Mic in Line in terminal 3 5mm stereo...
Страница 79: ...rizontal 3520 Vertical 2640 30fps Resolution HDMI 3840 2160 1920 1080 1280 720 RGB 1920 1080 1280 720 1024 768 USB 3840x2160 1920 1080 1280 720 3200 2400 1600 1200 1024 768 640 480 White balance Auto...
Страница 80: ...licensed from MPEG LA LLC Additional information including that relating to promotional and commercial uses may be obtained from MPEG LA LLC Unless used for personal use it is prohibited by copyright...
Страница 81: ...0 Fax 516 501 0429 E mail elmo elmousa com Web https www elmousa com ELMO Europe SAS Headquarters 12 place de la D fense Maison de la D fense 92974 Paris la D fense Cedex FRANCE Tel 33 0 1 73 02 67 06...