


Installation & Maintenance Manual (1000005506 Rev D)
13
Elkay Manufacturing Company
b. Plug an Ethernet cable into the back of the unit and
into the Wi-Fi extender.
514
c. Follow the manufacturer's directions for setting up
the unit. The remaining setup will occur during the
setup process for the Smartwell.
11. Attach the power cord and then plug it into the
electrical wall receptacle. Turn the main power switch
ON.
399
12. Open the water supply valve and purge the trapped
air from the water lines.
Note: To flush out trapped air, allow water to run
continuously until the flow is free of air bubbles.
NOTICE
Water pressure that does not
meet the minimum pressure
requirement of 40 psi can cause damage to the
internal components. Low pressure may also
affect the performance of the unit and the taste of
the beverage.
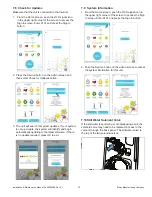
a. Place a container under the dispenser nozzle.
b. Press the Still water button on the touch screen
and begin dispensing water.
c. Dispense a minimum of two gallons of still water to
purge trapped air from the internal water line and
the filter. This will also fill the filter cartridge and
flush out fine carbon particles from the new filter.
d. Press the Sparkling Water button on the touch
screen and dispense about 15 ounces of water.
Wait about 30 seconds to allow the carbonator tank
to refill. Dispense another 15 ounces of water. Wait
another 30 seconds to allow the carbonator tank to
refill.
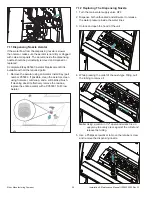
13. Connect the CO
2
tank to the unit.
a. Install and secure the CO
2
tank per the
manufacturer’s recommendations using the
supplied wall bracket.
50
8
b. Install the supplied regulator valve onto the CO
2
tank.
c. Cut the supplied CO
2
tubing to the appropriate length.
Note: Ensure there is sufficient excess tubing to
accommodate the need to access and replace
tanks in the future.
d. Connect the 1/4" poly tube to the CO
2
inlet on the
back of the unit.
493