10
set the two current levels for welding, "slope up" and "slope
down" (fig. 3 ref. N and fig. 3 ref. I), by turning the encoder and
pressing the value to set it.
SPOT WELDING
Select the welding current (fig. 5 ref. A)
and the spot welding time (fig. 5 ref. B), turning encoder
S1
to
select the required parameter and pressing it to set the values.
For this welding method, press the button on the torch and the
arc ignites; the arc is extinguished automatically at the end of the
set spot welding time. To do the next spot, release the torch
button and then press it again.
Fig.5
TYPE OF ARC IGNITION: only for items 166-168.
Using
encoder
S1
, select this icon to access the ignition menu and
choose between the following options:
START WELDING FROM EDGE WITH THIN MATERIAL
START WELDING FROM CENTRE WITH THIN
MATERIAL
START WELDING FROM CENTRE WITH THICK
MATERIAL
DIAMETER OF ELECTRODE: only for items 166-168.
This is to set ignition in relation to the diameter of the electrode.
AC FREQUENCY: only for items 166-168.
This is to set
the frequency of the alternating current between 10 and 150Hz.
WAVE BALANCE CONTROL: only for items 166-168.
This is to set cleaning between -8 and 0, or penetration between
0 and 8.
3.4. WELDING OPTIONS (AVAILABLE ONLY FOR TIG
WELDING)
In order to select the welding options, it is necessary to first set
the TIG, normal or high frequency welding method. Select the
options icon irrespective of the procedure (fig. 3 ref. E) by turning
and pressing the encoder, and select an option from among the
following:
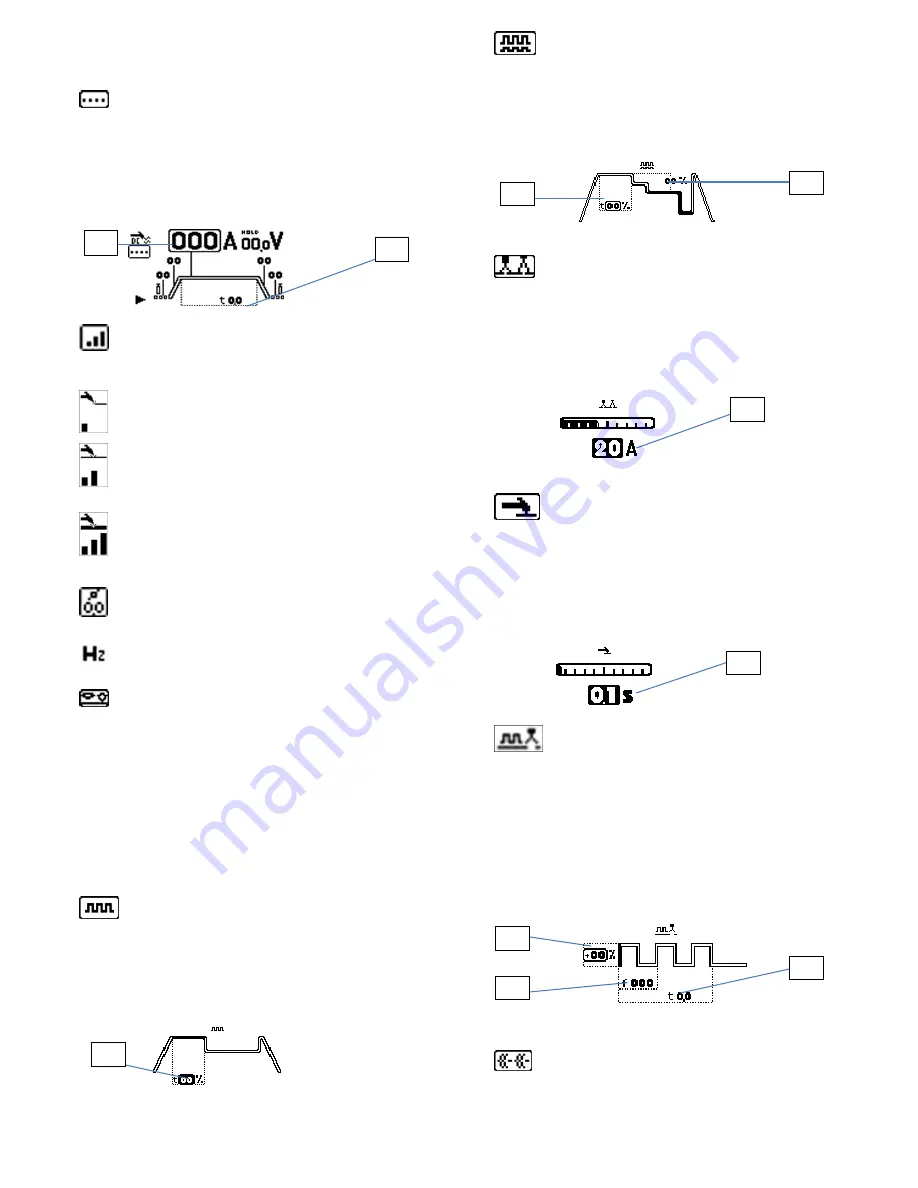
PULSE WELDING OPTION.
Set the main welding
current (fig. 3 ref. N), the basic current (fig. 3 ref. G) and the
pulse frequency (fig. 3 ref. H). Using encoder
S1
, select the
options sub-menu (fig. 3 ref. D) and set the duration of the main
current as a percentage of the period (fig. 6 ref. A) between 20
and 80%.
Fig.6
E-TWO PULSE WELDING OPTION (OPTIONAL).
Set the welding parameters as for the pulse option. Using
encoder
S1
, select the options sub-menu (fig. 3 ref. D) and
set the duration of the peak current as a percentage of the
period (fig. 7 ref. A) and the ratio as a percentage of
reduction of the second pulse in relation to the first (fig. 7 ref.
B).
Fig.7
E-ARC WELDING OPTION (OPTIONAL) ONLY DC
TIG
. Smart welding arc that permits control of the current and
weld seam in DC, by simply moving the torch. Before starting
the welding procedure, set the welding current (fig. 3 ref. N)
and, using encoder
S1
, select the options sub-menu (fig. 3
ref. D) and adjust the current variation controlled by lifting or
lowering the torch during welding. The parameter can be set
between 1 and 50 A (fig. 8 ref. A).
fig.8
E-SPOT WELDING OPTION (OPTIONAL) ONLY
DC TIG
.
Special spot welding available only with the DC
contact welding method, which greatly reduces the thermal
input and makes it easy to obtain white and glossy welding
spots on sheet metal that can be difficult to spot weld, like
stainless steel. Set the welding current (fig. 3 ref. N) and
then, using encoder
S1
, select the options sub-menu (fig. 3
ref. D) and adjust the spot-welding time. The parameter can
be set between 0.01 and 9.90 sec (fig. 9 ref. A).
Fig.9
E-START WELDING OPTION (OPTIONAL) ONLY
DC TIG.
Pulse start available only for the DC welding method
with high frequency ignition. This is ideal for optimizing the
spot welding of sheet metal during the initial welding phase.
Set the welding current (fig. 3 ref. N). Using encoder
S1
,
select the options sub-menu (fig. 3 ref. D) and set the
percentage of the second pulse welding current in relation to
the first (fig. 10 ref. A) between -50% and + 99%, the welding
frequency (fig. 10 ref. B) between 50 and 200 Hz, and the
spot welding time (fig. 10 ref. C) between 0.1 and 9.9 sec.
Fig.10
E-MULTIPOINT WELDING OPTION (OPTIONAL)
ONLY DC TIG
.
This is a new pulse welding system used only for the DC
welding method with high frequency ignition, that permits
quick alternation between the work time and the pause time
A
A
A
B
A
B
A
A
B
C


