background image

Thank you for choosing ELECTROHOME® Consumer Electronics Products!

ELECTROHOME gives the following express warranty to the original consumer purchaser or gift recipient for this ELECTROHOME 
product, when shipped in its original container and sold or distributed by ELECTROHOME or by an Authorized ELECTROHOME Dealer: 
ELECTROHOME warrants that this product is free, under normal use and maintenance, from any defects in material and workmanship. 
If any such defects should be found in this product within the applicable warranty period, ELECTROHOME shall, at its option, repair or 
replace the product as specified herein. Replacement parts furnished in connection with this warranty shall be warranted for a period 
equal to the unexpired portion of the original equipment warranty.

This warranty shall not apply to:

A.  Any defects caused or repairs required as a result of abusive operation, negligence, accident, improper installation or 

inappropriate use as outlined in the owner’s manual.

B. 

Any ELECTROHOME product tampered with, modified, adjusted or repaired by any party other than BlueTronics Group or 
ELECTROHOME’s Authorized Service Centres.

C. 

Damage caused or repairs required as a result of the use with items not specified or approved by ELECTROHOME, including 
but not limited to head cleaning tapes and chemical cleaning agents.

D.  Any replacement of accessories, glassware, consumable or peripheral items required through normal use of the product 

including but not limited to earphones, remote controls, AC adapters, batteries, stylus, trays, filters, cables, paper, cabinet, 
cabinet parts, knobs, buttons, baskets, stands and shelves.

E. 

Any cosmetic damage to the surface or exterior that has been defaced or caused by normal wear and tear.

F. 

Any damage caused by external or environmental conditions, including but not limited to transmission line/power line 
voltage or liquid spillage.

G. 

Any product received without appropriate model, serial number and CSA /cUL /cULus /cETL /cETLus markings.

H. 

Any products used for rental or commercial purposes.

I. 

Any installation, setup and/or programming charges.

Should this ELECTROHOME product fail to operate during the warranty period, warranty service may be obtained upon delivery 
of the ELECTROHOME product together with proof of purchase and a copy of this LIMITED WARRANTY statement to an Authorized 
ELECTROHOME Service Centre. In-home warranty service may be provided at ELECTROHOME’s discretion on any ELECTROHOME 
television with the screen size of 40” or larger. This warranty constitutes the entire express warranty granted by ELECTROHOME and 
no other dealer, service centre or their agent or employee is authorized to extend, enlarge or transfer this warranty on behalf of 
ELECTROHOME. To the extent the law permits, ELECTROHOME disclaims any and all liability for direct or indirect damages or losses or 
for any incidental, special or consequential damages or loss of profits resulting from a defect in material or workmanship relating to 
the product, including damages for the loss of time or use of this ELECTROHOME product or the loss of information. The purchaser will 
be responsible for any removal, reinstallation, transportation and insurance costs incurred. Correction of defects, in the manner and 
period of time described herein, constitute complete fulfillment of all obligations and responsibilities of ELECTROHOME Electronics to 
the purchaser with respect to the product and shall constitute full satisfaction of all claims, whether based on contract, negligence, 
strict liability or otherwise.

1 YEAR PARTS & LABOUR WARRANTY PERIODS

TO OBTAIN THE NAME AND ADDRESS OF THE NEAREST AUTHORIZED ELECTROHOME SERVICE CENTRE OR FOR MORE 

INFORMATION ON THIS WARRANTY

Contact ELECTROHOME Support by:

• 

Support: www.electrohome.com/support

• 

Website: www.electrohome.com

• 

By mail: ELECTROHOME Customer Service, 4080 Montrose Road, Niagara Falls, ON L2H 1J9

ELECTROHOME is a registered trade-mark of Circus World Displays Limited 04.2013

- 17 -

- 16 -

WARRANTY

CARE AND MAINTENANCE

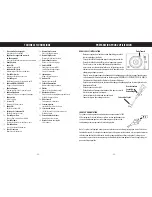
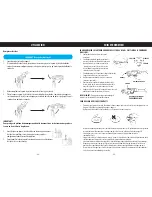
TONE ARM ADJUSTMENT

The auto-return point of the tone arm has been preset by the factory, however, if the tone arm auto-returns before 
the end of the album please make the following adjustments.  You will need a small Phillips screwdriver. Turn the 
adjustment screw clockwise  ¼ turn and test auto-return. Please make further adjustments as needed.

Making the adjustment

Clockwise turn = Moves Tone Arm to center of album

Counter-clockwise turn = Moves Tone Arm to 

outer-edge of album

Turn unit ON

Peel off the Service sticker

EANOS501/EANOS502  OPERATION  DIFFERENCE

POWER  ON/OFF

1,  Press  the  power  ON/OFF  button  on  the  back 

of  the  unit  to  the  position’-’  to

turn  on  the  unit;

2,  Press  the  power  ON/OFF  button  on  the  back 

of  the  unit  to  the  poistion’0’to

turn  off  the  unit;

AUX  IN  OPERATION

Rotate  the  AM/FM/CD/PH/AUX  to  ‘AUX’ 

position  and  connect  your  MP3  player 

or  smartphone  with  the  ‘AUX  IN’  input 

at  the  back  side  of  the  unit  via  an  aux  in 

cable.

ON - OFF

MARCHE - ARRÊT

EANOS501/EANOS502  OPERATION  DIFFERENCE

POWER  ON/OFF

1,  Press  the  power  ON/OFF  button  on  the  back 

of  the  unit  to  the  position’-’  to

turn  on  the  unit;

2,  Press  the  power  ON/OFF  button  on  the  back 

of  the  unit  to  the  poistion’0’to

turn  off  the  unit;

AUX  IN  OPERATION

Rotate  the  AM/FM/CD/PH/AUX  to  ‘AUX’ 

position  and  connect  your  MP3  player 

or  smartphone  with  the  ‘AUX  IN’  input 

at  the  back  side  of  the  unit  via  an  aux  in 

cable.

Adjustment screw

Plug in unit

EANOS501/EANOS502  OPERATION  DIFFERENCE

POWER  ON/OFF

1,  Press  the  power  ON/OFF  button  on  the  back 

of  the  unit  to  the  position’-’  to

turn  on  the  unit;

2,  Press  the  power  ON/OFF  button  on  the  back 

of  the  unit  to  the  poistion’0’to

turn  off  the  unit;

AUX  IN  OPERATION

Rotate  the  AM/FM/CD/PH/AUX  to  ‘AUX’ 

position  and  connect  your  MP3  player 

or  smartphone  with  the  ‘AUX  IN’  input 

at  the  back  side  of  the  unit  via  an  aux  in 

cable.

Service 

sticker

1

Raise the lid to expose the record player

Lock Tone Arm

2

Содержание WINSTON EANOS501

Страница 1: ...is manual in a safe place for future reference Merci d avoir fait l achat de cet appareil Electrohome Veuillez lire ce manuel attentivement avant de faire fonctionner l appareil pour vous assurer de l utiliser correctement Conservez ce manuel dans un endroit sûr afin de pouvoir vous y référer au besoin MANUAL MANUEL WINSTON RETRO STEREO SYSTEM SYSTÈME DE MUSIQUE RÉTRO WINSTON ...

Страница 2: ...OMPACT DISCS 15 TONE ARM ADJUSTMENT 16 MAKING THE ADJUSTMENT 16 WARRANTY 17 INSTRUCTIONS DE SÉCURITÉ IMPORTANTES 18 CE QUI EST INCLUS 20 DISPOSITIFS 20 TOUCHES ET CONNEXIONS 20 PRÉPARATION POUR L UTILISATION 23 DÉBALLAGE ET INSTALLATION 23 SOURCE D ALIMENTATION 23 UTILISATION 24 LEVER ET BAISSER LE COUVERCLE IMPORTANT 24 PROTÉGER VOS MEUBLES 24 ÉCOUTEURS 24 ÉCOUTER LA RADIO 24 UTILISER LA FONCTION...

Страница 3: ...CKS DEFEATED AVOID EXPOSURETO BEAM Avoidinstallingthisunitinplacesexposedtodirectsunlightorclosetoheatradiatingappliancessuchaselectric heaters ontopofotherstereoequipmentthatradiatestoomuchheat placeslackingventilationordustyareas placessubjecttoconstantvibrationand orhumidormoistareas Donotattempttocleanthisunitwithchemicalsolventsasthismightdamagethefinish Useacleandrycloth Operatecontrolsandsw...

Страница 4: ...aysVinyl Records CDs MP3s via AUX Input High Performance Dynamic Speakers Full Size 3 Speed Record Player Elegant RealWood Finish Vintage RotaryTuning Dial for AM FM Radio Main Unit 1 2 3 BUTTONS AND CONNECTIONS Control Panel Back of Unit Turntable 26 27 29 24 30 25 31 32 28 4 5 6 7 12 8 11 9 10 13 14 15 16 17 20 18 19 22 23 21 ...

Страница 5: ... played at 31 Tone Arm Lock Locks stylus arm 32 Tone Arm with Stylus Plays records BUTTONS AND CONNECTIONS Transit Screw UNPACKING AND SETUP Carefullyremovetheunitfromthedisplaycarton andremoveallpackingmaterialfromtheunit UnwindtheACpowercordandextendittoitsfull length UnwindtheFMAntennawireandextendittoits fulllength Placetheunitonastable levelsurface closeto anACoutlet outofdirectsunlight andaw...

Страница 6: ...rection of this antenna for the best reception AUX IN OPERATION Listen to music via the AUX IN input by connecting your MP3 player or smartphone Rotate the AM FM CD PH AUX switch to AUX mode Insert the 3 5mm Aux cable not included into the corresponding AUX IN Input at the back of your system Connect the other end of the cable to your device item A Adjust the volume using theVOLUME CONTROL knob on...

Страница 7: ...n you have programmed 20 tracks During PROGRAMMED playback press REPEAT button twice to activate repeat all feature The REPEAT inidcator will light and all tracks in your programmed sequence will be repeated continuously To cancel programmed repeat playback press the STOP button until both the program and repeat LED indicator go out OPERATION PLAYING RECORDS This system includes a full size 3 spee...

Страница 8: ...ds according to the direction as shown to the left to separate the cartridge from the tone arm 3 Using either a tweezer or your fingers carefully unplug the terminals from the cartridge 4 Carefully connect the terminals to the new cartridge not included 5 To re install the new cartridge to the tone arm First please lock the front end of the new cartridge on the hook of the tone arm 6 Press the rea...

Страница 9: ... of defects in the manner and periodoftimedescribedherein constitutecompletefulfillmentofallobligationsandresponsibilitiesofELECTROHOMEElectronicsto the purchaser with respect to the product and shall constitute full satisfaction of all claims whether based on contract negligence strict liability or otherwise 1YEAR PARTS LABOURWARRANTY PERIODS TO OBTAINTHE NAME AND ADDRESS OFTHE NEAREST AUTHORIZED...

Страница 10: ...itéd appareils de chauffage comme les radiateurs électriques le dessus d équipement stéréo qui produisent trop de chaleur des endroitssansventilation deszonespoussiéreuses desendroitssujetsàlavibrationconstanteet oules zoneshumides Netentezpasdenettoyercetappareilavecdessolvantschimiquescarcelapourraitendommagerlafinition Utilisez unchiffonpropreetsec Utilisez les touches et les interrupteurs comm...

Страница 11: ...et les MP3 via l entrée AUX Haut parleurs dynamiques à haute performance Tourne disque pleine grandeur à 3 vitesses Meuble élégant de qualité avec un fini en bois véritable Commutateur rotatif rétro pour radio AM FM Unité principale 1 2 3 TOUCHES ET CONNEXIONS Panneau de comande Arrière de l appareil Platine 4 5 6 7 12 8 11 9 10 13 14 15 16 17 20 18 19 26 27 29 24 30 25 31 32 28 22 23 21 ...

Страница 12: ...re Levierde Verrouillage CouvertduStylet 1 Couvercle du Phonographe Lever pour révéler la platine 2 Baguette de support du couvercle du Phonographe Lever et placer pour maintenir le couvercle soulevé 3 Haut Parleurs 4 Bande FM Indique les stations FM 5 Indicateur FM Stéréo Indique lorsque FM stéréo est alimenté 6 Touche Recherche Indique quelle station est en cours 7 Touche Repeat Répéter une ou t...

Страница 13: ...TION UTILISER LA FONCTION AUX IN Écoutez de la musique en connectant votre lecteur MP3 ou votre téléphone intelligent via l entrée AUX IN Tournez le bouton AM FM CD PH AUX au mode AUX Insérez le câble audio 3 5mm pas inclus dans l entrée correspondante AUX IN à l arrière de l appareil Branchez l autre bout du câble à votre dispositif Réglez le volume en utilisant le bouton de réglageVOLUME sur le ...

Страница 14: ...on de toutes les fonctions L indicateur REPEAT s allumera et toutes les chansons de votre séquence programmée seront répétée en continu Pour annuler la lecture programmée répétée appuyez le bouton STOP jusqu à ce que les DEL PROGRAM et de REPEAT s éteignent UTILISATION LECTURE DE DISQUES Ce système a une platine taille réelle à 3 vitesses à entrainement par courroie qui joue des disques 33 45 et 7...

Страница 15: ... vos doigts débranchez soigneusement les bornes de la cartouche 4 Branchez soigneusement les bornes à la nouvelle cartouche non inclus 5 Pour réinstaller la nouvelle cartouche pour le bras de lecture tout d abord verouillez l extrémité avant de la nouvelle cartouche sur le crochet du bras de lecture 6 Appuyez sur le côté arrière de la nouvelle cartouche vers le haut pour le verrouiller sur le bras...

Страница 16: ...OHOME ou de la perte de données Il incombe à l acheteur de défrayer les coûts encourus pour l enlèvement la réinstallation le transport et l assurance de cet appareil La correction de toute défectuosité de la manière et dans les délais indiqués dans la présente constitue l exécution complète de toutes les obligations et les responsabilités contractés par ELECTROHOMEenversl acheteuràl égardduprodui...

Страница 17: ...electrohome com ...
Отзывы: