background image

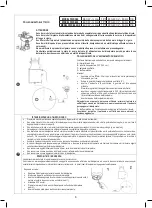
ELECTRICAL CONNECTON

TR 23 

370W - 1/2 Hp  1 Ph  220-240 V - 50 Hz  CE

TR 510 

370W - 1/2 Hp  1 Ph  110-120 V - 60 Hz  UL

TR 710 

550 W - 3/4 Hp 1 Ph  110-120 V - 60 Hz  UL

ATTENTION 

Ensure that the electrical rating of the disposer purchased corresponds to the electrical supply line. 

Ensure  that  the  electrical  supply  plant  is  provided  with  an  earth  (ground)  in  accordance  with  the  regulations, 

codes and ordinances in force. 

Ensure that the electrical supply plant is provided with safety devices in accordance with the regulations, codes 

and ordinances in force. 

Ensure to have an electrical socket near the sink.  Contact a qualified electrician if such a socket is missed. 

Do not modify the disposer’s plug if it is not fitting the socket, but do install the proper socket. 

Check periodically out the power cord of the disposer. In case of deterioration contact a qualified electrician to 

replace it.

]

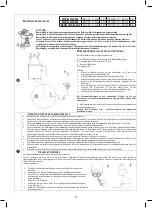
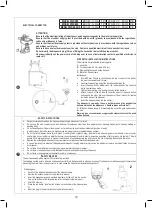
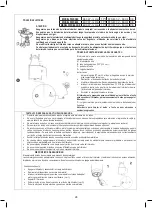
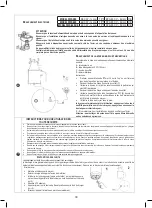
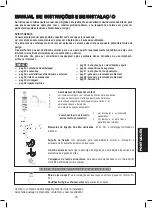
AIR SWITCH INSTALLATION INSTRUCTIONS

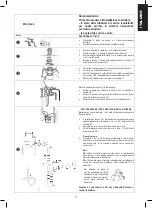
The air switch kit includes the following parts: 
A – air switch 
B – 1 metre of clear PVC air tube (100 cm.) 
C – Moulded metallic push button bellows  
D – Metallic L-Shape clamp 
Instructions: 

ƒ

Drill a 

Ø

 mm. 35 hole in the kitchen work top or corner of the sink at 

the most convenient point for use; 

ƒ

Unscrew the mounting ring of the push button bellows (C); 

ƒ

Insert  the  push  button  bellows  and  the  rubber  washer  into  the  hole 
which has just been made; 

ƒ

Tighten the mounting ring, locking the push button bellows; 

ƒ

Attach  one  end  of  the  air  tube  (B)  over  the  spout  of  the  push  button 
bellows and the other end over the spout of the air switch (A) located 
inside the base of the disposer; 

ƒ

Insert the disposer’s plug into the socket; 

The disposer is now ready to use: one firm press on the push button 

bellows will switch the disposer on. Another press will turn it off. 

D – Metallic L-Shape clamp to fit eventually the air switch push button under 
the sink. 

Warning: do not use abrasive or aggressive cleaners to clean the push 

button bellows.

SAFETY INSTRUCTIONS

ƒ

Pay particular attention when the disposer is operating in presence of children; 

ƒ

Do  not  use  the  sink  containing  the  food  disposer  for  purposes  other  than  food  preparation  or  washing  dishes  (such  as  baby  bathing  or 
washing hair); 

ƒ

Do not insert hands or fingers into disposer, not even by using an extension instrument (such as a ladle); 

ƒ

In order to push the food waste into disposer use the proper conveyor available as an optional; 

ƒ

Do not put into disposer metal objects, glass or china, plastic or plastic wrap, chemical drain cleaners, paper or cardboard, clam or oyster 
shells, large bones, toothpick, metal bottle tops, laces, tissues or similar products, excessive quantities of fat or greasy, hot liquids – This will 
ensure not to damage the unit, to prevent the expulsion of materials during use and to avoid the risk of blocking the domestic drain line; 

ƒ

Replace the splashguard when worn to help prevent entry/ejection of material/splashing water; 

ƒ

In case of jamming turn always off disposer and disconnect the plug before trying to solve the problem or remove any object fallen by chance 
into disposer; 

ƒ

Do not store flammable items such as rags, paper, aerosol cans near disposer; 

ƒ

Do not store or use gasoline or other flammable vapours and liquids in vicinity of disposer; 

ƒ

Do not store or use aggressive chemicals in vicinity of disposer; 

S

AFETY 

D

EVICES

^

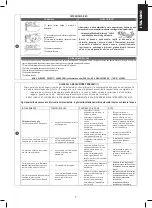
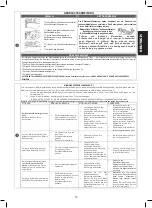
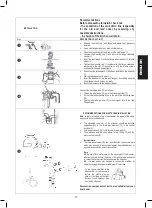
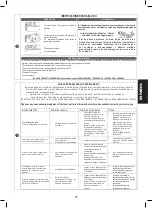
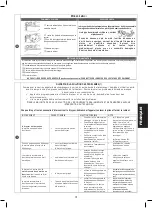
The unit is endowed with a system fit for preventing overload. 
Overloading usually occurs when an unknown object falls into disposer and/or when an excess of food waste is simultaneously put therein thus 
preventing the motor from running correctly. In such cases the disposer will automatically switch off.  

If this happens: 

ƒ

Switch off the disposer and disconnect the disposer’s plug; 

ƒ

Remove the unknown object or the material in excess; 

ƒ

Insert the hexagonal wrench, provided together with the unit, into the centre 
hole on the bottom of the disposer and turn it anti and clockwise (see 1); 

ƒ

Wait 5/10 minutes; 

ƒ

Press the red button “reset” switch located on the bottom of the disposer (see 
2);

ƒ

Insert the plug in the electrical socket and start up normally; 

3

18

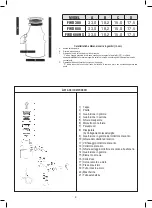
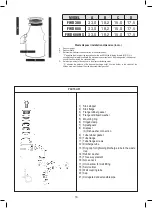
MODEL FWD 380

380 W - ½ Hp 1 Ph  220-240 V - 50 Hz CE

MODEL FWD 600

600 W - ¾ Hp 1 Ph  220-240 V - 50 Hz CE

MODEL FWD 600 HS

600 W - ¾ Hp 1 Ph  220-240 V - 50 Hz CE

Содержание FWD 380

Страница 1: ...enimiento Triturador de desperdicios de comida Einbauanleitung und Bedienungsanleitung K chenabfallentsorger Instruction Manual Food Waste Disposer Manuale di utilizzo e installazione Dissipatore di R...

Страница 2: ......

Страница 3: ...IN OPZIONE I SEGUENTI ACCESSORI Piletta 2 per installazione in lavelli con foro piccolo mm 51 53 Pastiglie biologiche effervescenti per prevenire gli odori MANUALE DI UTILIZZO E INSTALLAZIONE L imball...

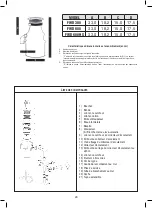
Страница 4: ...o innesto a muro 20 Mascherina 21 Tubo estensibile MODELLO A B C D TR 23 31 1 17 5 15 0 17 0 TR 510 31 1 17 5 15 0 17 0 TR 710 31 4 19 1 15 0 17 0 Caratteristiche dimensionali e ingombri in cm A Altez...

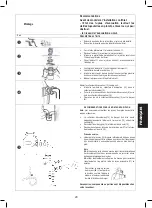
Страница 5: ...del collettore di scarico 9 sul bordo del collettore di scarico 12 Serrare con le viti il collettore di scarico 12 al dissipatore 8 RACCOMANDAZIONI PER IL MONTAGGIO DELLA SIFONERIA Nota per un miglio...

Страница 6: ...are il lavello in cui montato il dissipatore per scopi diversi dalla preparazione del cibo o dalla pulizia delle stoviglie p es per fare il bagno ai bambini o lavarsi i capelli Non introdurre mai le d...

Страница 7: ...iudere l acqua INCONVENIENTE POSSIBILE CAUSA POSSIBILE SOLUZIONE NOTE il dissipatore non gira il motore sembra non funzionare o non arriva tensione al motore del dissipatore o controllare il cavo di a...

Страница 8: ...re spento mentre veloce quando il dissipatore avviato o il dissipatore installato in un lavello a vasca singola o il paraspruzzi del dissipatore soprattutto quando nuovo limita il deflusso d acqua o c...

Страница 9: ...lentsorgers mm 89 90 auch als Verschluss geeignet zu dr cken AUF WUNSCH IST FOLGENDES ZUBEH R ERH LTLICH Sp lbeckeneinsatz 2 f r den Einbau in Sp lbecken mit einer kleinen ffnung mm 51 53 Biologische...

Страница 10: ...1 1 17 5 15 0 17 0 510 31 1 17 5 15 0 17 0 710 31 4 19 1 15 0 17 0 Dimensionale Angaben in cm A H he des K chenabfallentsorgers B Durchmesser des K chenabfallentsorgers C Abstand vom Zentrum des K che...

Страница 11: ...Gummidichtung des Abflussrohrs 9 fest auf den Abflussrohrrand 12 Befestigen Sie das Abflussrohr 12 mit den Schrauben an den K chenabfallentsorger 8 HINWEISE FUER DIE MONTAGE DES SIPHONS WICHTIG F r e...

Страница 12: ...nstrument z B Kochl ffel Um Abf lle in den K chenabfallentsorger zu dr cken verwenden Sie den auf Wunsch erh ltlichen Restestopfer Folgende Materialen und Substanzen sollten Sie niemals in den K chena...

Страница 13: ...Steckdose und stellen Sie das Wasser ab ST RUNG M GLICHE URSACHE M GLICHE LOESUNG ANMERKUNG Der K chenabfallentsorger dreht nicht Der Motor scheint nicht zu funktionieren o Der K chenabfallentsorger i...

Страница 14: ...bfallent sorger o Der K chenabfallentsorger ist in ein Sp lbecken mit nur einem Becken eingebaut o Der neue Spritzschutz vermindert die Geschwindigkeit des Wasserabflusses o Diese Erscheinung ist abso...

Страница 15: ...ge rubber gasket and screws an hexagonal unblocking wrench allen spanner n 6 an installation care and use manual an air switch on off system the air switch kit includes an air switch push button a PVC...

Страница 16: ...ng tube 20 Cap 21 Corrugated and extensible pipe MODEL A B C D TR 23 31 1 17 5 15 0 17 0 TR 510 31 1 17 5 15 0 17 0 TR 710 31 4 19 1 15 0 17 0 Waste disposer installation dimension in cm A Disposer He...

Страница 17: ...ube rubber gasket 9 on to the rim of the discharge tube 12 Tighten the discharge tube 12 to the disposer 8 with the tube flange screws RECOMMENDATIONS FOR WASTE TRAP INSTALLATION Note to improve the d...

Страница 18: ...perating in presence of children Do not use the sink containing the food disposer for purposes other than food preparation or washing dishes such as baby bathing or washing hair Do not insert hands or...

Страница 19: ...er s plug and close the water INCONVENIENCE POSSIBILE CAUSE POSSIBILE SOLUTION NOTES The disposer does not run the motor does not seem to work o There is no electrical tension to the disposer s motor...

Страница 20: ...en the disposer is on o the disposer has been installed in a single bowl sink o the splashguard of the disposer especially when it is new limits the down flow of water o this is absolutely normal beca...

Страница 21: ...tador de restos de alimentos al escurridor con el sistema est ndar mm 89 90 tambi n til como tap n OPCIONES DISPONIBLES PARA LOS SIGUIENTES ACCESORIOS Escurridor 2 para instalaci n en fregadero con ag...

Страница 22: ...a muro 20 Plantilla 21 Tubo extensible MODELO A B C D TR 23 31 1 17 5 15 0 17 0 TR 510 31 1 17 5 15 0 17 0 TR 710 31 4 19 1 15 0 17 0 Caracter sticas dimensionales en cm A Altura del triturador B Di m...

Страница 23: ...del colector de desag e o 9 en el borde del colector del desag e 12 Fijar con los tornillos del colector del desag e 12 al triturador 8 RECOMENDACIONES PARA EL MONTAJE DEL SIFON Nota para mejorar el...

Страница 24: ...adero en el que haya instalado el triturador para usos diversos de los preparados para alimentos o limpieza de la vajilla p ejemplo ba ar a los ni os o lavarse la cabeza No meter nunca los dedos o man...

Страница 25: ...ntaci n el ctrica desenchufar la clavija y cerrar el agua INCONVENIENTES POSIBLES CAUSAS POSIBLES SOLUCIONES NOTAS el triturador no gira el motor parece que no funciona o no llega tensi n al motor del...

Страница 26: ...do mientras que cuando esta encendido es m s r pido o el triturador instalado en el fregadero con una pila o el parasalpicaduras del triturador sobretodo cuando es nuevo limita el flujo del agua o qui...

Страница 27: ...une petite perforation mm 51 53 Pastilles biologiques effervescentes pour viter les odeurs MANUEL D UTILISATION ET D INSTALLATION L emballage du broyeur contient un broyeur complet de syst me de monta...

Страница 28: ...e branchement au mur 20 Cache 21 Tuyau extensible MODELE A B C D TR 23 31 1 17 5 15 0 17 0 TR 510 31 1 17 5 15 0 17 0 TR 710 31 4 19 1 15 0 17 0 Caract ristiques dimensionnelles et encombrement en cm...

Страница 29: ...acuation 9 sur le bord du collecteur d vacuation 12 Fixer avec les vis le collecteur d vacuation 12 sur le broyeur 8 RECOMMANDATIONS POUR LE MONTAGE DU SIPHON Nota pour un coulement meilleur les tuyau...

Страница 30: ...oyeur a t mont des fins autres que la pr paration des aliments ou du nettoyage de la vaisselle par ex y baigner les petits enfants ou se laver les cheveux Ne jamais introduire les doigts ou les mains...

Страница 31: ...le broyeur d brancher l appareil enlever la prise et fermer le robinet INCONVENIENT CAUSE POSSIBLE SOLUTION POSSIBLE NOTE le broyeur ne tourne pas le moteur ne semoble pas fonctionner o Le courant n...

Страница 32: ...ralenti quand le broyeur est teint tandis qu il est rapide quand le broyeur fonctionne o le broyeur est install dans un vier une seule vasque o la bavette du broyeur surtout quand elle est neuve limit...

Страница 33: ...o vosso revendedor MANUAL DE INSTRU ES E DE INSTALA O A embalagem do triturador cont m um triturador completo com sistema de fixa o para lava lou as um tubo de descarga com a flange guarni o e parafus...

Страница 34: ...de liga o parede 20 Grelha 21 Tubo extens vel MODELO A B C D TR 23 31 1 17 5 15 0 17 0 TR 510 31 1 17 5 15 0 17 0 TR 710 31 4 19 1 15 0 17 0 Caracteristicas dimensionais e estorvos em cm A Altura do t...

Страница 35: ...de descarga 12 Apertar com os parafusos o tubo de descarga 12 ao triturador 8 CONSELHOS PARA A MONTAGEM DOS ELEMENTOS DE LIGA O DO SIF O Nota para um melhor defluxo os tubos dos elementos de liga o do...

Страница 36: ...a onde est instalado o triturador para outras finalidades que n o sejam a prepara o de comida ou da lavagem das lou as p ex para dar banho s crian as ou lavar se os cabelos Nunca introduzir os dedos...

Страница 37: ...turador cortar a alimenta o el ctrica desligar a ficha e fechar a torneira da gua INCONVENIENTE CAUSA POSSIVEL SOLU AO POSSIVEL NOTAS O triturador n o gira o motor parece nao funcionar o n o chega ten...

Страница 38: ...urador foi desligado enquanto que veloz quando o triturador est aceso o o triturador est instalado num lava lou a com uma s bacia o o p ra respingos do triturador sobretudo quando novo limita o deflux...

Страница 39: ...b Yiyecek atiklar n t c ye aktaran ta y c mm 89 90 tapa olarak da faydalidir ISTE E BA LI AKSESUARLAR Lavabo drenaj n n k k olmas durumunda 2 eviye flan mm 51 53 Koku nleyici organic tabletler Y YECEK...

Страница 40: ...n 11 Boru flan vidalar 12 Bo alt m borusu 13 Bo alt m borusunu at k k sm na ba layan halka somun 14 Kau uk rondela 15 l eleman 16 Boyun 17 Dirsek duvara yerle tirme i in 18 Servis giri i 19 Duvara ba...

Страница 41: ...a a daki ekilde yerle tirin Boru flan n 10 bo alt m borusuna 12 vidalay n Kau uk boru contasin 9 bo alt m borusunun 12 kenar na gelecek ekilde yerle tirin Bo alt m borusunu 12 t c ye 8 vidalarla s k...

Страница 42: ...klar n bulunmas durumunda b y k dikkat g sterilmelidir t c montaj s ras nda lavabo kullan lmamal d r bebek y kama ve sa y kama gibi Ellerinizi ve parmaklar n z ba ka aletlerle dahi kep e gibi t c i in...

Страница 43: ...stedi inizde mutlaka t c y kapat n eletrik fi ini ve ba lant s n kesin ve suyu kapat n PROBLEM OLASI SEBEP OLASI Z M NOTLAR t c al m yor Motor al r g r nm yor o t c motoruna elektrik gelmiyor olabilir...

Страница 44: ...ar zan n tekrar olu mamas i in b l m_ deki a klamalar tekrar okuyun o U Boyun un montaj n tekrar kontrol ediniz D ER KONTROLLER a Uygun olmayan drenaj borusu yerle tirildi ide bu gibi par alar normal...

Страница 45: ...e di scarti alimentari per piletta in dotazione standard al dissipatore mm 89 90 utile anche come tappo DISPONIBILI IN OPZIONE I SEGUENTI ACCESSORI Piletta 2 per installazione in lavelli con foro picc...

Страница 46: ...Distanza dalla base del lavello allo scarico del dissipatore D indica la quota di scarico dal fondo del lavello lo scarico a muro non dovrebbe superare tale quota LISTA DEI COMPONENTI 1 Tappo 2 Pilet...

Страница 47: ...6 e 2 5 4 la parte 2 3 5 4 7 8 7 8 2 6 12 10 12 9 12 12 8 12 15 A 16 15 17 19 15 8A 8A 21 8A 2 47...

Страница 48: ...1 Ph 110 V 60 Hz UL TR 710 550 W 3 4 Hp 1 Ph 110 V 60 Hz UL A B PVC 100 cm C D mm 35 C PVC B A D 3 1 5 10 Reset 2 48 MODEL FWD 380 380 W Hp 1 Ph 220 240 V 50 Hz CE MODEL FWD 600 600 W Hp 1 Ph 220 240...

Страница 49: ...4 1 e 2 3 4 5 1 2 5 10 3 4 5 1 9 9 o o A o o reset o o A o o o o o o o o o o o o o o o o 5 Reset o o reset 2 49...

Страница 50: ...ANCO MARTELLI 5 20162 MILANO ITALY TEL 39 02 64470029 FAX 39 02 64470048 http www ecofastitalia com 5 2 o o o o o _ o o o _ o o o a b UE 2002 96 CE a GARANT ECOFAST ITALIA S R L PIAZZA FRANCO MARTELLI...

Страница 51: ......

Страница 52: ......

Отзывы:

Похожие инструкции для FWD 380