background image

Exercise 2: More Logic Instructions 

This exercise covers other basic functions like Set/Reset, MCS/MCR and Compare. 

Use case:   An injection mold machine has an automatic refiller for the plastic pellet reservoir.  At the 

beginning of the shift, the operator approaches the machine and presses the start button.  The 
filling mechanism automatically keeps the level in the reservoir between 10 and 100 lbs.  If the 
filler is already running, the operator has the opportunity to press a button that engages the filler 
at a higher speed to fill the reservoir quicker. 


We’ve already created the cycle start command (M0); an output that will turn on a lamp that indicates the fact 
that the machine is running (Y0); and an e-stop reference (M1). 


We will be adding 4 rungs in this exercise.  To insert rows, right click in the space between the first rung and 
the end statement and choose Insert Row

TIP: If you can’t choose Insert Row, you may still be in Ladder Monitoring Mode!  You can toggle in and out 

of this mode by clicking the         button in the toolbar.  


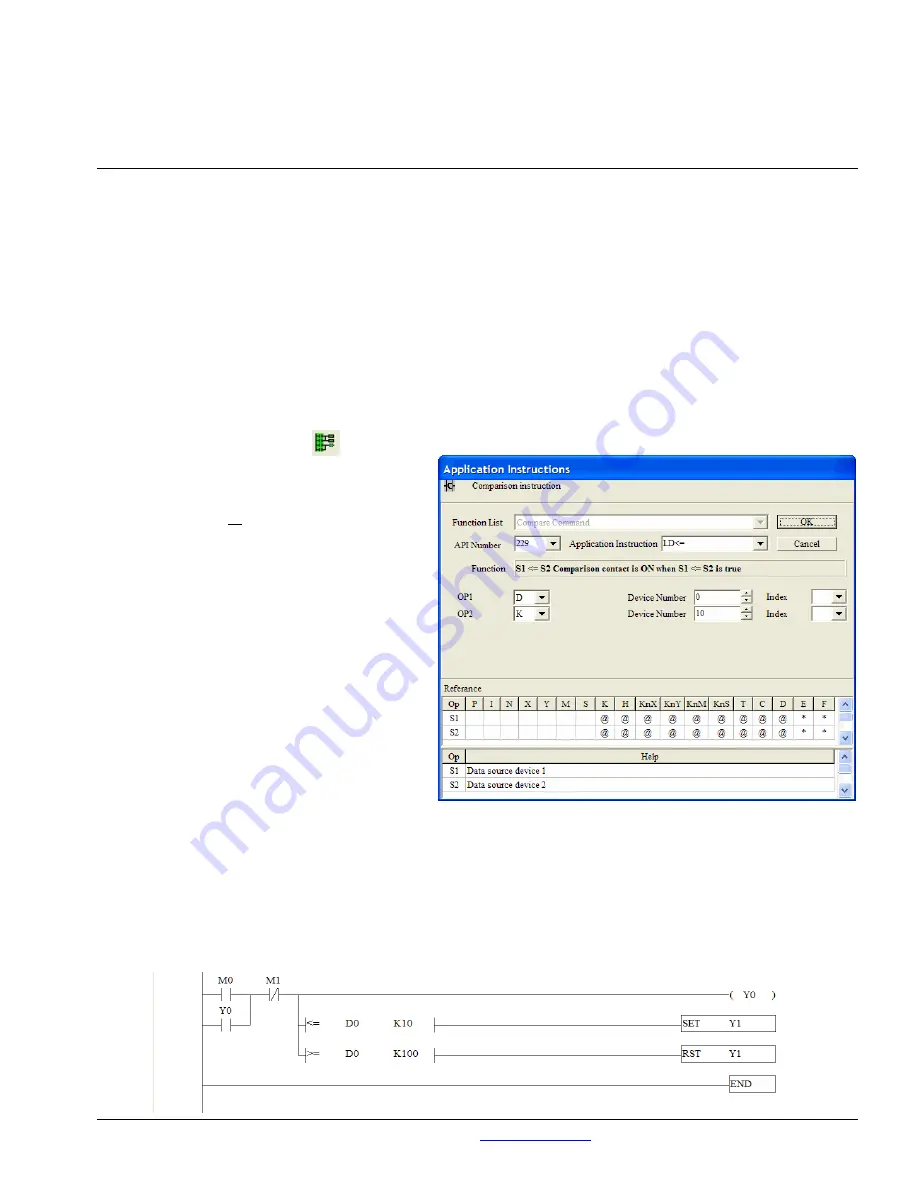
Just below the first rung and to the right of 
the M1 contact, either type LD<= and click 
the ellipsis button on the Input Instruction 
Popup window
 or click the Application 
Instruction
 tool on the toolbar and choose 
LD<= from the pull down arrow next to 
Application Instruction.
  The window to 
the right will appear. 

TIP: Get to know this window!  The better you 

understand this window, the easier it will be 
for you to program your ELC.  When you 
use an advanced function block in ELCSoft, 
this window is a big help in deciphering how 
the program works.  For each Application 
Instruction that you choose in this window, 
there is a specific description of its function 
in the “Function” window. 


We will be storing the weight of the reservoir 
in word D0.  Since we want the motor on 
when the wieght is at or below 10, we’ll set the OP1 window to D, the corresponding Device Number to 0, and 
leave the Index window blank.  The OP2 window will be K to represent a constant decimal value, the Device 
Number
 will be 10 (our minimum) and Index will again be blank. 


The output on this rung will be a SET instruction with Y1 as its reference (to turn on the “fill mechanism”).  
Either type SET Y0 and press enter, or use the Application Instruction window, choose the SET instruction, 
and enter Y and 1 respectively. 


Repeat the last 3 steps just below the rung you’ve been working on to create a rung that resets (RST) Y1 
when the value of D0 is equal to or greater than 100.  These two rungs should look somewhat like this: 

Pub. No. TR05003001E 

For more information visit: 

www.EatonElectrical.com

 19 

Содержание Cutler-Hammer ELC Series

Страница 1: ...Eaton Logic Controller Basic Training 1 Hour January 2006 Pub No TR05003001E For more information visit www EatonElectrical com 1...

Страница 2: ...Corporation Operator Interface Business 811 Green Crest Drive Westerville OH 43081 TRADEMARKS PanelMate Cutler Hammer Eaton and ePro Canvas are either federally registered trademarks or trademarks of...

Страница 3: ...f of shipment expediting an existing order emergency shipments product price information returns other than warranty returns and information on local distributors or sales offices e COM Support Center...

Страница 4: ...g to the ELC Software Overview Hardware Overview Basics Exercises Support Services Go Chart Exercise 1 Basic Project Programming Exercise 2 Basic Logic Instructions Exercise 3 Timer Math Instructions...

Страница 5: ...6 Analog I O terminals 7 I O point indicators 8 COM 1 RS 232 Rx indicator 9 COM 2 RS 485 Tx indicator 10 COM 1 RS 232 programming port 11 EATON nameplate 12 Extension port 13 Receptacle for expansion...

Страница 6: ...PB14NNDT Processor With Clock 12 I O PC Series 8 4 ELC PC12NNAR 12 I O PC Series 8 4 ELC PC12NNDR 12 I O PC Series 8 4 ELC PC12NNDT 10 I O PA Series 4 2 2 2 ELC PA10AADR 10 I O PA Series 4 2 2 2 ELC...

Страница 7: ...log In 4 ELC AN04ANNN Analog Out 2 I O Analog Out 2 ELC AN02NANN 4 I O Analog Out 4 ELC AN04NANN Analog Combination 6 I O Analog In Out 4 2 ELC AN06AANN Temperature 4 I O Thermocouple 4 ELC TC04ANNN 4...

Страница 8: ...Mouse Serial or Windows compatible mouse Printer Printer with Windows driver Comm Port 1 RS 232 labelled COM1 COM8 Compatible Products All Eaton ELC series Support Services Go Chart Exercise 2 Logic...

Страница 9: ...LCSOFT The following menus will be described here as a quick primer on just a few of the ELCSoft program features Some of these features may be limited based on which ELC processor you are using File...

Страница 10: ...ady saved ELC project SAVE Saves an already open file to its current filename Software Overview SAVE AS Saves an open project file as a name different than the one that is currently saved under CLOSE...

Страница 11: ...compile function or at a specific interval minimum is 5 minutes NOTE By default the Auto Save box is unchecked FONT SETTING AND COMMENT FORMAT Opens a window to configure colors and fonts used in the...

Страница 12: ...advanced instructions and special function registers D and words M ELCSOFT USER MANUAL Opens the ELCSoft User Manual Other helpful menu commands VIEW WORKSPACE Opens a treeview representation of the c...

Страница 13: ...various USB to serial converters to communicate to the ELC product line as well Set Station Address to 1 Select Communication ELC Information o The software will attempt to communicate to the ELC A w...

Страница 14: ...sword in the ELC The password is required for any communication to the ELC Once a password is set the only way to gain access to the ELC memory is to have that password If you do not have the correct...

Страница 15: ...Allows you to change the value of T C and D registers in table view format and send the values to the ELC EDIT BIT MEMORY Allows you to change the state of bits in table view format and send the valu...

Страница 16: ...take place in Ladder Diagram Mode Any screenshots you see will have that window maximized Support Services Exercise 2 Logic Instructions Connecting to the ELC Software Overview Hardware Overview Exer...

Страница 17: ...is the command code for a normally open contact To see a list of those codes select HELP ELC INSTRUCTION AND SPECIAL REGISTERS REFERENCE Y0 is the bit that we want to reference Either click OK on that...

Страница 18: ...ctions Exercise 1 Ladder Logic Connecting to the ELC Software Overview Hardware Overview Basics Exercises Go Chart Once you are monitoring the ladder you can select a contact and right click to change...

Страница 19: ...lication Instruction tool on the toolbar and choose LD from the pull down arrow next to Application Instruction The window to the right will appear TIP Get to know this window The better you understan...

Страница 20: ...utput on this rung is internal bit M3 the act of the filler engaged at the higher speed On the next rung there will be only an output that is an Application Instruction MCR with its operator being N0...

Страница 21: ...Pub No TR05003001E For more information visit www EatonElectrical com 21...

Отзывы: