8
Montage- und Betriebsanleitung GuideLed 10011...11026 LED CG-S 40071860108 (F) www.eaton.com
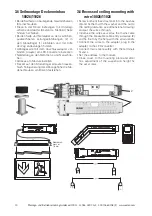
3.4 Pendelmontage
10022..23/11022..23
3.4 Pendulum mounting mounting
10022..23/11022..23
• Netzkabel an der Decke durch die Kabelein-
führung stecken, Deckenmontage-Adapter (s.
Seite 5) an den Befestigungslöchern mit ge-
eigneten Schrauben an der Decke befestigen
• Netzkabel an Versorgungsmodul V-CG-SLS 28
(2) anschließen (Steckklemme/8)
• Adresse am Versorgungsmodul einstellen
• Beiliegende Leitungsverlängerungen mit Hilfe
der Schraubklemmen anschließen.
• Die Pendelrohre (5) über die Leitungen führen
(noch nicht am Adapter/7 einrasten) und am
oberen Ende einen Kabelbogen formen
• Durch die Pendelaufnahme am Baldachin füh-
ren und durch die Aussparung wieder einfüh-
ren. Die Leuchte hängt nur an den Leitungen
• Pendelrohre auf Piktogrammscheibe stecken,
bis Nasen des Adapters (7) in den Löchern (6)
einrasten
• Pendelrohre in Montage-Adapter (2) stecken,
mit Madenschrauben (3) fixieren
• LED-Anschlussleitungen an Versorgungsmo-
dul anschließen.
Bipolarer Anschluss der
LEDs - auf eine Polung muss nicht geachtet
werden
• Beide Baldachin Gehäuse (1) auf den Decken-
montage-Adapter schieben (siehe Seite 7).
• Feed mains cable through cable entry of ceiling
mounting-adapter (s. page 5), fix it with suitable
screws at the fixing holes to the ceiling
• Connect the mains cable to the supply module
V-CG-SLS 28 (terminal/8)
• Set address on supply module
• Connect enclosed cable extensions by the help
of screw terminals
• Lead pendulum tubes (5) over the cables (do
not click into the adapter/7) and form a bend
at the top
• Lead them through the pendulum entry at the
mounting adapter and than back through the
recess. The luminaire only hangs at the cables
• Stick the pendulum tubes onto the pictogram
panel until the hooks of the adapter (7) snap in
the holes (6)
• Insert the pendulum tubes into the mounting
adapter (2), fix them with the set screws (3).
• Connect LED connection-cable to the supply
module.
Bipolar connection to LEDs - a pola-
rity has not be observed
• Slide both canopies (1) onto the ceiling moun-
ting-adapter. (s. page 7)
20 m
10022
11022
30 m


