33
6 Installation
MANUAL CEAG AUtoMAtiC tEst systEM At-s
+
40071860177 (C) December 2016 www.ceag.de
6.4.2 Connection to mains of substations AT-S
+
S
AT S
+
S substations are supplied from the power supply
of their associated AT-S
+
system (pos. 2). An outgoing
distributor (part no. 400 71 347 160) can be used for three
sinlge-phase supplies or one three-phase supply.
Connecting the cables for the mains supply to a AT-S
+
S..
substation:
•
Ensure that the system and feeders are isolated and
locked out!
•
Run the feeders to/in the AT-S
+
C.. control cabinet and
in its routing system and to/in the control cabinet of the
AT-S
+
S.. (pos. 8).
•
Connect the earth conductor (PE-conductor) to the
terminal block (pos. 5)
•
Connect the neutral conductor to the terminal block
(pos. 4)
•
Connect the L conductors to the terminals on the outgo-
ing feeder (pos. 2)
The mains supply is connected in the control cabinet as
described in section 6.4.1.
NOTES
To assist operations, outgoing distributors can be pulled
forward off the busbar when the lock on the upper enclo-
sure wall is released. Once the outgoing circuits have
been connected, the outgoing distributor can be pushed
back in position on the busbar with slight pressure and
locked in place.
6.5 Connection and installation of
internal modules
Control unit, DC/DC converter and AC supply are plugged
onto a module support. The circuit assemblies are
installed on DIN rails.
For simple installation/disassembly, connections with the
support modules are via pluggable screw terminal blocks
that can be plugged onto or removed from the fronts of
the modules.
Fixed terminals are used with circuit modules due to the
current load of the connection terminals. Connection
cables of the terminals are applied to the terminal strip in
the upper area of the switching cabinet. Assignment is via
number codes on the module and on the terminal block.
The connection of external inlet and outlet lines is via
this terminal block row in the upper area of the switching
cabinet.
NOTES
•
The circuit numbers used in the displays of the AT-S
+
controller and the displayed switch outputs of the
modules are assigned by the choice of slots on the
subracks.
•
To ensure that replaced modules function correctly
under the controller they must first be identified,
activated and their parameters set up with controller
software.
ATTENTION!
Never fit or remove SU S
+
modules in the On
condition! Deactivate a SU S
+
module at the CU-S
+
controller before removing or re-fitting it, e . g . for
testing . For dismantling or modification work the
controller must be disabled .
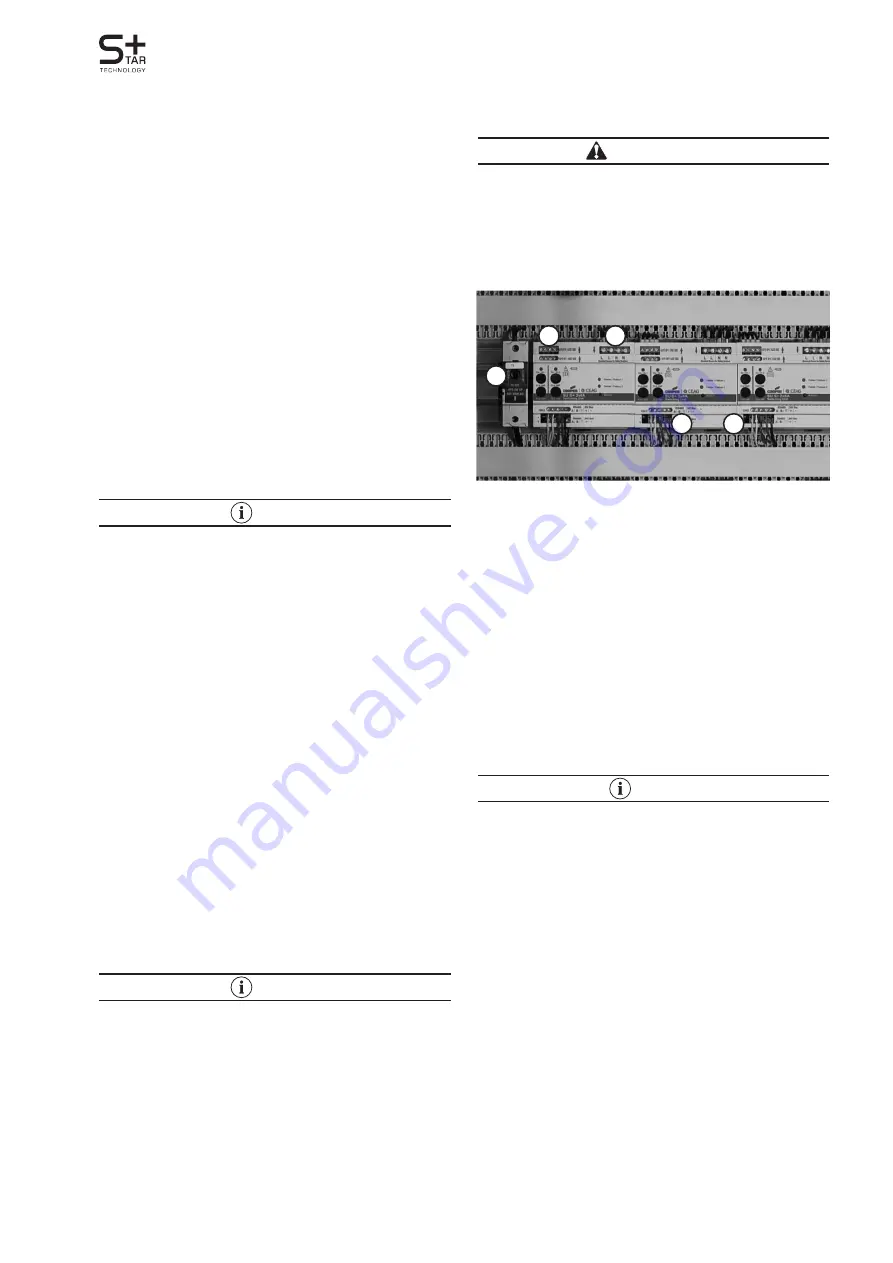
Field 3 assembled with six modules SU S
+
Pos 1: D02 fuse holder for field 3
Pos. 2: Terminals of field 1 modules.
Pos. 3: Terminals safety source feed.
Pos 4: Bus connection and 24V supply terminals.
Pos. 5: Dip-switch for Bus termination resistance.
1
4
3
2
5
6.6 Connection and installation of external
SU S
+
modules
Each CU S
+
controller is able to operate with max.
40 SU S
+
and max. 25 DLS Bus modules via RS 485 Bus.
In state of external installation please note the following
points.
NOTES
•
The bus cables A/B and their screening must also be
connected to the system´s terminals. Please attend
to the information regarding bus-technology and
screening!
•
Install/ activate the required terminating resistance
with the last device on a bus line (dip switch Pos 5 with
SU S
+
modules and bridging of terminal B1-B2 with DLS
bus modules).
•
See chapter 8.4.5 „Operation of circuit set-up“ for
registering of external SU S
+
modules. With DLS bus
modules, set the address intended for the module, but
avoid multiple assignment as this may cause operational
malfunctions.
•
For further information please refer to the technical
documentation of the module!


