UPS OPERATING INSTRUCTIONS
Eaton 9395 Plus 1 UPS (225–275 kVA) Installation and Operation Manual
S
164201710 Rev 2
www.eaton.com\powerquality
7-8
Table 7‐3. Display Menu Operation (continued)
Operation
Subfunction
Function
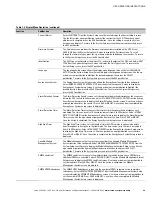
High Alert Timer
The High Alert Timer screen sets the length of time the all UPMs remain active before
transferring back to Variable Module Management System mode. The time can be set in 10
minute increments from 0 to 990 minutes. Select
HIGH ALERT TIMER
from the Module
Management System Setup screen to display the High Alert Timer screen. Use the up or down
arrow pushbutton to set the time. Press
SAVE
or
ABORT
. Once the action is completed, the
Module Management System Setup screen is displayed.
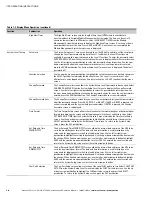
System Level 1 Setup
Password
The System Setup Level 1 screen can be used to set the UPS date and time, set the serial ports,
change the Level 1 password, and log out of Level 1. In addition, the Level 0 functions are
available. A password is required to access the Level 1 functions. To enter the password, select
ENTER PASSWORD
from the System Setup Level 0 menu to display the Enter Password screen.
Use the left or right arrow pushbutton to select the password character position. Use the up or
down arrow pushbutton to change the password character. Once the password is entered,
press the
DONE
pushbutton. The System Setup Level 1 menu screen is displayed. The default
password is L1.
Function Selection
Use the up or down arrow pushbutton to highlight the setup function screen desired, then press
the
SELECT
pushbutton to display the function screen. The Level 1 screen times out after
60 minutes or can be logged out at any time by selecting the
LOG OUT
function from the menu
screen.
Change Password
The Change Password screen allows the System Setup Level 1 password to be changed. Select
CHANGE PASSWORD
from the System Setup Level 1 menu to display the Change Password
screen. Use the left or right arrow pushbutton to select the password character position. Use
the up or down arrow pushbutton to change the password character. Once the new password is
entered, press the
DONE
pushbutton
.
The Change Password Save screen is displayed.
Change Password Save
The Change Password Save screen lets you save the new password, retry another password, or
abort the password change. Press
SAVE
,
RETRY
, or
ABORT
. If SAVE or ABORT is pressed, the
action is completed, and the System Setup screen displays. If RETRY is pressed, the Change
Password screen is redisplayed.
Time Format
The Time Format Setup screen allows the selection of either month/day/year or day/month/year
formats for display on the screen and for logging events in the Event and History Logs. Select
SET DATE AND TIME
from the System Setup Level 1 menu to display the Time Format Setup
screen. Use the up or down arrow pushbutton to highlight the desired format, then press the
SELECT
pushbutton to display the Set Date and Time screen. To return to the System Setup
screen, press the
ESC
pushbutton
.
Set Date and Time
MM/DD/YYYY
The Set Date and Time MM/DD/YYYY screen allows the internal date and time of the UPS to be
set in the month/day/year format. The date and time information is used for display on the
screen and for logging events in the Event and History Logs. Use the left or right arrow
pushbutton to highlight the setting to be changed. Use the up or down arrow pushbutton to make
the change. When finished making changes, use the left or right arrow pushbutton to highlight
SAVE and the up or down arrow pushbutton to select YES. To complete the save function and
return to the System Setup screen, select the return arrow pushbutton
.
Set Date and Time
DD/MM/YYYY
The Set Date and Time DD/MM/YYYY screen allows the internal date and time of the UPS to be
set in the day/month/year format. The date and time information is used for display on the
screen and for logging events in the Event and History Logs. Use the left or right arrow
pushbutton to highlight the setting to be changed. Use the up or down arrow pushbutton to make
the change. When finished making changes, use the left or right arrow pushbutton to highlight
SAVE and the up or down arrow pushbutton to select YES. To complete the save function and
return to the System Setup screen, select the return arrow pushbutton
.
Com Port Selection
The Com Port Setup screen allows selection of the serial COM port to set up. Select
COM PORT
SETUP
from the System Setup Level 1 menu to display the COM Port Setup screen. Use the up
or down arrow pushbutton to highlight the COM port to be set up, then press the
SELECT
pushbutton
.
To return to the System Setup screen, press the
ESC
pushbutton
.
Содержание 9395 Plus 1
Страница 1: ...Powerware Series Eaton 9395 Plus 1 UPS 225 275 kVA Installation and Operation Manual ...
Страница 2: ......
Страница 3: ...Powerware Series Eaton 9395 Plus 1 UPS 225 275 kVA Installation and Operation Manual ...
Страница 185: ......
Страница 186: ... 1642017102 164201710 2 ...


