background image

12

E-flite Extra 300 32e ARF Assembly Manual

Landing Gear and Wheel Installation

Required Parts

Fuselage assembly  Axle with hardware (2)
#4 washer (5) 

Aluminum landing gear

Main wheel (2) 

Wheel pant (left and right)

4-40 x 1-inch socket head screw (3)
4-40 x 3/8-inch socket head screw (2)

Required Tools and Adhesives

Hex wrench or ball driver: 1.5mm, 3/32-inch

Threadlock 

Nut driver: 7mm

Flat file 

Pliers or adjustable wrench

  1. Remove the landing gear fairing from the 

fuselage and set it aside.

Always use threadlock on metal-to-metal fasteners 

to prevent them from vibrating loose.

The landing gear can only be installed in one 

direction. If the holes in the landing gear don’t 

align with the blind nuts in the fuselage, rotate 

the gear front-to-back so the holes are aligned 

with the blind nuts installed in the fuselage.

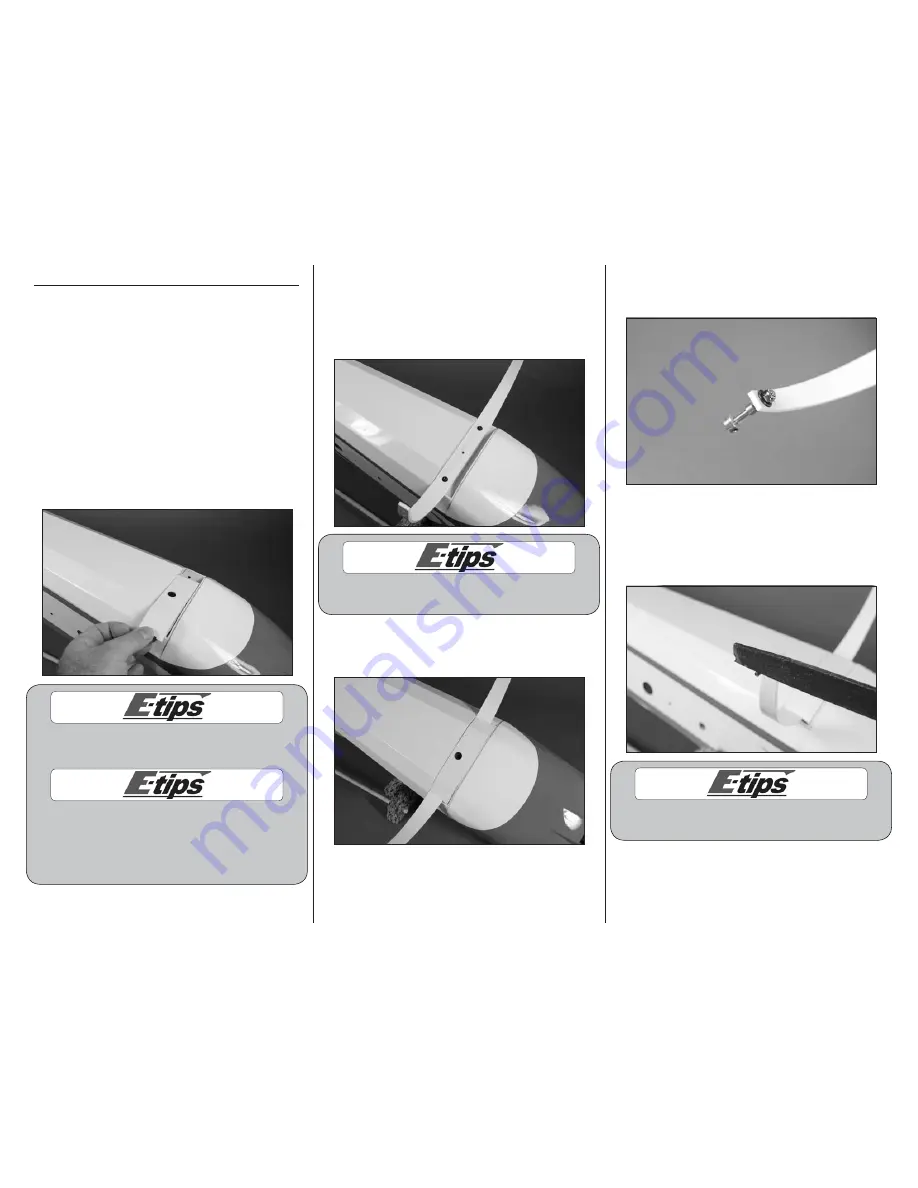
  2. Attach the landing gear using two (2) 4-40 x 

1-inch socket head screws and two (2) #4 washers. 

Use a 3/32-inch hex wrench or ball driver to 

tighten the screws. Only install the outer screws 

as shown in the photo. The center hole is for the 

attachment of the landing gear fairing.

Always use threadlock on metal-to-metal fasteners 

to prevent them from vibrating loose.

  3. Use a 4-40 x 1-inch socket head screw and 

#4 washer to attach the landing gear fairing to 

the fuselage.



  4. Attach the axle to the landing gear. Use a 7mm 

nut driver to tighten the locknut while holding the 

axle with an adjustable wrench or pliers.



  5. Use a 1.5mm hex wrench to loosen the setscrew 

in the wheel collar to remove the collar. Use a file 

to make a flat area for the first 1/4-inch (6mm) on 

the bottom of the axle. This will provide an area to 

tighten the setscrew, making it more secure.

Always use threadlock on metal-to-metal fasteners 

to prevent them from vibrating loose.

Содержание Extra 300 32e

Страница 1: ...ons Wingspan 52 5 inches 1335mm Wing Area 542 sq in 34 2 sq dm Length 49 0 inches 1245mm Weight w Battery 4 40 4 60 lb 1 90 2 10 kg Weight w o Battery 3 70 3 90 lb 1 60 1 80 kg Extra 300 32e ARF Assem...

Страница 2: ...a good time Important Information Regarding Warranty Information Please read our Warranty and Liability Limitations section on Page 32 before building this product If you as the Purchaser or user are...

Страница 3: ...y glue 30 minute epoxy Brushless Outrunner Setup EFLM4032A Power 32 Brushless Outrunner Motor 770Kv APC14070E APC 14x7E Propeller or APC13065E APC 13x6 5E Propeller EFLA1060 60 Amp Pro Switch Mode BEC...

Страница 4: ...ve 5 slots even though only three 3 hinges were removed in the previous step 3 Use a pin vise and 1 16 inch 1 5mm drill bit to drill a hole in the center of each of the hinge slots in the wing Note th...

Страница 5: ...r the bond between the hinge and wood could fail 9 Flex the aileron slightly so the hinges can be seen Make sure not to change the hinge gap in the process Saturate the hinges using thin CA on both th...

Страница 6: ...e in the aileron The screw must exit to the bottom of the wing Always use threadlock on metal to metal fasteners to prevent them from vibrating loose 2 Slide the countersink back onto the control horn...

Страница 7: ...and not touching the sides of the opening Use a pencil to mark the locations for the servo mounting screws 8 Move the servo and use a pin vise with a 1 16 inch 1 5mm drill bit to drill the holes for...

Страница 8: ...crewdriver 12 Use a pin vise and a 5 64 inch 2mm drill bit to enlarge the outer hole in the servo horn 13 Insert the Z bend of the 21 2 inch 64mm linkage wire into the hole in the servo horn as shown...

Страница 9: ...he hatch pin rearward and lifting the hatch from the fuselage Always use threadlock on metal to metal fasteners to prevent them from vibrating loose 2 Use a 2 Phillips screwdriver to attach the X moun...

Страница 10: ...se leads do not interfere with the operation of the motor 5 Secure a 3 inch 76mm servo extension to the lead from the speed control using string or a commercially available connector 6 Mount the switc...

Страница 11: ...vibrations to be transmitted into the airframe which could damage the airframe or other components as well as produce unwanted flight characteristics 4 Slide the propeller on the adapter It may be nec...

Страница 12: ...ind nuts installed in the fuselage 2 Attach the landing gear using two 2 4 40 x 1 inch socket head screws and two 2 4 washers Use a 3 32 inch hex wrench or ball driver to tighten the screws Only insta...

Страница 13: ...wrench or ball driver 8 Repeat Steps 4 through 7 to install the remaining wheel and wheel pant Fuselage Servo and Receiver Installation Required Parts Fuselage assembly Hook and loop tape Receiver Ser...

Страница 14: ...ur holes in the fuselage for the servo mounting screws 4 Place 2 3 drops of thin CA in each of the holes to harden the surrounding wood This will help in preventing the screws from vibrating loose 5 U...

Страница 15: ...lace the parts nearby so they can be used in the next two sections of the manual 2 Use a 1 Phillips screwdriver to remove the stock servo arm from the elevator servo Install a heavy duty servo arm on...

Страница 16: ...ering 1 16 inch 1 5mm inside the lines drawn on the fuselage 8 Repeat Steps 5 through 7 to prepare the opposite side of the fuselage 9 Check the fit of both stabilizers to the fuselage They must fit t...

Страница 17: ...aper towel and rubbing alcohol to remove any excess epoxy 14 Apply a small amount of epoxy in the holes of the stabilizer for the stabilizer tubes in the remaining stabilizer half 15 Use an epoxy brus...

Страница 18: ...plastic film the model was packaged in using scissors Use low tack tape to tape the plastic to the elevators so the joiner wire isn t accidentally glued to the stabilizers 3 Use a pin vise with a 1 1...

Страница 19: ...r wire is positioned in the elevator as well The elevator should fit tightly against the stabilizer in this step If it does not check to determine why and correct as necessary 7 Repeat Steps 4 through...

Страница 20: ...so the hinges can be accessed Use care not to change the hinge gap Saturate each hinge with thin CA on both the top and bottom of the hinge Allow the CA to fully cure before proceeding 13 Once the CA...

Страница 21: ...won t be able to use a square to accurately set the angles during this step but it will help gauge the angles Check that both angles are equal 4 Once the alignment has been checked mix 1 4 ounce 15mL...

Страница 22: ...ck at the top and bottom of the tail gear bushing Work the jelly into the bushing to prevent epoxy from entering the bushing If epoxy enters it could glue the wire to the bushing 2 Use medium grit san...

Страница 23: ...the two hinge slots in the rudder and fin 7 Place a T pin in the center of each of the hinges as shown You will need to prepare two 2 hinges in this step 8 Slide the two 2 hinges into the slots in the...

Страница 24: ...ust be allowed to penetrate the hinge or the bond between the hinge and wood could fail 12 Move the rudder slightly to access the hinges without changing the hinge gap Saturate each hinge on both side...

Страница 25: ...ep the rudder centered when installing the rudder cables will make the installation much easier 2 Slide a crimp on one end of a rudder cable 3 The cable then goes through the hole in the cable fitting...

Страница 26: ...ar to the rudder servo centerline 11 Check that the cable is not tangled in any of the formers or the elevator servo wires It must be a straight shot to the rudder servo The cable will connect to the...

Страница 27: ...ed 17 Adjust the cable in the crimps so there is light tension on each of the cables Once tensioned use crimping pliers to secure the crimps to the cables Use side cutters to trim any excess wire that...

Страница 28: ...Make sure to guide the servo lead from the aileron servo into the fuselage as well 3 Slide the wing tightly against the fuselage The rear anti rotation pin will fit into the fuselage to keep the wing...

Страница 29: ...bbing alcohol 1 Place a piece of the clear plastic your model was packed in or a piece of waxed paper over the fuselage in the area of the canopy hatch This will keep you from accidentally gluing the...

Страница 30: ...ghtly nose down This is the correct balance point for your model You should find the CG to be very close with the battery installed forward in the battery area inside the cowling We suggest a Center o...

Страница 31: ...dder and throttle move in the correct direction Check the radio installation and make sure all the control surfaces are moving correctly i e the correct direction and with the recommended throws Check...

Страница 32: ...zon Hobby Inc Horizon warranties that the Products purchased the Product will be free from defects in materials and workmanship at the date of purchase by the Purchaser Limited Warranty Horizon reserv...

Страница 33: ...onal protection Ship via a carrier that provides tracking and insurance for lost or damaged parcels as Horizon is not responsible for merchandise until it arrives and is accepted at our facility A Ser...

Страница 34: ...waste disposal service or where you purchased the product Age Recommendation 14 years or over Not a toy Not intended for use by children without direct adult supervision 2009 Official Academy of Mode...

Страница 35: ...duals properly licensed by the FCC are authorized to operate equipment on Amateur Band frequencies 6 I will not knowingly operate my model aircraft within three 3 miles of any preexisting flying site...

Страница 36: ...61822 USA 877 504 0233 Horizon Hobby UK Units 1 4 Ployters Rd Staple Tye Harlow Essex CM18 7NS United Kingdom 44 0 1279 641 097 Horizon Hobby Deutschland GmbH Hamburger Strasse 10 25335 Elmshorn Germ...

Отзывы: