Dyson SV06 205983-01 Скачать руководство пользователя страница 24

24

GARANTIE GEDURENDE 2 JAAR

GARANTIEVOORWAARDEN VAN DE DySON GARANTIE VAN 2 JAAR

WAT WORDT GEDEKT DOOR DE GARANTIE

• 

De reparatie van uw apparaat als uw apparaat defect raakt als gevolg van 

ondeugdelijke materialen, fabricage- of functioneringsfouten binnen 2 jaar 

na aankoop of levering (als een onderdeel niet langer beschikbaar is of niet 

meer wordt geproduceerd, zal Dyson het onderdeel vervangen door een 

functionerend alternatief).

• 

Indien dit apparaat buiten de EU wordt verkocht, is de garantie alleen van 

kracht als het apparaat wordt gebruikt in het land waarin het werd verkocht.

• 

Indien dit apparaat binnen de EU wordt verkocht, geldt deze garantie uitsluitend 

(i) als het apparaat wordt gebruikt in het land waarin het werd verkocht, of (ii) 

als het apparaat wordt gebruikt in België, Duitsland, Frankrijk, Ierland, Italië, 

Nederland, Oostenrijk, Spanje of het Verenigd Koninkrijk en als hetzelfde 

model als dit apparaat en met hetzelfde vermogen in het betreffende land 

wordt verkocht.

WAT WORDT NIET GEDEKT DOOR DE GARANTIE

Dyson geeft geen garantie op reparaties of vervanging van producten als 

gevolg van de volgende oorzaken:

• 

Schade door ongelukken, problemen veroorzaakt door verwaarlozing, verkeerd 

of onvoorzichtig gebruik of gebruik wat niet geschiedt in overeenstemming met 

de Dyson gebruikshandleiding.

• 

Gebruik van de apparaat voor iets anders dan normaal huishoudelijk gebruik.

• 

Gebruik van onderdelen die niet in overeenstemming met de instructies van 

Dyson aangesloten of geplaatst zijn.

• 

Gebruik van andere dan originele Dyson onderdelen en accessoires.

• 

Foutieve installatie (behalve installaties die door Dyson zelf verricht zijn).

• 

Reparaties of aanpassingen die door derden anders dan Dyson of haar 

gecertificeerde agenten zijn uitgevoerd.

• 

Verstoppingen – wij verwijzen u naar de instructies over het oplossen van 

verstoppingen die u vindt in de Dyson gebruikshandleiding of op www.dyson.nl 

onder Ondersteuning.

• 

Normale slijtage (bijvoorbeeld zekeringen, aandrijfriem, borstel, batterijen, 

enz.).

• 

Het gebruik van dit apparaat op puin, as, or gips.

• 

Korter wordende levensduur van batterij veroorzaakt door veroudering van de 

batterij of door gebruik (indien van toepassing).

Als u twijfelt over de dekking van de garantie neem dan contact op met het 

Dyson Helpdesk in Nederland op: 020 521 98 90.

OVERZICHT VAN DEKKING

• 

De garantie gaat in op het moment van aankoop (of een eventueel latere 

leverdatum).

• 

U dient uw aankoopbewijs en alle eventuele extra documentatie te laten zien 

voordat er enig onderhoud aan uw apparaat kan worden verricht. Zonder dit 

bewijs zijn wij verplicht kosten te berekenen. Bewaar uw aankoopbewijs en alle 

eventuele extra documentatie dus goed.

• 

Reparaties zullen worden uitgevoerd door Dyson of gecertificeerde agenten.

• 

Vervangen onderdelen worden eigendom van Dyson.

• 

Door reparatie of vervanging van uw apparaat wordt de garantieperiode 

niet verlengd.

• 

De garantie is een aanvulling op uw rechten als consument en beïnvloedt 

deze niet.

BELANGRIJKE INFORmATIE 

OVER GEGEVENSBESCHERmING

Als u ons informatie over derden verstrekt, bevestigt u dat u door hen bent 

aangesteld om hen te vertegenwoordigen, dat zij hebben ingestemd met het 

gebruik van hun persoonlijke gegevens inclusief vertrouwelijke persoonlijke 

gegevens en dat u hen hebt geïnformeerd over uw identiteit en de redenen 

waarom hun persoonlijke gegevens zullen worden gebruikt.  

U hebt recht op de verstrekking van een kopie van de informatie die we over u 

hebben geregistreerd (waarvoor we een kleine vergoeding mogen berekenen) 

en op correctie van eventueel onjuiste gegevens.  

Ten behoeve van kwaliteitscontrole en opleidingsdoeleinden kunnen we uw 

contacten met ons vastleggen en gebruiken.

• 

Als uw persoonlijke gegevens wijzigen, als u van mening verandert over uw 

marketingvoorkeuren of als u vragen hebt over het gebruik van uw gegevens, 

neem dan contact op met Dyson BV, Keizersgracht 209, 1016DT Amsterdam, of 

door te bellen met de Dyson Helpdesk in Nederland: 020 521 98 90. U kunt uw 

wijzigingen tevens e-mailen naar [email protected]

• 

Voor meer informatie over hoe wij uw privacy beschermen, raadpleeg ons 

privacybeleid op www.dyson.nl

ES

CÓmO UTILIZAR SU APARATO DySON

LEA LAS "RECOmENDACIONES ImPORTANTES DE SEGURIDAD" QUE SE 
INCLUyEN EN ESTE mANUAL DE INSTRUCCIONES DE DySON ANTES DE 
CONTINUAR.

FUNCIONAmIENTO

• 

No la utilice en el exterior o sobre superficies mojadas, ni para aspirar líquidos, 

puede sufrir una descarga eléctrica.

• 

Asegúrese de que el aparato esté siempre en posición vertical durante su uso. Si 

el aparato se pone boca abajo, pueden caer restos de suciedad y polvo. 

• 

No encienda el aparato mientras elimina cualquier obstrucción.

• 

Sólo para uso doméstico interior y para automóviles. No lo utilice con el 

automóvil en marcha o mientras conduce.

• 

Para que funcione en modo Máxima potencia, mantenga presionado el 

disparador y presione el botón Máxima potencia. Se encenderá el botón 

Máxima potencia.

• 

Para desactivar el modo Máxima potencia, mantenga presionado el disparador 

y presione el botón Máxima potencia nuevamente. Nota: El aparato funcionará 

en el último modo utilizado. Por lo tanto, si se usa en modo Máxima potencia 

y no se desconecta, el aparato funcionará en modo Máxima potencia las 

próximas veces que se use hasta que oprima el botón Máxima potencia para 

desactivar este modo.

• 

Este producto tiene cerdas de fibra de carbono. Tenga cuidado si las toca, 

pueden causar irritación de la piel. Lávese las manos después de tocar 

el cepillo.

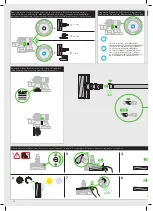
INSTALACIÓN DEL PUERTO DE CARGA

• 

Utilice accesorios de montaje apropiados para el tipo de pared y asegúrese 

de que el puerto de carga esté seguro y bien sujeto. Compruebe que no 

haya ninguna tubería (de gas, agua o aire), cables eléctricos ni otro tipo de 

conducciones situados directamente bajo el área de montaje. El puerto de 

carga debe montarse de acuerdo con las normas y los estándares en vigor 

(en cumplimiento de las leyes nacionales y locales correspondientes). Dyson 

recomienda usar la ropa, gafas y materiales de protección que sean necesarios.

ALFOmBRAS O PARQUETS

• 

Antes de aspirar el suelo o las alfombras, consulte las instrucciones de limpieza 

recomendadas por el fabricante de los mismos.

• 

La escobilla del aparato puede dañar determinados tipos de alfombras y 

suelos. Las fibras de determinadas alfombras se levantarán si se utiliza la 

escobilla giratoria motorizada para aspirar. Si esto ocurre, recomendamos 

aspirar sin el accesorio de suelo motorizado y consultar con el fabricante del 

material del suelo.

• 

Antes de aspirar superficies muy pulidas, como madera o linóleo, compruebe 

que la parte inferior del cepillo no contiene objetos extraños que pudieran 

arañar el suelo.

CUIDADO DE SU APARATO DySON

• 

No lleve a cabo ninguna operación de mantenimiento ni de reparación aparte 

de las indicadas en este manual de instrucciones o de las que se le aconseje en 

el servicio de atención al cliente de Dyson.

• 

Utilice únicamente piezas recomendadas por Dyson. En caso contrario, se 

invalidaría su garantía.

• 

Guarde el aparato en el interior. No lo utilice ni almacene en lugares en los que 

la temperatura sea inferior a 3°C. Asegúrese de que el aparato se encuentra a 

temperatura ambiente antes de utilizarlo.

• 

Limpie el aparato únicamente con un paño seco. No utilice lubricantes, 

productos de limpieza, pulidores ni ambientadores en ninguna parte 

del aparato.

UTILIZACIÓN DEL ASPIRADOR

• 

No utilice el aparato si el cubo transparente y el filtro no están 

colocados correctamente.

• 

Las partículas pequeñas de polvo, como el polvo de construcción o la harina, 

sólo se deben aspirar en cantidades pequeñas.

• 

No utilice el aparato para recoger objetos duros afilados, juguetes pequeños, 

alfileres, sujetapapeles, etc., ya que podrían dañar el aparato.

• 

Al pasar la aspiradora, algunas alfombras pueden generar pequeñas descargas 

de estática en el cubo transparente o en la empuñadura. Estas son inofensivas y 

no están asociadas al suministro de corriente eléctrica. Para minimizar cualquier 

efecto derivado de ello, no coloque la mano ni inserte ningún objeto en el cubo 

transparente, salvo que lo haya vaciado primero. Lave el cubo transparente con 

un paño húmedo únicamente. (Consulte “Limpieza del cubo transparente”).

• 

Ponga atención mientras limpie en escaleras.

• 

No coloque el aparato sobre sillas, mesas, etc.

• 

No ejerza demasiada presión sobre la boquilla cuando utilice el aparato, ya 

que se podría dañar.

• 

No deje el cepillo sobre superficies delicadas.

• 

Al aspirar suelos encerados, el movimiento del cepillo de la aspiradora puede 

crear un brillo irregular. Si esto sucede, pase un paño húmedo, pula la zona con 

cera y deje secar.

DIAGNÓSTICO DEL CUERPO PRINCIPAL

Cuando esté en funcionamiento, con el disparador presionado:

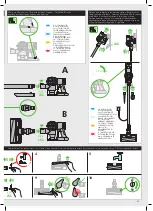
VACIADO DEL CUBO TRANSPARENTE

• 

Vacíe el cubo tan pronto como la suciedad llegue a la marca "MAX". No permita 

que la sobrepase.

• 

Asegúrese de que el aparato esté desconectado del cargador antes de vaciar el 

cubo. Tenga cuidado de no apretar el botón de encendido.

• 

Para vaciar el cubo con más facilidad, se recomienda retirar la empuñadura y el 

cepillo para suelos.

• 

Para eliminar la suciedad recogida, presione el botón rojo que se encuentra 

al lado del cubo transparente: presiónelo una vez para abrir la base del cubo. 

Presiónelo por segunda vez para extraer el cubo transparente del cuerpo 

principal del aparato.

• 

Para minimizar el contacto con el polvo o con alérgenos cuando vacíe el cubo, 

meta el cubo transparente en una bolsa de plástico y vacíelo.

• 

Saque el cubo transparente con cuidado de la bolsa.

• 

Cierre bien la bolsa y deséchela como lo hace normalmente.

• 

Cierre la base del cubo transparente de manera que haga “clic” y se 

ajuste correctamente.

Azul fijo: máxima potencia activada.

Luz apagada: Succión potente.

Luz azul intermitente: advertencia de nivel bajo 

de carga de batería.

Luz azul intermitente rápida: sin electricidad, fallo temporal 

(p. ej. control del filtro o detección de bloqueos).

Содержание SV06 205983-01

Страница 1: ...c h h e u t e I h r e G a r a n ti e R e g i s tr e e r u w g a r a n ti e v a n d a a g R e g i s tr e l a g a r a n t a h o y m i s m o R e g i s tri o g g i s t e s s o l a g a r a n z i a R e g i...

Страница 2: ...AS POR ELEGIR UN APARATO DYSON Despu s de registrar la garant a su aparato Dyson estar cubierto en piezas y mano de obra durante 2 a os desde la fecha de compra sujeto a los t rminos de la garant a Si...

Страница 3: ...n u pour tre utilis par de jeunes enfants ou des personnes handicap es physiques sensorielles ou mentales ou qui manquent d exp rience ou de connaissances moins d tre supervis s ou de recevoir des ins...

Страница 4: ...AUSHALT GEEIGNET NL BE BELANGRIJKE VEILIGHEIDSINSTRUCTIES LEES ALLE INSTRUCTIES EN WAARSCHUWINGEN IN DEZE GEBRUIKSHANDLEIDING EN OP HET APPARAAT ALVORENS DIT TE GEBRUIKEN Bij het gebruik van elektrisc...

Страница 5: ...RIPORTATE ALL INTERNO DEL PRESENTE mANUALE E SULL APPARECCHIO Quando utilizzate un apparecchio elettrico dovete attenervi sempre alle precauzioni fondamentali tra cui le seguenti ATTENZIONE Gli avvis...

Страница 6: ...e apparater skal man altid tage visse sikkerhedsforbehold ADVARSEL Disse advarsler g lder for selve apparatet og hvor det er relevant alle redskaber tilbeh r opladere eller netadaptere FOR AT mINDSKE...

Страница 7: ...kulmia vasten Sijoita virtajohto sivuun kulkuteist siten ettei sen p lle astuta eik siihen kompastuta l ved imuria sen virtajohdon yli 10 l irrota pistotulppaa vet m ll virtajohdosta Irrota laite s h...

Страница 8: ...INGER F R DU TAR I BRUK DETTE PRODUKTET m DU LESE ALLE INSTRUKSJONER OG ADVARSLER I DENNE H NDBOKEN OG P SELVE PRODUKTET Ved bruk av elektriske apparater m du f lge noen grunnleggende forholdsregler d...

Страница 9: ...ODAS AS INSTRU ES E mARCAS DE ATEN O DESTE mANUAL E NO APARELHO Quando utilizar um aparelho el ctrico devem se sempre seguir umas precau es b sicas incluindo as seguintes AVISO Estes avisos dizem resp...

Страница 10: ...dden 10 Dra inte i sj lva sladden n r du ska dra ur kontakten H ll i kontakten f r att dra ut den inte i sladden Anv ndning av en f rl ngningssladd rekommenderas inte 11 Anv nd den inte f r att suga u...

Страница 11: ...ZI KULLANmADAN NCE BU KILAVUZDAK VE C HAZIN ZER NDEK T m TAL mATLARI VE UyARI ARETLER N OKUyUN Elektrikli bir cihazi kullanirken a a idakiler de dahil temel nlemlere daima uyulmalidir UyARI Bu uyar la...

Страница 12: ...uche Diagnostiek Diagn stico Diagnostica Diagnostika Power mode and run time Mode de puissance et autonomie Betriebsmodus und Laufzeit Inschakelmodus en gebruikstijd Modo de potencia y tiempo de funci...

Страница 13: ...ES DYSON GER TS Zie UW DYSON APPARAAT GEBRUIKEN Ver C MO UTILIZAR SU APARATO DYSON Vedere USO DELL APPARECCHIO DYSON DYSON Glejte UPORABA VA E NAPRAVE DYSON Charging Chargement Ger t wird geladen Opla...

Страница 14: ...ren op verstoppingen Eliminaci n de obstrucciones Ricerca delle ostruzioni Iskanje blokad Clearing brush bar obstructions Enlever les obstructions dans la brosse Reinigung der B rstwalze Borstelversto...

Страница 15: ...ery month Laver le filtre l eau froide une fois par mois minimum Waschen Sie den Filter mindestens einmal im monat mit kaltem Wasser aus Was het filter ten minste eenmaal per maand met koud water Lave...

Страница 16: ...E CLEAR BIN Ensure the appliance is disconnected from the charger before removing the clear bin Be careful not to pull the ON trigger Remove the wand and floor tool Push the red button by the clear bi...

Страница 17: ...yson com Telephone the Dyson Helpline This will confirm ownership of your Dyson appliance in the event of an insurance loss and enable us to contact you if necessary LImITED 2 yEAR GUARANTEE TERmS AND...

Страница 18: ...UR TRANSPARENT V rifiez que l appareil est d branch du chargeur avant de retirer le collecteur transparent Veillez ne pas tirer sur la g chette ON Retirez l accessoire tube et brosse Appuyez sur le bo...

Страница 19: ...ENREGISTREZ VOUS COmmE PROPRIETAIRE D UN DySON mERCI D AVOIR CHOISI UN APPAREIL DySON Pour nous aider vous garantir un service rapide et efficace veuillez vous enregistrer comme propri taire Dyson Vou...

Страница 20: ...Verwendung des Ger ts nicht zu stark auf die D se damit diese nicht besch digt wird Bleiben Sie auf empfindlichen B den mit der Bodend se nicht auf der gleichen Stelle Bei gewachsten B den kann der E...

Страница 21: ...takt kann zu einer Reizung f hren Sp len Sie die Augen sofort mindestens 15 Minuten lang mit Wasser aus Konsultieren Sie einen Arzt Entsorgung tragen Sie beim Umgang mit dem Akku Schutzhandschuhe und...

Страница 22: ...of reparatiewerk uit anders dan hetgeen in deze Dyson gebruikshandleiding wordt toegelicht of door de Dyson Helpdesk wordt geadviseerd Gebruik uitsluitend onderdelen die door Dyson zijn aanbevolen Als...

Страница 23: ...voordat u het apparaat in gebruik neemt Het verwijderen van verstoppingen wordt niet gedekt door de garantie OPLADEN EN OPBERGEN Dit apparaat zal automatisch worden uitgeschakeld als de temperatuur va...

Страница 24: ...do el disparador y presione el bot n M xima potencia Se encender el bot n M xima potencia Para desactivar el modo M xima potencia mantenga presionado el disparador y presione el bot n M xima potencia...

Страница 25: ...jetos afilados cuando intente eliminar las obstrucciones Para acceder a los bloqueos del cepillo retire la placa base use una moneda para desajustar el tornillo marcado con un candado Si no es posible...

Страница 26: ...INSTALLAZIONE DELLA DOCKING STATION Utilizzare i componenti di montaggio appropriati per il tipo di parete e assicurare il corretto montaggio della docking station Verificare che dietro l area di mon...

Страница 27: ...che possono creare lievi irritazioni alla pelle Lavatevi le mani dopo aver maneggiato le setole Rimontare tutte le parti dell apparecchio prima dell uso La rimozione delle ostruzioni non coperta dall...

Страница 28: ...he non appartenenti alla Comunit Europea i Dati a soggetti terzi che rientrino in una delle seguenti categorie altre societ del gruppo Dyson agenti Dyson e ogni terzo che agisca in nome e per conto di...

Страница 29: ...bu Pokud p strojem vys v te jemn prach nebo pou v te li jej p ev n v re imu Vysok konstantn s n m e b t zapot eb pr t filtr ast ji Omyjte filtr ve studen vod Oplachujte vodou vn j st filtru dokud z n...

Страница 30: ...Anvend kun dele som er anbefalet af Dyson Hvis du ikke g r dette kan det ugyldigg re din garanti Opbevar apparatet indend rs Det m ikke anvendes eller opbevares under 3 C Kontroll r at apparatet har...

Страница 31: ...SEL Det batteri der anvendes i denne maskine kan ved forkert brug udg re en brandfare eller fare for tsning M ikke skilles ad kortsluttes opvarmes over 60 C eller forbr ndes Opbevares utilg ngeligt fo...

Страница 32: ...staminen Ole erityisen varovainen imuroidessasi portaita l aseta laitetta tuolille p yd lle tms l paina suulaketta liikaa k yt n aikana ettei se vaurioidu l j t laitteen suulaketta yhteen kohtaan help...

Страница 33: ...vit se v litt m sti paikallisten m r ysten mukaisesti HUOm T ss imurissa k ytetty akku voi aiheuttaa tulipalon tai kemikaalivuodon vaaran jos sit k sitell n v rin l pura akkua aiheuta oikosulkua tai...

Страница 34: ...34 Dyson DySON B Dyson Dyson 3 C 37 4 F ON ON ON 24 ON 24 ON ON...

Страница 35: ...n 15 140 F 60 C Dyso n GR Dyso n Dyso n Dyso n Dyso n DySON DySON Dyso n Dyso n 800 111 3500 Dyso n 2 DySON Dyso n 2 Dyso n i ii TI Dyso n Dyso n Dyso n Dyso n Dyso n Dyso n Dyso n o Dyso n 800 111 35...

Страница 36: ...azonnal r tse ki a tart lyt nem szabad t lt lteni Az tl tsz portart ly ki r t se el tt vegye le a k sz l ket a t lt r l gyeljen nehogy v letlen l bekapcsolja a k sz l ket Az tl tsz portart ly ki r t s...

Страница 37: ...en jrahasznos that anyagokb l k sz lnek K rj k k sz l k t k r ltekint en selejtezze le s lehet leg gondoskodjon az jrahasznos t s r l Miel tt a term ket leselejtezi t vol tsa el bel le az elemet Az ak...

Страница 38: ...t Trykk inn den r de knappen ved den klare beholderen Trykk n gang for pne understellet p beholderen Trykk n gang til for l sne den klare beholderen fra selve st vsugeren Ta forsiktig ut den klare beh...

Страница 39: ...brukerkj pslovens rammer velge erstatte denne med en fungerende erstatningsdel Der dette produktet selges utenfor EU er garantien gyldig kun n r produktet installeres og brukes i det landet der den bl...

Страница 40: ...podstaw przezroczystego pojemnika CZ CI ZmyWALNE Urz dzenie zawiera cz ci zmywalne kt re wymagaj regularnego czyszczenia Nale y post powa zgodnie z poni szymi instrukcjami myCIE TURBOSZCZOTEK Urz dzen...

Страница 41: ...dzenie b dzie u ywane na terenie Austrii Belgii Francji Irlandii Holandii Hiszpanii Niemiec Wielkiej Brytanii lub W och oraz gdy w odpowiednim kraju sprzedawany jest taki sam model urz dzenia o takim...

Страница 42: ...caixar no lugar certo Feche o dep sito transparente de modo a que ele encaixe na devida posi o e fique bem fixo PE AS LAV VEIS O seu aparelho tem pe as lav veis que exigem uma limpeza regular Siga as...

Страница 43: ...cer o n mero de s rie da m quina data e lugar de compra factura de compra ou o alvar de entrega c pia e qualquer outro documento adicional Guarde estas informa es num lugar seguro para se assegurar de...

Страница 44: ...44 DySON Dyson Dyson Dyson 3 C 37 4 F MAX ON 24 24 1 2 ON...

Страница 45: ...n Dyson 8 800 100 100 2 info russia dyson com 10 00 19 00 Dyson Dyson SV06 100 28 6 20 6 16 3 5 0 4 68 9 87 1180 x 250 x 208 2 1 EAC Dyson 16 20 9 info russia dyson com 8 800 100 100 2 EU Dyson 2009 2...

Страница 46: ...bara delar som rekommenderas av Dyson Om du inte g r det kan garantin upph vas F rvara maskinen inomhus Anv nd eller f rvara den inte i temperaturer under 3 C Se till att maskinen har rumstemperatur...

Страница 47: ...nvisningar om hur du g r det Ta bort igens ttningen och s tt tillbaka borsthuvudena p det s tt som visas i avsnittet Tv tta borsthuvudena Se till att f stanordingen r helt vriden och att borsthuvudena...

Страница 48: ...primerno namestitveno opremo za tip stene in zagotovite da je zdru itvena postaja varno pritrjena Prepri ajte se da za namestitvenim obmo jem ni nobenih cevi plin voda zrak ali elektri nih kablov ic a...

Страница 49: ...ncija ne pokriva POLNJENJE IN SHRANJEVANJE Naprava se bo izklopila e bo temperatura baterije padla pod 3 C 37 4 F Ta funkcija iti motor in baterijo Sesalnika nikoli ne napolnite in nato shranite v pro...

Страница 50: ...kaplamalar kilim ve hal lar n z s p rmeden nce reticilerinin tavsiye etti i temizleme talimatlar n kontrol edin Cihazda kullan lan f r a ba l k belli hal cinslerine ve zeminlere zarar verebilir S p rm...

Страница 51: ...sonu lanabilir Yeniden al t rmadan nce t m t kan kl klar giderin Kullanmadan nce t m par alar yerine g venli bir ekilde yerle tirin T kan kl klar n giderilmesi garanti kapsam nda de ildir ARJ ETmE VE...

Страница 52: ...yna kla na n ha sa rla r Dyso n ta ra f nda n ya p la n yerle tirme ha ri Ba k m ve ta mira tla r n Dyso n yetkili temsilcisi ha ricinde ya p lma s Blo ka j Elektrikli s p rgedeki blo ka jla r n na s...

Страница 53: ...53...

Страница 54: ...54...

Страница 55: ...55...

Страница 56: ...ht cz 491 512 083 Solight Holding s r o Svatoplukova 47 796 01 Prost jov DE Dyson Kundendienst kundendienst dyson de 0800 31 31 31 8 Dyson Servicecenter DVG Birkenmaarstr 50 53340 Meckenheim DK Witt A...

Отзывы: