background image

Award BIOS Setup Guide

43

IDE Primary Master PIO/IDE Primary Slave PIO/IDE Secondary Master PIO/IDE
Secondary Slave PIO:
 Available selection are “Auto”, “Mode 0”, “Mode 1”, “Mode 2”, “Mode
3” and “Mode 4”.  To choose “Auto”, the system BIOS will scan the IDE device and decide
which mode of the device is.  Otherwise the user should key in the mode of the device to the
corresponding field.

Some harddisks cannot work properly with its corresponding timing, please set a slower
timing.

IDE Primary Master UDMA/IDE Primary Slave UDMA/IDE Secondary Master
UDMA/IDE Secondary Slave UDMA:
 Available selection are “Auto” or “Disabled”.  To
choose “Auto”, the system BIOS will scan the IDE device and decide Ultra DMA supported or
not.

Init Display First: To select priority of initialization the PCI display card or the AGP display
card.

POWER ON Function: To support PS/2 mouser power on (hit the left key or the right key of the
mouse two times) and keyboard password power on.

KBC input clock: To select the keyboard controller frequency 6, 8, 12, 16MHz.

Onboard FDD Controller: Choose Enabled or Disabled.  Enabled allows onboard Floppy Drive
Controller to be functioned, otherwise the users should use other sources.

Onboard Serial Port 1: Choose Auto, Disabled, 3F8/IRQ4, 2F8/IRQ3, 3E8/IRQ4 and
2E8/IRQ3.  While choosing proper I/O Address/IRQ, be sure not to cause Address conflict with
other I/O devices.  The default setting is 3F8/IRQ4.

Onboard Serial Port 2: Choose Auto, Disabled, 3F8/IRQ4, 2F8/IRQ3, 3E8/IRQ4 and
2E8/IRQ3.  While choosing proper I/O Address/IRQ, be sure not to cause Address conflict with
other I/O device.  The default setting is 2F8/IRQ3.

UART Mode Select: Available selection are “Normal”, “IrDA” and “ASKIR”.

Onboard Parallel Port: Choose None or with four different I/O Address and corresponding
IRQx.  While choosing proper I/O Address, be sure not to cause Address conflict with other I/O
devices.

Parallel Port Mode:  Choose SPP, EPP, ECP, ECP+EPP Mode.  Make proper selection with the
attached printer port device.

ECP Mode Use DMA: Choose “1” or “3” to select the DMA channel used for the ECP device.
This item is shown if the Onboard Parallel Mode is chosen as “ECP” or “ECP/EPP” option.

Содержание PAM-0067V

Страница 1: ...PAM 0067V High Performance Pentium PCI Mainboard User s Guide Edition 1 00 1998 DTK Computer Inc P N 155100 8651 ...

Страница 2: ......

Страница 3: ... off the power Windows MS DOS and MS Word are trademarks of Microsoft Corporation Novell Netware are trademarks of Novell Inc PC AT PC DOS OS 2 and Presentation Manager are trademarks of IBM Corporation Pentium is registered trademark of Intel Corp UNIX is the trademark of AT T All other brand and product names are trademarks or registered trademarks of their respective companies The information p...

Страница 4: ... SELECTION SW1 6 7 8 13 2 7 CHIPSET BUS CLOCK SETTING JP9 JP10 13 2 8 CPU SPEED 14 2 9 JP7 CLEAR CMOS DATA 15 2 10 JP5 VOLTAGE SELECTION FOR SYSTEM ROM 16 2 11 JP6 ONBOARD AUDIO SELECT OPTIONAL 17 2 12 JP2 ONBOARD VGA SELECT 17 2 13 JP8 JP11 SDRAM CLOCK SETTING 18 2 14 JP12 POWER SUPPLY SELECTION 18 2 15 RESERVED JUMPERS 18 2 16 MEMORY CONFIGURATION 19 2 17 VIDEO MEMORY CONFIGURATION 20 CHAPTER 3 ...

Страница 5: ...ETUP MENU 38 4 6 PCI CONFIGURATION 40 4 7 INTEGRATED PERIPHERALS SETUP MENU 42 4 8 LOAD SETUP DEFAULTS MENU 44 4 9 SUPERVISOR PASSWORD 44 4 10 USER PASSWORD 45 4 11 IDE HDD AUTO DETECTION 45 4 12 HDD LOW LEVEL FORMAT MENU 46 4 13 SCSI HARD DISK INSTALLATION 49 4 14 SAVE EXIT SETUP MENU 49 4 15 EXIT WITHOUT SAVING MENU 49 CHAPTER 5 SOFTWARE INSTALLATION 51 5 1 WIN95 BUS MASTER IDE DRIVER INSTALLATI...

Страница 6: ...IV CHAPTER 6 FLASH AND DMI UTILITY 59 6 1 AWARD FLASH UTILITY 59 6 2 DESKTOP MANAGEMENT INTERFACE DMI OVERVIEW 61 APPENDIX A QUICK GUIDE 65 ...

Страница 7: ...86B PCI Integrated Peripheral Controller ATI 3D Rage LT PRO AGP Integrated Graphics Accelerator Winbond W83977EF AW Super I O Controller ESS 1869 Audio Drive Sound Controller Optional Cache Size Built in 512KB Synchronised Pipelined Burst Mode SRAM to achieve the high Pentium system performance Main Memory Support Mixed Memory Technologies Extend Data Output EDO Standard Page Mode SPM and Fast Pag...

Страница 8: ...Chapter 1 2 Fig 1 Key Components of the Mainboard ...

Страница 9: ... up drives LS 120 etc PCI Master IDE controller supports PIO Mode 3 and 4 devices I O data transfer rate can be up to 17Mb s Ultra DMA Mode supported Transfer rate can be up to 33Mb s Sound Controller Compatible with all major PC sound standards including Sound Blaster Pro MPU 401 and Windows Sound System Plug and Play support for Audio Joystick FM Controller MPU 401 Wave Audio support sample rate...

Страница 10: ...4 515 hours Preventive Maintenance Not Required Environmental Limits Operating Non operating Temperature 0 to 50 degree Celsius 10 to 65 Degree Celsius Relative Humidity without condensation 8 to 85 5 to 95 Altitude 10 000ft 40 000ft Vibration 1 000Hz Electricity 4 75 5 25V ...

Страница 11: ...ed from jumper 2 2 CPU TYPE 2 2 1 INTEL PENTIUM CPU The pentium processors have different operation voltage In order to using the CPU Voltage correctly the following is the marking for identify the CPU type Fig 2a CPU Description Bottom Side Description X Voltage Specification S or V Y Timing Specification S or M S Standard Voltage 3 4V S Standard EDS timings V VRE 3 4 3 6V 3 5V M Min Valid Delay ...

Страница 12: ...indicate a valid product marking Fig 2b CPU Description Top Side 2 2 3 AMD K6 CPU The AMD K6 CPU family require dual voltage power for operation The AMD K6 166 200 require a voltage of 2 9V core and 3 3V I O The AMD K6 233 require a voltage of 3 2V core and 3 3V I O The following diagram is provided as an example only It does not necessarily indicate a valid product marking Fig 2c CPU Description ...

Страница 13: ...f the CPU The following diagram is provided as an example only It does not necessarily indicate a valid product marking Fig 2d CPU Description Top Side 2 2 5 CYRIX 6x86 CPU The Cyrix 6x86 has different nominal voltage depends on different lot Please refer to the CPU marking Fig 2e CPU Description Top Side Marketing Recommended Nominal Voltage 3 3V or 3 52V 3 52V 028 3 52V 016 3 3V Blank 3 52V ...

Страница 14: ...oltage Please refer to the CPU marking Fig 2f CPU Description Top Side 2 2 7 CYRIX 6x86MX CPU The Cyrix 6x86MX has different I O and Core Voltage Please refer to the CPU marking Fig 2g CPU Description Top Side I O Voltage Core Voltage Cyrix 6x86MX 3 3V 2 9V Cyrix 6x86L 3 3V 2 8V ...

Страница 15: ...Jumper Settings 9 2 2 8 IDT WinCHIP C6 CPU The IDT WinChip C6 CPU has different operating voltage Please refer to the CPU marking to identify the operating voltage Fig 2h CPU Description ...

Страница 16: ...Chapter 2 10 2 3 GRAPHICAL DESCRIPTION OF JUMPER SETTINGS Fig 3 Jumper Location of the mainboard ...

Страница 17: ...d BIOS CPU core voltage as Auto Fig 4 2 4 2 CPU VOLTAGE BIOS SELECTION The CPU Voltage can be selected through BIOS setup CPU Core Voltage Selection It can be set as following table 2 2 AMD K6 2 2V K6 2 2 8 Intel MMX P55C Cyrix 6x86L 2 9 AMD K6 2 9V Cyrix 6x86MX M II IBM6x86MX 3 2 AMD K6 3 2V 3 3 Intel Pentium 3 52 Cyrix 6x86 AMD K5 Table 1 Note SW1 1 2 and JP1 should be set at OFF see Fig 4 when ...

Страница 18: ...nd JP1 when the BIOS CPU Core Voltage be set as Disabled Voltage SW1 JP1 CPU Type 2 2V AMD K6 2 2V K6 2 2 8V Intel Pentium w MMX P55C Cyrix 6x86L 2 9V AMD K6 2 9V Cyrix 6x86MX M II IBM6x86MX 3 2V AMD K6 3 2V 3 3V Intel Pentium P54C 3 5V 6x86 AMD K5 Table 2 ON 1 2 ON 1 2 ON 1 2 ON 1 2 ON 1 2 ON 1 2 ...

Страница 19: ...hese must be set together with the above jumpers CPU External Bus Frequency Selection 2 6 CPU EXTERNAL BUS FREQUENCY SELECTION SW1 6 7 8 These switches tell the clock generator what frequency to send to the CPU The Bus clock times the Bus Ratio equals the CPU s Internal frequency 2 7 CHIPSET BUS CLOCK SETTING JP9 JP10 These jumpers set the chipset timing according the CPU external bus frequency se...

Страница 20: ... OFF ON ON 2 3 1 2 AMD K6 2 250 250MHz 2 5x 100MHz ON ON OFF OFF OFF OFF 1 2 2 3 AMD K6 2 266 266MHz 4 0x 66MHz ON OFF ON OFF ON ON 2 3 1 2 AMD K6 2 300 300MHz 3 0x 100MHz OFF ON OFF OFF OFF OFF 1 2 2 3 AMD K6 2 333 333MHz 3 5x 95MHz OFF OFF OFF ON OFF OFF 1 2 2 3 AMD K6 2 350 350MHz 3 5x 100MHz OFF OFF OFF OFF OFF OFF 1 2 2 3 Cyrix 6x86L PR150 120MHz 2 0x 60MHz ON OFF OFF ON ON ON 2 3 1 2 Cyrix 6...

Страница 21: ...Jumper Settings 15 2 9 JP7 CLEAR CMOS DATA JP7 is used to clear the content of the CMOS Data in the RTC 1 Normal Mode Fig 5a 2 Reset Content of RTC Fig 5b ...

Страница 22: ...Chapter 2 16 2 10 JP5 VOLTAGE SELECTION FOR SYSTEM ROM 1 5V Flash EPROM on System ROM Fig 6a 2 12V Flash EPROM on System ROM Fig 6b ...

Страница 23: ...6 ONBOARD AUDIO SELECT OPTIONAL JP6 is used to set the onboard Audio enabled or disabled Table 4 Onboard Audio Select 2 12 JP2 ONBOARD VGA SELECT JP2 is used to set the onboard VGA enabled or disabled Table 5 Onboard VGA Select ...

Страница 24: ...2 14 JP12 POWER SUPPLY SELECTION Table 7 Power Supply Selection Note You should set the Power Supply Type Section 4 4 correctly to match this jumper setting 2 15 RESERVED JUMPERS JP4 is an optional jumper it may not be installed on the mainboard when the optional CPU overheat alarm system not installed When JP4 is set as pin 2 3 shorted the optional CPU overheat alarm system will be enabled If it ...

Страница 25: ...Note The type of SIMM1 SIMM2 must be same Only 3 3V unbuffered DIMM can be used Both single sided and double sided SIMM or DIMM can be supported Table 8 provides the typical memory configurations supported by the mainboard Bank 0 1 SIMM1 2 Bank 2 3 DIMM1 Bank 4 5 DIMM2 Installed None None Installed Installed None None Installed None Installed None Installed None None Installed Installed Installed ...

Страница 26: ...nding the video memory size 2MB video memory is built in with SGRAM on U27 and U28 User can upgrade the video memory to 4MB with the 2MB SGRAM module Optionally 4MB video memory may be installed on the mainboard in such case user have to upgrade the video memory to 8MB with the 4MB SGRAM module Fig 7 ...

Страница 27: ...been fastened into system case the next step is to connect the internal cables and external cables The mainboard connectors have varying numbers of pins and are the points of contact between the mainboard and other parts of the computer Fig 8 Connector Location ...

Страница 28: ...Chapter 3 22 Fig 9a Optional GOI 660 Extension Card Fig 9b Optional GOI 603 Extension Card ...

Страница 29: ...ollowing figure Fig 10 Multiple Function Jumper 3 2 J2 CPU FAN CONNECTION J2 is a three pin connector which is used to connect with the CPU FAN power cable Fig 11 CPU Fan Connector 3 3 J3 FEATURE CONNECTOR This connector is the feature connector for VGA controller 3 4 J4 TV OUT CONNECTOR This connector is the extension connector for TV OUT support use the cable to connect on board J4 pin1 2 to J4 ...

Страница 30: ...nboard Thus the mainboard can be wake up from suspend mode through the Internal Modem Ring in Fig 12 Internal Modem Ring in Connector 3 6 J6 PARALLEL PORT CONNECTOR Use the 25 way cable to connect the J6 with J6 of GOI 603 extension card 3 7 J7 J8 USB CONNECTOR Use the 10 way cable to connect the J7 J8 with J5 of GOI 603 extension card Fig 13 USB Connector ...

Страница 31: ...R The pin definition is as following Fig 14 IrDA Fast IR Connector 3 9 J10 J11 PRIMARY SECONDARY IDE CONNECTOR These connectors support the provided IDE hard disk ribbon cable After connecting the single end to the board connect the two plugs on the other end to your hard disk 3 10 J12 FLOPPY DRIVE CONNECTOR This connector supports the floppy drive ribbon cable After connecting the single end to t...

Страница 32: ...tion 1 Power Good Orange 7 Ground Black 2 5 VDC Red 8 Ground Black 3 12 VDC Yellow 9 5 VDC White 4 12 VDC Blue 10 5 VDC Red 5 Ground Black 11 5 VDC Red 6 Ground Black 12 5 VDC Red Table 9 AT Power Connector 3 12 J14 ATX POWER CONNECTOR J14 is a 2x10 pin male connector Plug the power connector of the ATX power supply onto the connector Fig 15 ATX Power Connector ...

Страница 33: ...R SONY J16 is a four pin connector which is used to connect with the Sony CD ROM audio output This pin definition is as following Fig 17 CD ROM Audio Connector 3 15 J17 WAVETABLE EXPANSION CONNECTOR J17 is a 2x13 pin male connector which is used to connect the hardware wavetable expansion card 3 16 J18 J19 AUDIO EXTENSION CARD GOI 660 CONNECTOR OPTIONAL Use the 9 way cable to connect the J18 with ...

Страница 34: ...S 2 KEYBOARD CONNECTOR This connector is a six pin female mini DIN connector using a PS 2 plug If a standard AT size keyboard plugs you may use the DIN to mini DIN adaptor 3 19 PS 2 MOUSE CONNECTOR This connector is a six pin female mini DIN connector using a PS 2 plug Plug the jack on the PS 2 keyboard cable into this connector 3 20 LCD OUT This is a D Type 44 pin 3 rows female connector for LCD ...

Страница 35: ...nnector Configuration 29 3 21 SERIAL PORT COM1 COM2 This is a D Type 9 pin male connector for pointing devices or other serial devices 3 22 VGA CONNECTOR This is a D Type 15 pin male connector for monitor ...

Страница 36: ...Chapter 3 30 ...

Страница 37: ...he BIOS setup program to tell the operating system what type of devices such as disk drives are connected to the system board The system setup is also called CMOS setup Normally users need to run system setup if either the hardware configuration is not identical with information contained in the CMOS RAM or the CMOS RAM has lost power 4 1 AWARD BIOS SETUP The setup program provided with the mainbo...

Страница 38: ...SSWORD IDE HDD AUTO DETECTION HDD LOW LEVEL FORMAT SAVE EXIT SETUP EXIT WITHOUT SAVING Esc Quit Select Item F10 Save Exit Setup Shift F2 Change Color Time Data Hard Disk Type Fig 20 3 Choose an option and press Enter Modify the system parameters to reflect the options installed in the system see the following sections for more information 4 Press ESC at anytime to return to the Main Menu 5 In the ...

Страница 39: ...ll Errors Base Memory Extended Memory Other Memory Total Memory 0K 0K 512K 512K Esc Quit Select Item PU PD Modify F1 Help Shift F2 Change Color Fig 21 Date mm dd yy Type the current date Time hh mm ss Type the current time Hard Disks Choose from the standard hare disk types 1 to 45 Type 47 is user definable Type Auto is for auto detect the hard disk type Drive A B Choose 360K 5 25in 1 2M 5 25in 72...

Страница 40: ...isabled Disabled PCI VGA Palette Snoop OS Select For DRAM 64MB HDD S M A R T Capability Report No FDD For WIN 95 Disabled Non OS2 Disabled No ESC Quit Select Item F1 Help PU PD Modify F5 Old Values Shift F2 Color F7 Load Setup Defaults Fig 22 BIOS Setup Defaults A short description of the screen items follows Virus Warning When enable you received a warning message if a program specifically a viru...

Страница 41: ...ally the gate A20 was handled via a pin on the keyboard Today while keyboards still provide this support it is more common and much faster for the system chipset to provide support for gate A20 Memory Parity ECC Check Choose Enabled or Disabled If memory modules with Parity of ECC is installed Typematic Rate Setting Choose Enabled or Disabled Enabled will determines the typematic rate defined by f...

Страница 42: ...tion is used to change the values of the chipset registers These registers control most of the system options in the computer Note Change these Settings only if user is familiar with the Chipset ROM PCI ISA BIOS 2A5LEG3B CHIPSET FEATURES SETUP AWARD SOFTWARE INC Bank 0 1 DRAM Timing Bank 2 3 DRAM Timing Bank 4 5 DRAM Timing SDRAM Cycle Length DRAM Read Pipeline Cache Rd CPU Wt Pipeline Cache Timin...

Страница 43: ...nabled Memory Hole At 15MB Addr Choose Enabled or Disabled Enabled allows some linear VGA Cards to run larger frame port or it can be reserved or some operating system Aperture Size It is used to setup the maximum aperture size used by the AGP Graphic Card The available options are 4M 8M 16M 32M 64M 128M 256M CPU Core Voltage This feature is implemented to simplify the jumper setting for end user ...

Страница 44: ...served Disabled Disabled PM Events IRQ12 PS 2 Mouse Disabled VGA LPT COM HDD FDD DMA Master OFF None OFF OFF IRQ13 Coprocessor IRQ14 Hard Disk IRQ15 Reserved Disabled Disabled Disabled ESC Quit Select Item F1 Help PU PD Modify F5 Old Values Shift F2 Color F7 Load Setup Defaults Fig 24 A short description of the screen items follows Power Management Available selection are Disabled User Define Max ...

Страница 45: ...the system will be switched off at once when the power button is pressed for turn it off For Delay 4 sec option the power of the system will be switched off with holding the power button for 4 second HDD Power Down To select the time period will turn the HDD off Accessing the HDD again will take a few seconds for HDD to spin up for operation Suspend Mode To set the time period waiting for Suspend ...

Страница 46: ... PCI ISA PnP PCI ISA PnP PCI ISA PnP PCI ISA PnP PCI ISA PnP PCI ISA PnP CPU to PCI Write Buffer PCI Dynamic Bursting PCI Master 0 WS Write PCI Delay Transaction PCI Master Read Prefetch PCI 2 Access 1 Retry AGP Master 1 WS Write AGP Master 1 WS Read PCI IRQ Actived By Assign IRQ For USB Assign IRQ For VGA Enabled Enabled Enabled Enabled Enabled Disabled Enabled Disabled Level Disabled Enabled DMA...

Страница 47: ...pecified IRQ DMA have a chance to be assigned to the PCI or ISA PnP devices CPU to PCI Write Buffer It is used to enable or disable the CPU to PCI Write Buffer PCI Dynamic Bursting It is used to enable or disable the PCI dynamic bursting cycles PCI Master 0 WS Write Choose enable to let the PCI Master using 0 wait state in write cycle PCI Peer Concurrency Choose Enabled or Disabled To enable this ...

Страница 48: ... Auto Auto Auto Auto Auto Auto Auto Auto PCI Slot Button Only UART Mode Select Onboard Parallel Port Parallel Port Mode Normal 378 IRQ7 SPP KBC input clock Onboard FDD Controller Onboard Serial Port 1 Onboard Serial Port 2 8MHz Enabled 3F8 IRQ4 2F8 IRQ3 ESC Quit Select Item F1 Help PU PD Modify F5 Old Values Shift F2 Color F6 Load BIOS Defaults F7 Load Setup Defaults Fig 26 A short description of ...

Страница 49: ... the keyboard controller frequency 6 8 12 16MHz Onboard FDD Controller Choose Enabled or Disabled Enabled allows onboard Floppy Drive Controller to be functioned otherwise the users should use other sources Onboard Serial Port 1 Choose Auto Disabled 3F8 IRQ4 2F8 IRQ3 3E8 IRQ4 and 2E8 IRQ3 While choosing proper I O Address IRQ be sure not to cause Address conflict with other I O devices The default...

Страница 50: ...assword is supported Depending on the setting of the Security Option in the BIOS FEATURES SETUP the system BIOS will ask for password every time booting up the System or entering BIOS Setup With the supervisor password both the system booting and BIOS setup changing is allowed This main menu item lets the user to set up the Supervisor Password Change the password as follows 1 Choose PASSWORD SETTI...

Страница 51: ...s can not find the Hard Disk information it is very helpful to use this option 1 Choose this item and press Enter 2 After couple seconds the screen will appear the Hard Disk information and following message SELECT PRIMARY MASTER OPTION N SKIP N 3 Enter Y or N to confirm the acceptance then enter 4 The process will repeat for Primary Slave Secondary Master and Secondary Slave Hard Disks ...

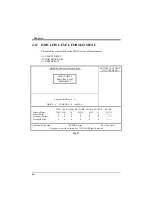
Страница 52: ...IVE BAD TRACK LIST PREFORMAT Current select drive is C DRIVE C CYLINDER 0 HEAD 0 BAD TRACKS TABLE NO CYLS HEAD SIZE CYLS HEAD PRECOMP LANDZ SECTOR MODE Primary Master 3228 6256 16 65535 6255 63 AUTO Primary Slave 0 0 0 0 0 0 Secondary Master 0 0 0 0 0 0 Secondary Slave 0 0 0 0 0 0 Up Down Select item ENTER Accept ESC Exit Abort Copyright c Award Software Inc 1992 98 All Rights Reserved Fig 27 ...

Страница 53: ...E C CYLINDER 0 HEAD 0 BAD TRACKS TABLE NO CYLS HEAD SIZE CYLS HEAD PRECOMP LANDZ SECTOR MODE Primary Master 3228 6256 16 65535 6255 63 AUTO Primary Slave 0 0 0 0 0 0 Secondary Master 0 0 0 0 0 0 Secondary Slave 0 0 0 0 0 0 Up Down Select item ENTER Accept ESC Exit Abort Copyright c Award Software Inc 1992 98 All Rights Reserved Fig 28 Setup Screen shown when BAD TRACK LIST option is selected ...

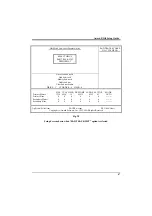
Страница 54: ...EAD 0 BAD TRACKS TABLE NO CYLS HEAD SIZE CYLS HEAD PRECOMP LANDZ SECTOR MODE Primary Master 3228 6256 16 65535 6255 63 AUTO Primary Slave 0 0 0 0 0 0 Secondary Master 0 0 0 0 0 0 Secondary Slave 0 0 0 0 0 0 Up Down Select item ENTER Accept ESC Exit Abort Copyright c Award Software Inc 1992 98 All Rights Reserved Fig 29 Setup Screen shown when PREFORMAT option is selected ...

Страница 55: ...dress located at DC00 or DE00 Format the SCSI disk by the Formatter provided in the SCSI BIOS 4 14 SAVE EXIT SETUP MENU When you select this function the following message will appear at the centre of the screen to assist you to Save data to CMOS and Exit the Setup Save to CMOS and Exit Y N 4 15 EXIT WITHOUT SAVING MENU When you select this function the following message will appear at the centre ...

Страница 56: ...Chapter 4 50 ...

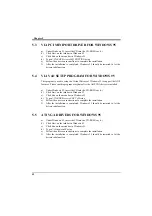
Страница 57: ...E Devices under Windows 95 a Under Windows 95 insert the CD into CD ROM say d b Click Start on the taskbar in Windows 95 c Click Run on the menu bar in Windows 95 d Type d VIAAGP Drivers IDE MASTER setup e Follow the on screen instructions to complete the installation f After the installation is completed Windows 95 should be restarted to let the drivers take function 5 2 VIA POWER MANAGEMENT CONT...

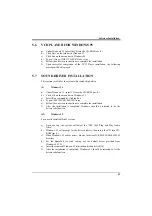
Страница 58: ... everytime after the AGP VGA driver is installed a Under Windows 95 insert the CD into the CD ROM say d b Click Start on the taskbar in Windows 95 c Click Run on the menu bar in Windows 95 d Type d VIAAGP Drivers AGP VxD setup e Follow the on screen instructions to complete the installation f After the installation is completed Windows 95 should be restarted to let the drivers take function 5 5 AT...

Страница 59: ...indows 3 1 c Select Run command by clicking Run d Type d ESS1869 ES1869 W31 setup e Follow the on screen instructions to complete the installation f After the installation is completed Windows should be restarted to let the drivers take function II Windows 95 For a newly installed Win95 system a Upon boot up the system will detect the ESS 1869 Plug and Play Audio Drive b Windows 95 will prompt for...

Страница 60: ...nd Center customizes the appearance of the AudioRack32 3 D Tone Controller adds 3 D stereo and tone controls to the AudioRack32 Audio Mixer controls the volume and balance of the AudioRack32 devices Digital Audio Player plays and records files in the WAV format MIDI Player enables you to play MIDI files Compact Disk Player enables you to play audio CDs on a CD ROM drive In addition the AudioRack32...

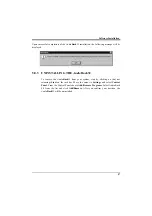
Страница 61: ...Rack32 Setup dialog box appears Note the instructions then click Next to proceed or Cancel to leave Setup Next the Choose Destination Location dialog box appears Click Next to install the AudioRack32 in the default directory or Browse to choose a different directory Click on Cancel to leave the Setup program or Back to return to the Welcome dialog box ...

Страница 62: ...ist you will be asked to confirm your selection Click Yes to proceed or No to go back and enter a new destination directory Once you have chosen the default directory or entered a directory of your own choosing the Setup program will install AudioRack32 Before completing installation of the AudioRack32 you will be given the option to view the README file before exiting the setup program Click Yes ...

Страница 63: ...HE AudioRack32 To remove the AudioRack32 from your system start by clicking on but not releasing Start on the task bar Move the cursor to Settings and select Control Panel From the Control Panel choose Add Remove Programs Select AudioRack 2 0 from the list and click Add Remove After you confirm your decision the AudioRack32 will be uninstalled ...

Страница 64: ...Chapter 5 58 ...

Страница 65: ...les to let you have a more clear understanding of the updating process How to Begin 1 Please type awdflash and press the ENTER key to begin the updating process 2 Once you enter you will see a main menu displaying FLASH MEMORY WRITER V5 XX Copyright C 1996 Award Software Inc For I430HX 2A59F000 Flash Type File Name to Program DATE 06 18 96 Error Message Fig 30 3 Type the program name test bin and ...

Страница 66: ...n the file name 2A59F000 OLD 11 Then you will be requested to answer Are You Sure to Program Y N 12 Type Y to begin programming and press the ENTER key 13 When the programming is finished the showing message will appear Programming Flash Memory 1FF00 0K Message Please Power off or Reset System 14 Once you see the showing message Power Off or Reset System please re start your system 15 When you pow...

Страница 67: ...hose collected information in a 4KB block in the motherboard s flash EPROM and allow the DMI to retrieve data from this database The DMI Configuration Utility DMICFG EXE must be used in real mode in order for the program to run the base memory must be at least 180K Memory managers like HIMEM SYS required by windows must not be installed You can boot up from a system diskette without AUTOEXEC BAT a...

Страница 68: ... up menu is available use the plus minus keys to change the settings Enter to exit and save ESC to exit and not save If the user has made changes ESC will prompt you to answer Y or N Enter Y to go back to the left hand screen and save enter N to go back to left hand screen and not save If editing has not been made ESC will send you back to the left hand menu without any messages Add DMI This DMI C...

Страница 69: ...Flash and DMI Utility 63 Load DMI File You can load the disk file to memory by entering a drive and path and file name here ...

Страница 70: ...DMI File You can save the DMI normally only saved to flash ROM to a file by entering the drive and path here If you want to cancel save you may press ESC and a message Bad File Name appears here to show it was not saved ...

Страница 71: ...FF OPEN Intel Pentium P54C SW1 1 SW1 2 JP5 OFF ON OPEN Cyrix 6x86 AMD K5 SW1 1 2 JP5 ON CLOSE CPU Speed Selection For 90MHz Intel Pentium AMD K5 PR90 CPU SW1 3 SW1 4 SW1 5 SW1 6 OFF OFF OFF ON SW1 7 SW1 8 JP9 JP10 ON ON 2 3 1 2 For 100MHz and 233MHz Intel Pentium AMD K6 233 AMD K5 PR100 AMD K5 PR150 Cyrix M II 300 using 66MHz and IBM6x86MX PR300 CPU SW1 3 SW1 4 SW1 5 SW1 6 OFF OFF OFF OFF SW1 7 SW...

Страница 72: ... SW1 5 SW1 6 ON ON OFF ON SW1 7 SW1 8 JP9 JP10 ON OFF 1 2 1 2 For 200MHz Intel Pentium AMD K6 200 Cyrix 6x86MX PR233 and IDT WinChip C6 200 CPU SW1 3 SW1 4 SW1 5 SW1 6 OFF ON OFF OFF SW1 7 SW1 8 JP9 JP10 ON ON 2 3 1 2 For 208MHz IBM6x86MX PR266 CPU SW1 3 SW1 4 SW1 5 SW1 6 ON ON OFF OFF SW1 7 SW1 8 JP9 JP10 ON OFF 1 2 1 2 For 225MHz Cyrix M II 300 and IBM6x86MX PR300 using 75MHz CPU SW1 3 SW1 4 SW1...

Страница 73: ...Quick Guide 67 ...

Страница 74: ...W1 6 OFF OFF OFF ON SW1 7 SW1 8 JP9 JP10 OFF OFF 1 2 2 3 For 350MHz AMD K6 2 350 CPU for future support only SW1 3 SW1 4 SW1 5 SW1 6 OFF OFF OFF OFF SW1 7 SW1 8 JP9 JP10 OFF OFF 1 2 2 3 On board VGA Enabled JP2 short Chip Selection Disabled JP2 open Clear RTC Normal JP7 1 2 short CMOS Data Clear JP7 2 3 short System ROM 5V Flash EPROM JP5 1 2 short Selection 12V Flash EPROM JP5 2 3 short Power Sup...

Страница 75: ...Quick Guide 69 ...

Страница 76: ...Appendix A 70 ...

Страница 77: ...Quick Guide 71 ...

Страница 78: ...Appendix A 72 ...

Страница 79: ...Quick Guide 73 ...

Страница 80: ...Appendix A 74 ...

Страница 81: ...Quick Guide 75 ...

Отзывы: