Award BIOS Setup Guide
41
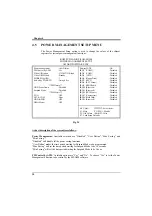
A short description of the screen items follows:
PNP OS Installed: Set this option to Yes if the operating system installed in the computer is Plug
and Play-aware (e.g. Windows 95).
Resources Controlled By: The Award Plug and Play BIOS can automatically configure all the
boot and Plug and Play-compatible devices. If you select Auto, all the interrupt request (IRQ)
and DMA assignment fields disappear, as the BIOS automatically assigns them..
Reset Configuration Data: If enable this option, the BIOS will clear and reset the ESCD after
hardware reset.
IRQ#/DMA# assigned to: These items will be shown only when “Resources Controlled By”
option is set the “Manual”. The available options are “Legacy ISA” and “PCI/ISA PnP”. If the
option is set to “Legacy ISA”, the BIOS will never assign the specified IRQ/DMA resource to
PCI or ISA PnP Devices. If “PCI/ISA PnP” is chosen, the BIOS will make the specified
IRQ/DMA have a chance to be assigned to the PCI or ISA PnP devices.
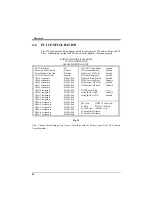
CPU to PCI Write Buffer: It is used to enable or disable the CPU to PCI Write Buffer.
PCI Dynamic Bursting: It is used to enable or disable the PCI dynamic bursting cycles.
PCI Master 0 WS Write: Choose enable to let the PCI Master using 0 wait state in write cycle.
PCI Peer Concurrency: Choose Enabled or Disabled. To enable this option will let the system
active more than one PCI device at a time.
PCI Delay Transaction: Select Enabled to use the write buffer for the delay transaction cycles. It
is selected to support the compliance of PCI Specification Version 2.1.
PCI Master Read Prefetch: It is used to enable or disable the PCI master read prefetch cycle.
AGP Master 1 WS Write/AGP Master 1 WS Read: These items are used to enable or disable
the AGP master device 1 wait state Write and Read cycle correspondingly.
PCI IRQ Active By: Choose Level or Edge. The default setting is Level.
Assign IRQ For USB: It is used to choose the IRQ that the USB is used.
Assign IRQ For VGA: It is used to choose the IRQ that the VGA is used.
Содержание PAM-0067V
Страница 2: ......
Страница 8: ...Chapter 1 2 Fig 1 Key Components of the Mainboard ...
Страница 16: ...Chapter 2 10 2 3 GRAPHICAL DESCRIPTION OF JUMPER SETTINGS Fig 3 Jumper Location of the mainboard ...
Страница 28: ...Chapter 3 22 Fig 9a Optional GOI 660 Extension Card Fig 9b Optional GOI 603 Extension Card ...
Страница 36: ...Chapter 3 30 ...
Страница 56: ...Chapter 4 50 ...
Страница 64: ...Chapter 5 58 ...
Страница 73: ...Quick Guide 67 ...
Страница 75: ...Quick Guide 69 ...
Страница 76: ...Appendix A 70 ...
Страница 77: ...Quick Guide 71 ...
Страница 78: ...Appendix A 72 ...
Страница 79: ...Quick Guide 73 ...
Страница 80: ...Appendix A 74 ...
Страница 81: ...Quick Guide 75 ...


