4
Guidelines for Locating Smoke Detectors
Experience has shown that all hostile fires in family living units
generate smoke to a greater or lesser extent. Experiments using
typical fires in family living units indicate that detectable quantities
of smoke precede detectable levels of heat in most cases. For these
reasons, smoke detectors should be installed outside of each
sleeping area and on each additional story of the family unit.
The following information is for general guidance only and it is
recommended that the smoke detector manufacturer's literature be
used for detailed installation instructions.
It is recommended that additional smoke detectors beyond those
required be installed for increased protection. The added areas
include: basement, bedrooms, dining rooms, furnace room, utility
room and hallways not protected by the required detectors.
Bedroom
Bedroom
Basement
Living
Room
Dining
Room
Bedroom
Bedroom
Bedroom
Living Room
Kitchen
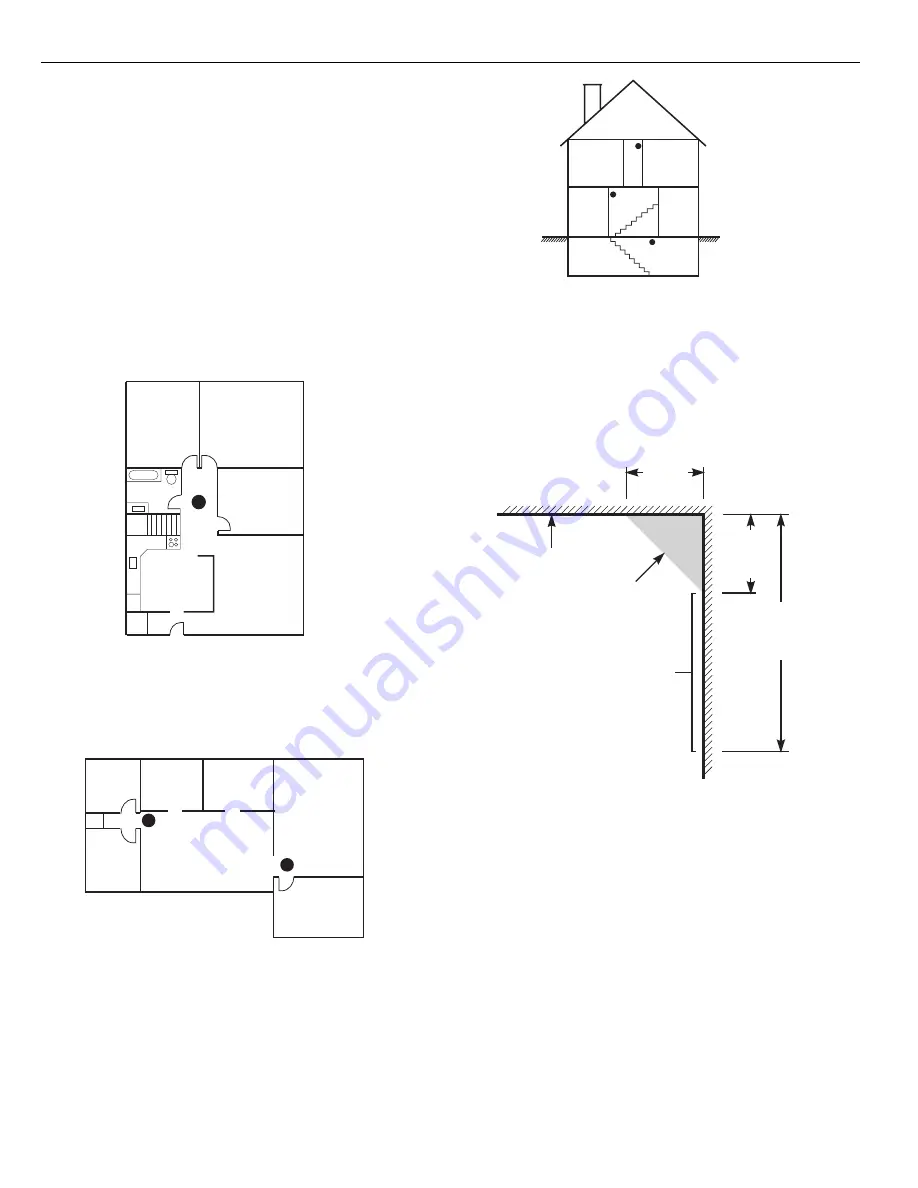
FIG. 1: A smoke detector should be located between the
FIG. 1: A smoke detector should be located between the
FIG. 1: A smoke detector should be located between the
FIG. 1: A smoke detector should be located between the
FIG. 1: A smoke detector should be located between the
sleeping area and the rest of the family unit.
sleeping area and the rest of the family unit.
sleeping area and the rest of the family unit.
sleeping area and the rest of the family unit.
sleeping area and the rest of the family unit.
FIG. 3: A smoke detector should be located on each story of
FIG. 3: A smoke detector should be located on each story of
FIG. 3: A smoke detector should be located on each story of
FIG. 3: A smoke detector should be located on each story of
FIG. 3: A smoke detector should be located on each story of
the living unit.
the living unit.
the living unit.
the living unit.
the living unit.
NEVER
HERE
Acceptable
here
Top of detector
acceptable here
12"
(0.3m)
Max.
4"
(0.1m)
Max.
4"
(0.1m)
Ceiling
Wall
NOTE: Measurements shown are to
the closest edge of the detector.
FIG. 4: Smoke Detector mounting - “Dead” Air Space. The
FIG. 4: Smoke Detector mounting - “Dead” Air Space. The
FIG. 4: Smoke Detector mounting - “Dead” Air Space. The
FIG. 4: Smoke Detector mounting - “Dead” Air Space. The
FIG. 4: Smoke Detector mounting - “Dead” Air Space. The
smoke from a fire generally rises to the ceiling, spreads out
smoke from a fire generally rises to the ceiling, spreads out
smoke from a fire generally rises to the ceiling, spreads out
smoke from a fire generally rises to the ceiling, spreads out
smoke from a fire generally rises to the ceiling, spreads out
across the ceiling surface and begins to bank down from the
across the ceiling surface and begins to bank down from the
across the ceiling surface and begins to bank down from the
across the ceiling surface and begins to bank down from the
across the ceiling surface and begins to bank down from the
ceiling. The corner where the ceiling and wall meet is an air
ceiling. The corner where the ceiling and wall meet is an air
ceiling. The corner where the ceiling and wall meet is an air
ceiling. The corner where the ceiling and wall meet is an air
ceiling. The corner where the ceiling and wall meet is an air
space into which the smoke may have difficulty penetrating. In
space into which the smoke may have difficulty penetrating. In
space into which the smoke may have difficulty penetrating. In
space into which the smoke may have difficulty penetrating. In
space into which the smoke may have difficulty penetrating. In
most fires, this “dead” air space measures about 4 in. (0.1m)
most fires, this “dead” air space measures about 4 in. (0.1m)
most fires, this “dead” air space measures about 4 in. (0.1m)
most fires, this “dead” air space measures about 4 in. (0.1m)
most fires, this “dead” air space measures about 4 in. (0.1m)
along the ceiling from the corner and about 4 in. (0.1m) down the
along the ceiling from the corner and about 4 in. (0.1m) down the
along the ceiling from the corner and about 4 in. (0.1m) down the
along the ceiling from the corner and about 4 in. (0.1m) down the
along the ceiling from the corner and about 4 in. (0.1m) down the
wall as shown in Figure 4. Detectors should not be placed in the
wall as shown in Figure 4. Detectors should not be placed in the
wall as shown in Figure 4. Detectors should not be placed in the
wall as shown in Figure 4. Detectors should not be placed in the
wall as shown in Figure 4. Detectors should not be placed in the
dead” air space.
dead” air space.
dead” air space.
dead” air space.
dead” air space.
Family Room
Bedroom
Living
Room
Dining
Room
Kitchen
Bedroom
Bedroom
FIG. 2: In the family living units with more than one sleeping
FIG. 2: In the family living units with more than one sleeping
FIG. 2: In the family living units with more than one sleeping
FIG. 2: In the family living units with more than one sleeping
FIG. 2: In the family living units with more than one sleeping
area, a smoke detector should be located to protect each
area, a smoke detector should be located to protect each
area, a smoke detector should be located to protect each
area, a smoke detector should be located to protect each
area, a smoke detector should be located to protect each
sleeping area.
sleeping area.
sleeping area.
sleeping area.
sleeping area.
Содержание PC1550
Страница 23: ......


