


36
OM-HY/6G(CE)
Service Procedures
2. Remove cavity side and lower side panels of table.
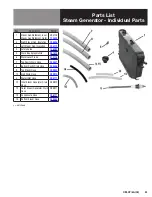
3. In the upper portion of the steamer, remove hose. Turn and pull the hose to remove it from the hose nipple.
4. In the lower section of the steamer, remove the hose clamp from where the hose is connected to the steam generator.
Turn and pull the hose to remove it from the hose nipple.
5. The hose may be removed. Be careful that the hose clamps do not fall off and get lost.
IMPORTANT: Make sure that the correct part (and part number) are being used. The two hoses in the steamer are of different
lengths. (See Page 21 for Part Numbers.)
To Install:
6. Slide the two hose clamps onto the hose and position the hose adjacent to the steam port and steam generator.
7. Slide the hose onto the hose nipple on the steam port and at the other end, onto the steam generator nipple. Make sure
the hose is on all the way so that the end of the hose is against the face of the nipples.
8. Install the hose clamps 3 mm (1/8”) from the end of the hose.
X. Door Removal/Installation/Alignment (P/N 094150)
1. To remove the door, turn off the steamer power and allow the steamer to cool. Then, remove door by supporting the
weight of the door and remove hinge pin.
2. Place the door on a flat, clean table or similar support, with gasket facing up. Be careful not to scratch door surface.
3. Inspect door gasket for signs of cuts or other defects which may impair its function. Replace if necessary.
To Install:
4. To install the door, apply NEVER-SEEZ lubricant to hinge pin. Align door with hinge and insert hinge pin.
To Align:
5. Place a piece of masking tape over the door pin (bullet) hole in the door.
6. Close the door until the door pin just penetrates the masking tape. Make sure the door pin contacts only the door latch
spring.
7. If door pin does not strike the center of the spring hole in the U-channel, loosen the hinge-to-oven bolts and align the door
to the door pin. Tighten hinge-to-oven mounting bolts.
8. You should be able to pull a dollar bill or comparable piece of paper smoothly between the gasket and oven cavity with
the door closed. To adjust the hinge side, loosen the door-to-hinge bolts and align the door gasket with the oven cavity.
Tighten the door-to-hinge mounting bolts. To adjust the bullet side refer to 10.30.
9. Operate the steamer and check for leaks.
Y. Door Switch (P/N
1. From the right side of the steamer with panel removed, unplug the door switch from the cable harness.
2. The switch (for normal door opening) is held in place with two small screws. With a flat blade screwdriver, remove these
screws and the switch may be removed.
3. To install screws for the door switch reverse the above procedure.
Содержание Unified Brands Groen HyperSteam HY-6G
Страница 25: ...OM HY 6G CE 25 Electrical Schematic ...
Страница 41: ...OM HY 6G CE 41 ...
Страница 42: ...42 OM HY 6G CE ...
Страница 43: ...OM HY 6G CE 43 ...


