


OM-HY/6G(CE) 29
14. Disconnect boiler temperature probe leads from harness.
15. Remove temperature probe. If male fitting was removed with the probe and compression nut, remove it from the probe.
16. With a socket wrench, remove the four 1/4-20 bolts holding the steam generator to the steamer table.
17. The entire steam generator (with fittings attached) may now be removed. Remove outer bolt from the side and inner bolt
from the rear.
18. Once the steam generator has been removed, the fittings and probes may be transferred to the new steam generator.
Make sure that all screw fittings are installed using high temperature pipe compound.
NOTE: Refer to appropriate sections for detailed instructions on fittings and heater assembly.
19. Install new boiler in the reverse order of removal.
20. Attach the water inlet hose, drain hose and steam hose. Tighten hoses around fittings with hose clamps
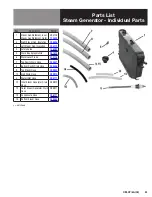
J. Steam Generator Probes (High and Low Water) (P/N
1. Shut off power to the steamer.
2. With a wrench LOOSEN, but do not remove the nuts holding the wire(s) on the probe terminal(s)
3. The wires are connected to wire fork terminals. These will “snap” on and off the terminal post. “Unsnap” them by gently
pulling on the terminal.
4. Using an open ended wrench, turn the probe counter-clockwise to remove.
To Install:
5. Apply high temperature pipe compound to the probe and screw it in by hand. Using an open ended wrench, tighten the
probe into the fitting.
6. Replace the wire(s) to the probes by snapping the fork terminals around the terminal post. Using a wrench, tighten the
terminal nut.
NOTE: If two probes are to be replaced, either replace them one at a time or note the color of the wires attached to the probes.
Do not get them mixed up.
K. Main Gas Valve and Gas Pressure Adjustment (P/N
1. Disconnect power to the steamer.
2. Remove the front and side panels, as described in Section B.
3. Turn the manual gas valve to the closed position. Disconnect the wire to the solenoids.
4. Note the color and position of the two connectors for assembly. Remove the aluminum tubing from the main gas valve
assembly using an open-ended wrench. Be careful not to move the aluminum tubing excessively, or to bend it.
5. Using a wrench, remove the two bolts that fasten the main gas valve bracket.
6. With a pipe wrench, open the pipe union on the left side of the main gas valve and remove the gas inlet pipe from the
manual gas valve.
Service Procedures
Содержание Unified Brands Groen HyperSteam HY-6G
Страница 25: ...OM HY 6G CE 25 Electrical Schematic ...
Страница 41: ...OM HY 6G CE 41 ...
Страница 42: ...42 OM HY 6G CE ...
Страница 43: ...OM HY 6G CE 43 ...


