


Back Office Manual
H5
−
12
Function (Dosing System)
1.00
2006
Version
March
5.2.2
Replacing components
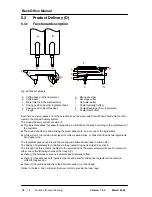
5.2.2.1 Mixer motor unit
1.
Unplug the power cord!
2. Open the door of the dispenser.
3. Remove the trough.
4. Unscrew the mixer motor unit (Fig.39 a).
a.
4. Unscrew the mixer motor unit (Fig.39 a).
5. Disconnect the wiring.
6. Replace the mixer motor unit and assemble in reverse order.
Connect the wires the right way
Fig. 39 Mixer motor unit
Connect the wires the right way
(indicated on the back of the motor).
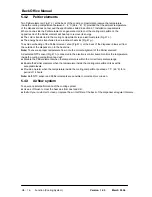
Fig. 40 Service panel
a.
b.
c.
d.
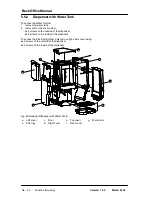
5.2.2.2 Impeller and seals
1.
Unplug the power cord!
2. Open the door of the dispenser.
3. Remove the trough.
4 U
th
l t i
t it (Fi 39 )
a.
g
4. Unscrew the complete mixer motor unit (Fig.39 a).
5. Disconnect the wiring.
6. Remove the impeller (Fig.41 d.) with a combination pliers.
7 Remove the seals (Fig 41 a +b +c )
b.
c.
d.
7. Remove the seals (Fig.41 a.+b.+c.)
8. Replace the seals and impeller and assemble in reverse
order.
Fig. 41 Impeller and seals
Connect the wires the right way
(indicated on the back of the motor).
Put the impeller in a cup of hot water,
this way it is easier to mount.
Moumt the last seal (mixer motor axis) with
the opening forward (Fig. 42 )
Fig. 42 Seal, mixer motor axis
5.2.2.3 Dosing coil
1.
Unplug the power cord!
2. Open the door of the dispenser.
3. Remove both ingredient packs.
Store the ingredient packs temporary in a refrigerator.
4. Remove the trough.
5. Unscrew the mixer motor unit (Fig.39 a.).
6. Unscrew (4 screws) the service panel (Fig.40 ).
7. Disconnect the flat cable from the light sensor (trough detection).
8. Remove four screws, behind the protective gasket (Fig.43 a.).
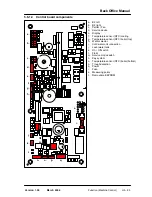
9. Remove the right cover (Fig.26 ).
10. Disconnect the B2 coil connector (Fig.51 ) from the control board.
11. Guide the wiring through the opening.
12. Replace the dosing coil and assemble in reverse order.
Fig. 43 Dosing coil
a.
a.B2 left
b.B2 right
Connect the wires of the mixer motor unit the right way
(indicated on the back of the motor).
Fig. 44 Control board
b.B2 right
Содержание Cafitesse 60
Страница 1: ...Version Back Office Manual A Company 1 00 2006 700 703 054 March Part number Cafitesse 60 ...
Страница 22: ...Back Office Manual 1 00 2006 Version March H3 6 Faults ...
Страница 24: ...Back Office Manual 1 00 2006 Version March H4 2 Programming 4 1 1 Counters ...
Страница 25: ...Back Office Manual 1 00 2006 Version March H4 3 Programming 4 1 2 Cleaning ...
Страница 27: ...Back Office Manual 1 00 2006 Version March H4 5 Programming 4 1 4 Clock settings 4 1 5 Language settings ...
Страница 31: ...Back Office Manual 1 00 2006 Version March H4 9 Programming 4 2 2 Counters ...
Страница 34: ...Back Office Manual 1 00 2006 Version March H4 12 Programming 4 2 6 Hot water settings ...
Страница 37: ...Back Office Manual 1 00 2006 Version March H4 15 Programming 4 2 9 Clock settings Next page ...
Страница 39: ...Back Office Manual 1 00 2006 Version March H4 17 Programming 4 2 10 I O tests ...
Страница 44: ...Back Office Manual 1 00 2006 Version March H4 22 Programming ...
Страница 78: ...Back Office Manual 1 00 2006 Version March H5 34 Function Pay System ...
Страница 79: ...Back Office Manual 1 00 2006 Version March H6 1 Preventive Maintenance 6 PREVENTIVE MAINTENANCE RESERVED ...
Страница 80: ...Back Office Manual 1 00 2006 Version March H6 2 Preventive Maintenance ...
Страница 91: ...Back Office Manual 1 00 2006 Version March H8 1 Service Information 8 SERVICE INFORMATION BULLETINS ...
Страница 92: ...Back Office Manual 1 00 2006 Version March H8 2 Service Information ...


