background image

Back Office Manual

1.00

2006

Version

March

H9 

 2

Modification Instructions

9.1.3

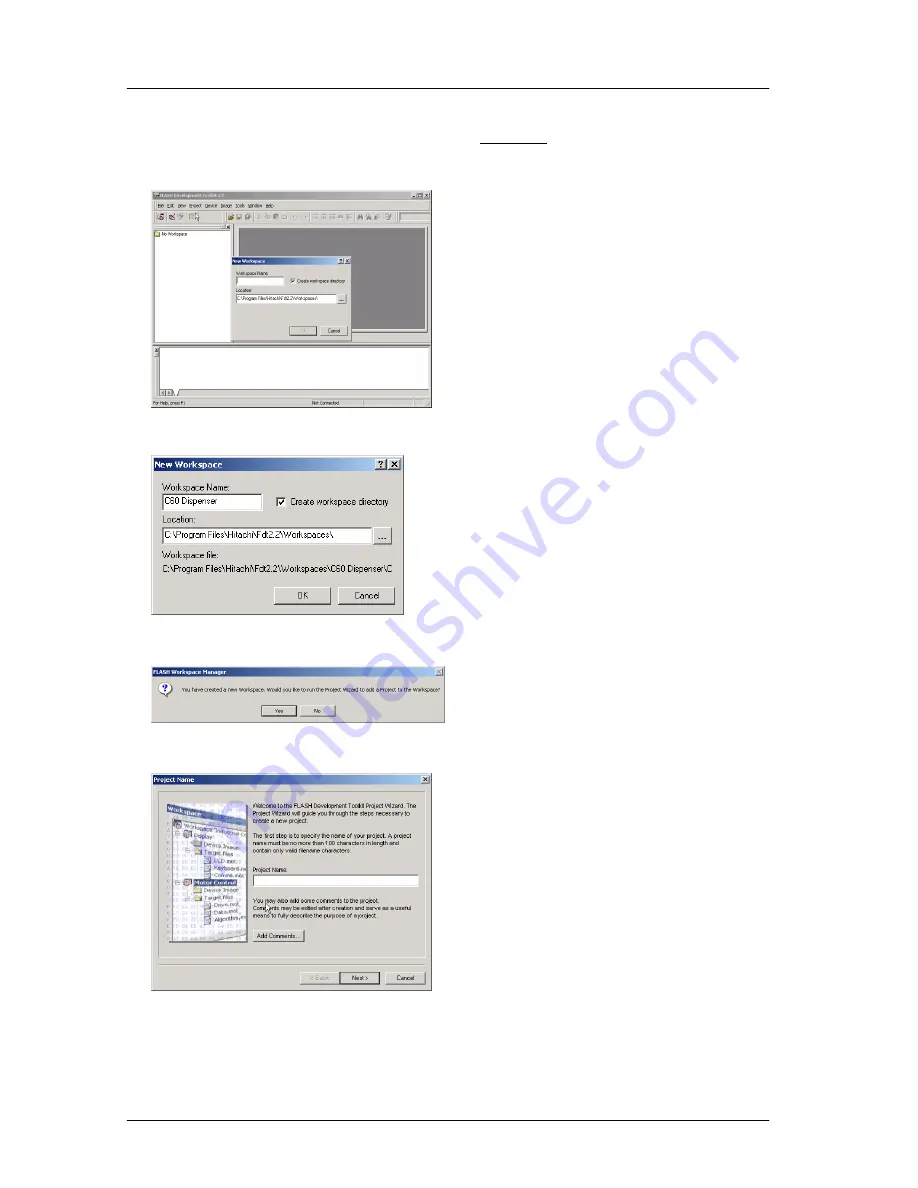
Creating a C60 workspace

After installing the “Hitachi Flash Development Toolkit” a 

workspace

 must be defined in order to be able

to connect to the C60 dispenser and be able to upgrade its firmware.
Create a workspace by selecting the “Create a new Workspace” button and then click “OK”.

Now the name of the new workspace must be entered in the “Workspace Name” field in a new sub

window. A valid name would be “C60 Dispenser”.

Enter this name in the “Workspace Name” field and click “OK” to continue.
A new window will appear asking whether the setup wizard must be started.

Click “YES” to start the wizard.
The first wizard window appears asking for a valid “Project Name”.

Содержание Cafitesse 60

Страница 1: ...Version Back Office Manual A Company 1 00 2006 700 703 054 March Part number Cafitesse 60 ...

Страница 2: ...o part of this manual may be copied and or published by means of printing photocopying microfilming or by any other means whatsoever without the prior written consent of Douwe Egberts Coffee Systems International BV This applies equally to the included drawings and or diagrams Douwe Egberts Coffee Systems International BV issues no explanation or guarantees with regard to the contents of this publ...

Страница 3: ...umbered see the table of contents The page numbers are placed at the bottom of each page Keep your information up to date Service Information Bulletins When the manufacturer applies changes to the dispenser the manufacturer will issue Service Information Bulletins When you receive an Service Information Bulletin 1 File the sheet by number in section 8 of this document 2 Mark the relevant pages in ...

Страница 4: ... Delivery D 14 5 4 Cooling System F 15 5 5 Housing G 19 5 6 Machine Control K 22 5 7 External options L 31 5 8 Payment system P 33 6 Preventive maintenance reserved 1 7 Service code numbers 1 7 1 Water system A 1 7 2 Dosing system C 3 7 3 Product delivery D 4 7 4 Cooling system F 5 7 5 Housing G 6 7 6 Machine control K 8 8 Service information bulletins 1 9 Modification instructions 1 9 1 Upgrading...

Страница 5: ...bination of ingredient packs D coffee milk D coffee coffee D coffee decaf coffee The dispenser can also deliver hot water for tea or other instant drinks The dispenser can provide drinks per cup or pot A special pot with vacuum flask is available as accessory 1 1 1 Office Coffee Service OCS The Office Coffee Service OCS concept is based on D Delivery of coffee and other ingredients D Preventive ma...

Страница 6: ...e technician must hand over and explain the operating instructions to the customer Installation start up programming and if required repair of the dispenser must be performed by trained and authorized service technicians only 1 2 2 Hazard intensity levels There are different levels of hazard intensity identified by pictograms The level of hazard is determined by the following definitions DANGER Su...

Страница 7: ...ressure when a dispenser with a fixed water connection is installed D The drip tray capacity is limited to 500 ml 27 fl oz 3 4 cups Empty the drip tray in case the beverage has been delivered while no cup or pot was present D The customer should clean the dispenser on a daily and weekly basis as described in the operator manual for hygienic and functional reasons D Always observe basic hygiene and...

Страница 8: ...gredient quality may otherwise deteriorate D Store ingredient packs only in a refrigerator at a temperature below 6 C 42 8 F D Always check the expiration date on the package best before date and use the ingredient pack that has been stored for the longest period first in first out principle D Never disconnect power from the dispenser when it contains ingredient packs ...

Страница 9: ...1 to 32 C 34 to 90 F Humidity up to 80 RH Power supply Europe 200V 240V 11A 19A USA CND 110V 120V 13A 12 A Water supply fixed water connection Water pressure allowed Min 0 5 bar dynamic pressure Max 10 bar static pressure measure in case of doubt Water flow 2 l min Always operate in compliance with local regulations Location Avoid direct exposure to extreme temperatures humidity vibration and exce...

Страница 10: ... and connect water supply hose length 1150 mm 45 2 5 2 Fill water tank 6 Connect length 1600 mm 63 0 7 Switch on dispenser 8 Place ingredient packs 9 Run the cleaning program 10 Program and calibrate Size and type of filter may vary depending on local circumstances Not illustrated 2 2 1 Unpack the dispenser 840 mm 33 1 497 mm 19 6 497 mm 19 6 28 3 Kg Drip tray drip grid Power cord length 1600 mm 6...

Страница 11: ...e the push buttons with the name plates Fig 7 5 Replace the button name plates and assemble in reverse order 6 Go to the Service Mode D for button 1 Fig 7 a see section 4 2 5 D for button 2 Fig 7 b see section 4 2 5 D for button 3 Fig 7 c see section 4 2 5 D for button 4 Fig 7 d see section 4 2 5 a b c Fig 6 Front cover Fig 7 Button name plates a b c d 2 2 4 Attach product stickers 1 Open the door...

Страница 12: ... 1 2 Read the filter instructions as provided by its manufacturer 3 Connect the filter to the water supply 4 Flush the filter 5 Connect the filter to the dispenser 6 Open the tap 1 1 3 5 4 6 Fig 9 Install to the water supply 2 2 5 2 Removable water tank version Not available for USA CND version 1 Remove the lid 2 Lift the cold water tank using the handle 3 Clean the inside with a brush and a food ...

Страница 13: ...e flashing thermometer boiler temperature low indication remains in the display until the operational temperature has been reached This takes approx 8 minutes for 230V or up to 10 minutes for 120V dispensers Fig 12 Stand by button 2 2 8 Place ingredient packs 1 Wash your hands hygiene 2 Remove the foil from the pack 3 Install the ingredient packs both1 25 l 42 3 fl oz a Check the expiration date o...

Страница 14: ...he dispenser to the customer 2 3 1 Customer instructions 1 Ensure the dispenser is working properly according to customer preferences 2 Instruct the operator s of the dispenser about D HACCP D Safety D Daily operation and cleaning see operator manual and instruction sticker Incorrect pack removal may result in a snapped dosing tube and spilled ingredient Please instruct the customer snap Do not pu...

Страница 15: ... tank only b Water tank removable water tank only c Door lock d Hot water outlet e Beverage outlet f Drip grid g Drip tray h Cooling compartment door i Operation panel j Power on stand by button k Filter house cooling fan l Power inlet m Water inlet valve fixed water connection only a b c d a Display b Selection buttons c Stop button d Hot water button Fig 15 Operation panel ...

Страница 16: ...r element with fan 2 x 1 25 liters 2 x 42 3 fl oz BIB bag in box 2 to 5 C 35 6 to 41 F Boiler System Capacity Temperature Heating element 230 V 1970 W 120 V 1300 W 2 25 liters 76 1 fl oz 83 to 97 C 181 4 to 206 6 F Water flow 2l min Cold water supply Fixed water connection water tank with a capacity of 2 9 liters 98 1 fl oz Dosing B2 dosing coil Vacuum flask Volume Height Diameter 900 ml 30 4 fl o...

Страница 17: ...ee pack Optional The symbol right hand coffee ingredient pack almost empty shows in the display The right hand ingredient pack is almost empty Place a new pack ready in the cooling compartment Optional The symbol left hand ingredient pack almost empty shows in the display The left hand ingredient pack is almost empty Place a new pack ready in the cooling compartment A flashing thermometer shows in...

Страница 18: ...nfo number shows in the display A specific failure has occurred See section 3 1 2 for the specific error indications All dispenser functions except the cooling are switched off All dispenser functions except the cooling are switched off Switch the dispenser on at the switch The display is off The power supply has been interrupted Check the supply plug Check the power supply earth leak switch or fu...

Страница 19: ...oard i 18 Inlet valve opens without Leakage of water system Check replace inlet valve i 18 Inlet valve opens without pressing any keys The temperature in the boiler is too high Temperature sensor loosened by vibration Connect the temperature sensor correct Temperature sensor defective Replace temperature sensor Atmospheric pressure is higher due to different location Calibrate the dispenser i 19 R...

Страница 20: ... or 10 ms Left B2 coil defect Replace left B2 coil i 45 Bad dosing error right B2 pulse 6 5 ms or 10 ms Right B2 coil defect Replace right B2 coil i 61 The mixer current is out of limits 3A Mixer motor runs with difficultly Clean s 3 Mixer motor defect Replace mixer motor i 93 Pumpmotor defect Replace pumpmotor i 93 Missing encoder Replace encoder i 97 Control board watchdog Replace control board ...

Страница 21: ... sensor water selector Replace the light sensor Calcification of the water selector outlet Disassemble the water selector check the outlet se ec o ou e Descale the dispenser Check the descaling signal programming Water selector defective Check the function of the water selector Replace defective part Calcification between the serration of the water selector disc Disassemble the water selector chec...

Страница 22: ...Back Office Manual 1 00 2006 Version March H3 6 Faults ...

Страница 23: ...4 Section 4 1 5 Section 4 1 6 Section 4 1 7 Section 4 1 8 Section 4 1 9 Section 4 1 1 Section 4 1 10 Optional This function shall be visible for the customer when it is activated in the service menu in Section 4 2 8 Other settings Optional This function shall be visible for the customer when it is activated in the service menu in Section 4 2 8 Other settings ...

Страница 24: ...Back Office Manual 1 00 2006 Version March H4 2 Programming 4 1 1 Counters ...

Страница 25: ...Back Office Manual 1 00 2006 Version March H4 3 Programming 4 1 2 Cleaning ...

Страница 26: ...ressing the stop buttun for more the 10 seconds When renegite has entered the descale programm must be completed to ensure that all renegite is flushed out accordingly Till this step an escape is possible by pressing the stop buttun for more the 10 seconds When renegite has entered the descale programm must be completed to ensure that all renegite is flushed out accordingly ...

Страница 27: ...Back Office Manual 1 00 2006 Version March H4 5 Programming 4 1 4 Clock settings 4 1 5 Language settings ...

Страница 28: ...r more then 10 seconds it will ask if it is a new or the existing pack new pack confirm by enter same pack confirm by back in case a milk coffee dispenser is installed it also asks whether it is a small pack for the milk small confirm by enter large USA CND only confirm by back 4 1 8 Volume settings 4 1 9 Strength settings 4 1 10 Service mode Pin code 1402 ...

Страница 29: ... March H4 7 Programming 4 2 Service Mode Section 4 2 1 Section 4 2 2 Section 4 2 3 Section 4 2 4 Section 4 2 5 Section 4 2 5 Section 4 2 5 Section 4 2 5 Section 4 2 6 Section 4 2 7 Section 4 2 8 Section 4 2 9 Section 4 2 10 Section 4 1 10 ...

Страница 30: ...Back Office Manual 1 00 2006 Version March H4 8 Programming 4 2 1 Error logs 25 Memory positions available If this is reached the 26st error log is placed on the 1st memory position ...

Страница 31: ...Back Office Manual 1 00 2006 Version March H4 9 Programming 4 2 2 Counters ...

Страница 32: ...Back Office Manual 1 00 2006 Version March H4 10 Programming 4 2 3 Machine setting When this setting is chosen the automatic switch over is automatically activated 4 2 4 Calibration ...

Страница 33: ...ce Manual 1 00 2006 Version March H4 11 Programming 4 2 5 Button settings Volume recipe dependent Ratio recipe dependent Only possible with D Cappuccino D Café au lait Only possible with D Coffee D Coffee creme ...

Страница 34: ...Back Office Manual 1 00 2006 Version March H4 12 Programming 4 2 6 Hot water settings ...

Страница 35: ...Back Office Manual 1 00 2006 Version March H4 13 Programming 4 2 7 Boiler settings Ca 15 min Empty the drip tray after running the ATAP ...

Страница 36: ...0liter 4 8 5 2000liter 0 4 Total water hardness ºdH When switched ON in the service menu the customer can change themselves the coffee volume and coffee strengths in the operator menu When you don t want this option available it shall be switched to OFF The filter counter can be reset to 0 in the operator menu In chapter counters you will find this option When switched on visible in operator menu ...

Страница 37: ...Back Office Manual 1 00 2006 Version March H4 15 Programming 4 2 9 Clock settings Next page ...

Страница 38: ...ee Coffee Decaf Milk Coffee Decaf Cleaning tti Never g settings Every day Every day Twice a week Twice a week Every week Twice a week means B B B B B B B Sunday 1 2 Monday 1 2 Tuesday 1 2 Wednesday 1 2 Thursday 2 1 Friday 2 1 Saterday 2 1 1 selected day first cleaning session 2 following cleaning session ...

Страница 39: ...Back Office Manual 1 00 2006 Version March H4 17 Programming 4 2 10 I O tests ...

Страница 40: ...tem 6 is delivered with an adapter for connection to the dispenser Fig 16 Service device 1 Activating button D Functions of the service device 1 Activating button 2 Clear button 3 Ti Display 2 lines 16 digits each serves to 3 Time 4 R i d b tt t i Display 2 lines 16 digits each serves to display all information regarding the 4 Repair code button not in use 5 I t b tt display all information regard...

Страница 41: ... programming mode is now enabled Scroll through the main programming menu with the up down keys see the service mode flow charts section 4 2 and press input to enter a sub menu to change any settings The time out is 5 minutes 5 Switch the dispenser to stand by after programming 6 Disconnect the service device switch it off 7 Switch the dispenser on Should the dispenser become locked up during prog...

Страница 42: ...abled Enabled Fixed 1 Coffee 125 040 999 22 05 99 Yes No Yes No 2 Cappuccino 125 100 600 12 05 99 2 6 60 30 70 No No Yes No 3 Café creme 125 040 600 19 05 99 No No Yes No 4 Coffee 840 040 999 22 05 99 Yes No Yes No 5 Hot water 125 040 999 Yes No Yes Yes Cleaning Programmable options Frequency Default Off Daily Every three days Weekly q y 3 Days No Yes Yes No Show Coolbox hot error Yes Machine comb...

Страница 43: ...9 Yes Yes Yes No 2 Café au lait 180 100 600 09 05 99 2 6 30 30 70 No No Yes No 3 Cappuccino 180 100 600 09 05 99 2 6 30 30 70 No No Yes No 4 Coffee 040 040 999 32 05 99 Yes Yes Yes No 5 Hot water 040 040 999 Yes Yes Yes Yes Cleaning Programmable options Frequency Default Off Daily Every three days Weekly q y Daily No Yes Yes No Show Coolbox hot error Yes Machine combination 2 Coffee R Milk L Volum...

Страница 44: ...Back Office Manual 1 00 2006 Version March H4 22 Programming ...

Страница 45: ...use the specific weight of hot water is less than the specific weight of cold water hot water in the boiler will always float upwards and avoid that hot water might flow back into the float tank or water pump see also water pump and boiler d a p f g r h k l i q m o n c e j b Fig 17 Operating principle water system a Water tank b Float c Automatic water lock d Inlet valve e float tank f Float g Wat...

Страница 46: ...ection a b Tank full Tank empty a b a b 5 1 2 2 Dispenser with fixed water supply The dispenser for fixed water supply can be connected to a water tap according to the instructions described in section 2 2 5 1 5 1 3 Inlet valve At the dispenser side an electromagnetic inlet valve Fig 17 d will control the water flow into the dispenser The type of inlet valve Fig 17 d differs per dispenser version ...

Страница 47: ... 2 When the boiler is filled with water the water level in the reservoir will increase simultaneously and lift the float upwards 3 When the float is in top position the dispenser will close the inlet valve again If during operation the float tank is running empty and the float sinks to the bottom position the dispenser will open the inlet valve again to refill the float tank 5 1 5 Water pump Each ...

Страница 48: ...e resistance value changes when their temperature increases or decreases By determining the resistance value of the NTC the dispenser can easily measure the temperature of the water Although their placement on the outside of the boiler may seem less accurate it avoids the long term risk of leakage via feed through sensors in the boiler skin To compensate the level of direct sensitivity the dispens...

Страница 49: ...AP program takes approximately 10 15 minutes During determining the boiling point hot water can come out of the hot water and product outlets When you select the ATAP function in the Service Mode 1 The boiler will heat the water with full power until approx 80 C 176 F Fig 23 point A During the heating process the display of the dispenser will display the value 100 C 212 F with a flashing thermomet...

Страница 50: ... on the selector base as II leads the water to the mixer through for coffee only D outlet tube Fig 24 d marked on the selector base as III leads the water to the mixer trough for a mixed drink like cappuccino coffee and milk D outlet tube Fig 24 e marked on the selector base as IIII leads directly to the hot water outlet of the dispenser left outlet ÎÎ ÎÎ a ÎÎ ÎÎ b ÎÎ ÎÎ c Î Î d ÎÎ e Fig 25 Cross ...

Страница 51: ...se order Fig 26 Left cover a b c d e f a b c d e f Fig 27 Right cover Take care that the encoder can rotate Fig 26 Left cover Fig 27 Right cover Take care that the encoder can rotate freely 5 1 8 2 Float 1 Unplug the power cord 2 Close the water supply or remove the water tank 3 Open the door of the dispenser 4 Remove the left and right cover Fig 26 and Fig 27 5 Disconnect two tubes Fig 28 a b 6 R...

Страница 52: ...e dispenser 3 Remove the left and right cover Fig 26 and Fig 27 4 Disconnect the NTC connector Fig 30 a NTC high b NTC low from the control board a Mark one of the temperature sensors and how it is placed high or low a 5 Guide the wiring through the openings 6 Replace the NTC Fig 31 a NTC high b NTC low and assemble in reverse order b Assemble the NTC carefully fragile Fig 31 NTC s b 5 1 8 5 The h...

Страница 53: ...etaining bolts at the backside boiler mounting to the body 12 Remove the hot water tube Fig 33 a 13 Remove the spring 14 Tilt the boiler forward and upwards 15 Remove the cold water tube Fig 33 b from the boiler Fig 34 Water selector a b Tube Fig 33 b can contain some cold water Fig 34 Water selector 16 Remove the drain tube Fig 33 c from the boiler 17 Disconnect the connectors from the heating el...

Страница 54: ... connector of the light sensor 7 Disconnect the wiring of the light sensor 8 Replace the light sensor and assemble in reverse order Fig 36 Light sensor Don t clamp the flat cable of the light sensor during assembly of the water selector cap 5 1 8 10 Water selector 1 Unplug the power cord 2 Close the water supply or remove the water tank 3 Open the door of the dispenser 4 Remove the left cover Fig ...

Страница 55: ... electromagnetic dosing coil inside the dispenser see section 5 4 1 Cooling compartment The dosing tube is semi transparent to interact with a small light beam and sensor in the dispenser to detect D the presence of an ingredient pack inside the dispenser D the empty state of an ingredient pack In normal operation the liquid ingredient will prevent the sensor from receiving the light emitted by th...

Страница 56: ...he seals and impeller and assemble in reverse order Fig 41 Impeller and seals Connect the wires the right way indicated on the back of the motor Put the impeller in a cup of hot water this way it is easier to mount Moumt the last seal mixer motor axis with the opening forward Fig 42 Fig 42 Seal mixer motor axis 5 2 2 3 Dosing coil 1 Unplug the power cord 2 Open the door of the dispenser 3 Remove b...

Страница 57: ... and assemble in reverse order a b c d e Connect the wires of the mixer motor unit the right way indicated on the back of the motor e 5 2 2 5 Spring trough detection 1 Unplug the power cord 2 Remove the trough 3 Unscrew the mixer motor unit Fig 39 a 4 Unscrew 4 screws the service panel Fig 40 5 Unscrew 2 screws the trough snap finger Fig 45 c 6 Remove the trough snap finger Fig 45 d 7 Replace the ...

Страница 58: ...on of drinks according to the preferences of the customer D The mixing chamber to allow mixing the water either both one or none of the ingredients D A mixer motor to provide a foam layer for coffee based drinks or drinks that include two ingredients like Cappuccino The Ingredient packs are stored in the cooling compartment described in section 5 4 1 The dosing of ingredients is controlled via the...

Страница 59: ...oling compartment can preserve the ingredient packs at a temperature between 2 5 C 35 6 41 F provided that the ambient temperature of the dispenser does not exceed the specifications listed in section 2 1 Installation requirements The cooling compartment has a thermal insulated door that allows access to the ingredient packs The door is equipped with a latch and airtight seal to lock the cooling c...

Страница 60: ...back of the dispenser blows air from the outside of the dispenser on to the heat sink Note To ensure a proper temperature flow note the correct alignment of the Peltier element A dedicated NTC sensor Fig 47 h connected to the electronic control board monitors the temperature inside the cooling compartment and will D Disable the Peltier elements when the temperature is within the correct temperatur...

Страница 61: ...aces have to be clean and smooth polish if there are damages visible a b 8 Apply thermal compound to the cold plate and the cooling compartment Fig 52 9 Replace the complete cooling unit fan included and assemble in reverse order Fig 50 Cooling element a b 5 4 4 3 NTC cooling system 1 Unplug the power cord 2 Remove the trough 3 Unscrew the mixer motor unit Fig 53 4 Unscrew the protective plate Fig...

Страница 62: ...red black 11 Apply a thin coat of thermal compound evenly to the side of the Peltier element s that rest on the heat sink Fig 57 Use the special tool to apply the thermal compound The imprint on the Peltier element must still be visible 12 Place the Peltier element into the foam seal Fig 56 c with the compound covered side facing the heat sink Insert the Peltier element in center into the foam sea...

Страница 63: ... Fixed Water Supply To access the Water System only remove left side cover using D 3 screws on the outside of the dispenser D 3 screws on the inside of the dispenser To access the electrical System only remove right side cover using D 3 screws on the outside of the dispenser D 3 screws on the inside of the dispenser a b c d e f Fig 59 Housing Dispenser with Fixed Water Supply a Left cover b Drip t...

Страница 64: ...ng D 4 screws on the outside of the dispenser D 2 screws on the inside of the dispenser To access the Electrical System only remove right side cover using D 3 screws on the outside of the dispenser D 3 screws on the inside of the dispenser a b c d e f g Fig 60 Housing Dispenser with Water Tank a Left cover b Drip tray c Door d Right cover e Top cover f Rear cover g Water tank ...

Страница 65: ... Fi 61 a b e f 4 1 1 Remove the right cover Fig 61 4 1 2 Disconnect the connector from the control board Fig 63 or 4 2 from the keyboard 4 2 1 Remove the two caps Fig 62 a b 4 2 2 Remove the front cover Fig 62 c 4 2 3 Disconnect the connector from the control board Fig 63 Fig 61 Right cover b c d control board Fig 63 5 Lift the door upwards from its hinges 6 Replace the door and assemble in revers...

Страница 66: ...ormation for the display as well Communication is established by I2C serial data communication protocol Software loaded into the keyboard is used to establish communication between these boards 5 6 1 3 Control board This board is responsible for the complete process of the dispenser The micro controller doesn t handle only the different background processes like boiler routines but also handles th...

Страница 67: ...t b B2 right c Peltier Fan d Service device e Display f Temperature sensor NTC cooling g Temperature sensor NTC boiler top h Water selector i Cold water unit connection j Level water tank k On Off switch l Float m Service mode switch n Pay system o Temperature sensor NTC boiler bottom p Trough detection q Power r Fuse s Measuring points t Removable EEPROM ...

Страница 68: ...ck blue red red red red black red g ab aa a Empty detection left b B2 Coil left c Empty detection right d B2 Coil right e Fan cooling f Peltier element g Temperature sensor peltier h Service device i Keyboard j Temperature sensor NTC cooling k Temperature sensor NTC boiler high l Detection water selector m Pump motor n Mixer motor o Valve water inlet p Water selector motor q Empty detection cold w...

Страница 69: ...t e Fan cooling f Peltier element g Temperature sensor peltier h Service device i Keyboard j Temperature sensor NTC cooling k Temperature sensor NTC boiler high l Detection water selector m Pump motor n Mixer motor o Valve water inlet p Water selector motor q Empty detection cold water r Switch on off s Level switch t Temperature sensor NTC boiler low u Trough detection v Boiler w High temperature...

Страница 70: ... a Empty detection left b B2 Coil left c Empty detection right d B2 Coil right e Fan cooling f Peltier element g Temperature sensor peltier h Service device i Keyboard j Temperature sensor NTC cooling k Temperature sensor NTC boiler high l Detection water selector m Pump motor n Mixer motor o Valve water inlet p Water selector motor q Empty detection cold water r Switch on off s Level switch t Tem...

Страница 71: ...ments so it can be put back easily after the assembly of the control board Ensure you have the right EEPROM Country specific 1 Unplug the power cord 2 Open the door of the dispenser 3 Remove the right cover Fig 65 4 Carefully replace the EEPROM Fig 67 and assemble in reverse order 5 Program the customer adjustments ÄÄÄ ÄÄÄ ÄÄÄ ÄÄÄ ÄÄÄÄÄÄÄÄÄÄÄÄÄ ÄÄÄÄÄÄÄÄÄÄÄÄÄ ÄÄÄÄÄÄÄÄÄÄÄÄÄ ÄÄÄÄÄÄÄÄÄÄÄÄÄ ÄÄÄÄÄÄÄÄÄÄÄ...

Страница 72: ...he control board Fig 66 b and assemble in reverse order Use the wiring diagram 5 6 1 to ensure for a correct connection 5 6 2 4 Power pack Standard version 1 Unplug the power cord 2 Open the door of the dispenser 3 Remove the right cover Fig 65 4 Remove the protection plate Fig 68 a The following components are replaced easily D Transformer Fig 68 b D RC combination Fig 68 c D Relay Fig 68 d D Fus...

Страница 73: ...cover Fig 65 4 Remove the protection plate Fig 69 c 5 Replace the electrical components and assemble in reverse order To replace the condenser Fig 69 d 1 Unplug the power cord 2 Remove the back cover Fig 65 3 Remove the protection plate Fig 69 e 4 Replace the electrical component and assemble in reverse order To replace the fuse Fig 69 f 1 Unplug the power cord 2 Replace the fuse and assemble in r...

Страница 74: ...hat hold the keyboard Fig 71 a b 6 Disconnect the connector from the keyboard Fig 71 c 7 Remove the button foils with the name plates push from behind and pull gently forward Fig 72 8 Replace the keyboard and assemble in reverse order Carefully check the position of the buttons in relation to the front cover Adjust the keyboard left right or up down if necessary a b c Fig 70 Front cover Fig 71 Key...

Страница 75: ...0 on the scale Minimum flow rate 1 5 l min 0 4 gal min setting between 0 and 1 on the scale Maximum flow rate 30 l min 7 2 gal mi Maximum water temperature 70 C 158 F Connection to the water tap internal thread R 3 4 to the supply hose of the dispenser external thread R 3 4 5 7 1 1 Installation of the water stop valve kit D Insert the filter 1 into the water stop valve with the curvature of the si...

Страница 76: ... 4 gal Do not adjust to a setting below 3 D Whenever a defect in the dispenser or water supply hose occurs the water stop valve interrupts in the water supply after the preset quantity of water e g setting 3 15 l 4 gal has flown through the water stop valve Putting the water stop valve back into service again following a defect D Close the water tap D Eliminate the defect in the dispenser or water...

Страница 77: ...r cord 2 Remove the back and right cover 3 Connect the flat cable to the connector Fig 74 a on the control board 4 Make an opening specially prefrabricated in the back cover Fig 75 5 Lead the flat cable trough the back cover 6 Connect the flat cable to the connector of the payment system 7 Program the price lines see section 4 2 5 4 2 6 8 Mount the right and back cover a Fig 74 Payment connection ...

Страница 78: ...Back Office Manual 1 00 2006 Version March H5 34 Function Pay System ...

Страница 79: ...Back Office Manual 1 00 2006 Version March H6 1 Preventive Maintenance 6 PREVENTIVE MAINTENANCE RESERVED ...

Страница 80: ...Back Office Manual 1 00 2006 Version March H6 2 Preventive Maintenance ...

Страница 81: ...ater inlet water tank version A 22 Housing cold water inlet water tank version A 23 Inlet valve water tank version A 24 Bridge inlet valve water tank version A 25 Spring high temperature safety switch left A 26 High temperature safety switch left A 27 Spring high temperature safety switch right A 28 High temperature safety switch right A 29 Temperature sensor boiler bottom A 30 Temperature sensor ...

Страница 82: ...cold water inlet A 50 Tube clamp A 51 Tube boiler inlet A 52 Boiler A 53 Tube boiler to selector A 54 Tube rest position A 55 Tube coffee A 56 Tube products A 57 Tube hot water A 58 Nozzle A 59 Tube de aeration A 60 Overflow tube A 61 Tube descale A 62 Boiler drain A 63 Drain hose A 64 Plug drain hose The American Canadian and Great Brittain dispensers have only one high temperature safety switch ...

Страница 83: ...3 C14 C15 C16 C17 C 10 Other fault in product delivery general C 11 Coil assy left C 12 Coil assy right C 13 Sealing ring top coil C 14 Empty C 15 Coil C 16 O Ring coil C 17 Lead through coil C 18 Ingredient coffee C 19 Ingredient milk C 20 Ingredient cacao C 21 Ingredient tea C 22 Ingredient decaf ...

Страница 84: ...general D 11 Outlet coffee D 12 Outlet hot water D 13 Trough D 14 Lid trough D 15 Service panel D 16 Trough release D 17 Spring loaded bush trough D 18 Snap finger trough D 19 Spring trough D 20 Bar trough D 21 Light sensor trough D 22 Flat cable trough sensor D 23 Mixer motor D 24 Seal mixer motor D 25 Housing mixer motor D 26 Seal mixer housing D 27 Seal axis mixer motor D 28 Impeller mixer moto...

Страница 85: ...em F F12 F11 F20 F19 F15 F16 F18 F17 F14 F13 F 10 Other fault in product delivery general F 11 Funnel F 12 Fan F 13 Cover plate thermo protection F 14 Thermo protection F 15 Heat sink F 16 Peltier F 17 Foam seal Peltier F 18 Foam seal cold plate F 19 Cold plate F 20 Temperature sensor ...

Страница 86: ...er outside fixed water version G 16 Screws left cover inside fixed water version G 17 Screws left cover outside front water tank version G 18 Screws left cover outside back water tank version G 19 Screws left cover inside water tank version G 20 Screws right cover inside G 21 Screws right cover outside G 22 Drip grid G 23 Drip tray G 24 Volume floater drip tray G 25 Door hinge upper G 26 Door hing...

Страница 87: ...edures 7 5 2 Housing 2 2 G38 G39 G35 G33 G34 G36 G37 G27 G 10 Other fault in product delivery general G 33 Rear cover G 34 Filter cooling fan G 35 Grid filter cooling fan G 36 Sealing door G 37 Lock handle door G 38 Cover operation panel G 39 Branding plate RVS ...

Страница 88: ...y general K 11 Connector service device K 12 Flat cable service device K 13 Clips control board fixation K 14 Control board K 15 Microprocessor Software K 16 Fuse control board K 17 Wiring and connector Details see section 5 6 1 K 18 Condenser K 19 Rectifier K 20 Relay K 21 RC Combination K 22 Main fuse K 23 Print on off switch K 24 On off switch K 25 Fixation hook on off switch K 26 Label on off ...

Страница 89: ...1 Connector service device K 12 Flat cable service device K 13 Clips control board fixation K 14 Control board K 15 Microprocessor Software K 16 Fuse control board K 17 Wiring and connector Details see section 5 6 1 K 18 Condenser K 20 Relay K 23 Print on off switch K 24 On off switch K 25 Fixation hook on off switch K 26 Label on off switch K 29 Power pack K 30 Protection cover K 31 Main fuse K 3...

Страница 90: ...anel K38 K37 K39 K41 K35 K40 K42 K36 K34 K 10 Other fault in product delivery general K 34 Keyboard K 35 Display K 36 Selection button s keyboard K 37 Connector flat cable K 38 Foil product buttons K 39 Stop button K 40 Selection button s K 41 Product label s K 42 Foil hot water button ...

Страница 91: ...Back Office Manual 1 00 2006 Version March H8 1 Service Information 8 SERVICE INFORMATION BULLETINS ...

Страница 92: ...Back Office Manual 1 00 2006 Version March H8 2 Service Information ...

Страница 93: ...e programming device and the C60 dispenser the programming device unit a connection interface PCB The programming device does not need a power source battery It is powered by the connected hardware The ON OFF switch should be set to ON Fig 76 Programming set and a PC notebook 9 1 2 Running the software on the PC notebook In order to upgrade the C60 the Hitachi Flash Development Toolkit software sh...

Страница 94: ...ts firmware Create a workspace by selecting the Create a new Workspace button and then click OK Now the name of the new workspace must be entered in the Workspace Name field in a new sub window A valid name would be C60 Dispenser Enter this name in the Workspace Name field and click OK to continue A new window will appear asking whether the setup wizard must be started Click YES to start the wizar...

Страница 95: ...e field and click Next to proceed A new window appears asking to select the used microcontroller Select the name of the used micro controller from the list H8S 2138AF and click Next Now a window appears asking for the appropriate COM port to be selected Usually COM1 is used Select another COM port from the list if needed Click Next to proceed ...

Страница 96: ...equency The crystal frequency must be 20 00 MHz Enter this value and click Next to continue The next window shows default values which should not be changed Click Next to continue The next window shows default values which should not be changed Click Finish to continue After the wizard has ended the next window will appear ...

Страница 97: ...er firmware files to the workspace Before new software referred to as Firmware can be loaded into the dispenser this software must be added to the C60 Target file folder Right click on the Target file folder The window will change to Select Add Files to Project in order to add the appropriate MOT file firmware data file to the workspace The next window will appear Browse to the folder in which the...

Страница 98: ...ftware version Now save the workspace by selecting the File menu Save Workspace 9 1 5 Upgrading the C60 dispenser The Target Files folder holds all added MOT files One of these files can be selected to upgrade the C60 dispenser However it is a good habit to only hold the file which is to be loaded into the dispenser This prevents the service engineer to make mistakes by loading the wrong firmware ...

Страница 99: ...r removing the file from the Target File folder a new file can be added to this folder as described in the paragraph Adding C60 dispenser firmware files to the workspace Double clicking the file in the Target File folder will open the data file in a new sub window Now this data file can be loaded into the dispenser First a connection must be established between the PC notebook and the C60 ...

Страница 100: ...onds 2 Plug the red 14 pin MicroMatch connector in the C60 s PCB connector Fig 77 connection to the C60 PCB 3 Connect the interface cable and the programmer cable by means of the interface connection PCB 4 Connect the programming device to the PC notebooks COM port 5 Reconnect the C60 to the mains power The C60 is now in the upgrade mode Please note in the upgrade mode the C60 is not active No dat...

Страница 101: ...into the C60 dispenser 1 Connect to the C60 Select the main menu item Device Select Connect to Device in order to establish a connection between de PC notebook and the C60 In the bottom window field text will appear showing that a connection is being established If a connection was established successfully the bottom field shows the text as below ...

Страница 102: ...nection failed to establish the text as shown below will appear in the bottom field If an error occurred check the power the cables and the connections 2 Erase all blocks in the micro controller Select the option Erase Flash Blocks from the Device menu Select Select All and then Erase ...

Страница 103: ...ntroller is completely empty and ready for receiving new firmware 3 Download the new firmware to the C60 Select Download from the Device menu The name of the MOT file is shown in the Download menu line Now the firmware transfer starts While downloading the firmware into the C60 the window shows the following text A blue progress bar in the right bottom corner indicates the progression ...

Страница 104: ...evice from the Device menu to close down the connection After the connection has been closed the window shows the following text 4 Disconnect the mains power from the C60 dispenser and disconnect the programming device from the C60 s PCB 5 Reconnect the C60 to the mains power After a while a beep will sound and the software version will appear in the display Now the C60 has been upgraded with the ...

Отзывы: