12 Chapter 2
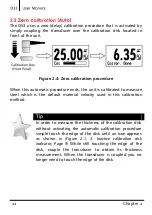
The QS3 uses a zero (delay) calibration procedure that is activated by
simply coupling the transducer over the calibration disk located in
front of the unit.
Figure 2.4: Zero calibration procedure
When this automatic procedure ends, the unit is calibrated to measure
steel which is the default material velocity used in this calibration
method.
Tip
In order to measure the thickness of the calibration disk
without activating the automatic calibration procedure
simple touch the edge of the disk until an icon appears
as shown in
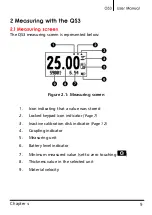
(Figure 2.1, 3. Inactive calibration disk
indicator, Page 9)
While still touching the edge of the
disk, couple the transducer to obtain its thickness
measurement. When the transducer is coupled you no
longer need to touch the edge of the disk.
Содержание QS3 B
Страница 1: ...I ...
Страница 2: ...P N QSD 301 ENG Rev 3 2012 ...
Страница 43: ...33 Capitulo 4 P N QSD 501 ENG Rev 3 2012 2012 dmq ...


