Connections and Setup
83
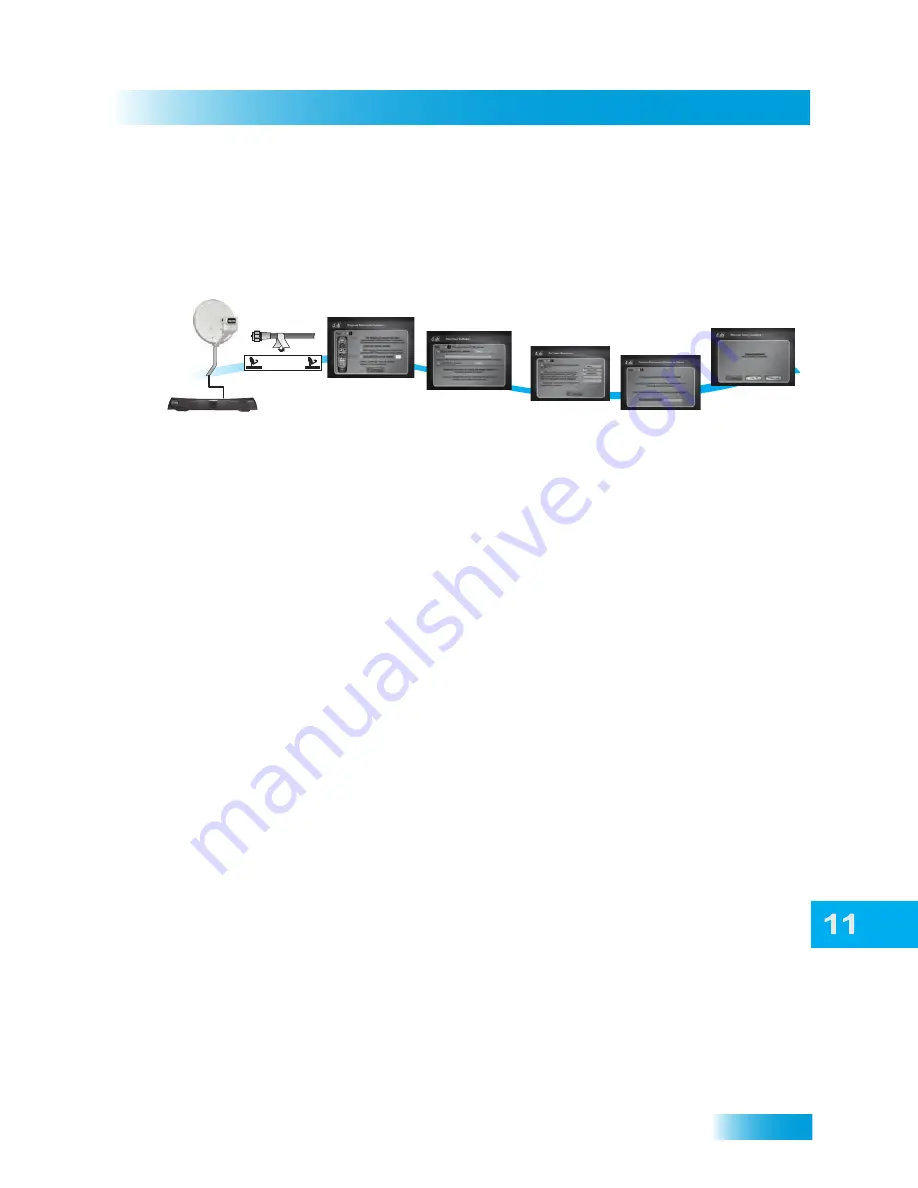
Connecting to Your Dish Antenna
C
ONNECTING
TO
Y
OUR
D
ISH
A
NTENNA
Connect your TV to the receiver using the previous sections before connecting the
receiver to the dish antenna.
1
Connect one RG-6 coaxial cable from the LNBF to a DISH Pro Plus (DPP) Separator or a
DISH Pro Plus Triplexer. Connect the DPP Separator or DPP Triplexer to the
S
ATELLITE
I
N
port on the receiver’s back panel.
Note
: If you are installing your receiver in a system with DISH Pro or DISH Pro Plus
LNBFs (and/or switches), you can have as much as 200 feet of cable between the LNBF
and the receiver. You must use RG-6 coaxial cables rated up to at least 2150 MHz.
2
Peel off the blue stickers (found at the beginning of this
User’s Guide
) and affix them to the
cable near where they connect to the
S
ATELLITE
I
N
connection on the back of the receiver.
3
Power on the receiver and the TV. Program Remote to Receiver (Step 1 of 5) appears,
which is the first step of the Installation Wizard.
4
Using the remote, press SAT and then press RECORD. A number appears in the box on
the screen. Select
Continue
. Download Software (Step 2 of 5) of the Installation Wizard
appears.
5
After the software is downloaded and the receiver has been updated, the receiver restarts.
This process can take 10-25 minutes.
Note
: Step 2 of 5 eventually fails to proceed if your antenna is not pointed correctly. You
may see a pop-up instructing you to make sure that all cables leading to the receiver are
connected securely and correctly. If this is the case, make sure your antenna is pointed
correctly before selecting
Continue
on this screen.
6
On the Set Video Resolution screen, select the best resolution supported by your TV.
Select
Test
. On the confirmation screen, select
Save
.
7
On the Connect Receiver to Ethernet screen, the system is establishing connection to
broadband Internet. Wait while this process occurs.
8
On the Receiver Setup Complete screen, select
Guide
to display the Program Guide,
select
Live TV
to view live programming, or select
Preferences
to customize the guide
and channel lists (see Customizing the Guide and Channel Lists on page 70).
1-2
3
4
5
6
7
SATELLITE IN
SATELLITE IN
Connect receiver
to dish system
Label
cables
Wait as the system
downloads software
and updates the
receiver. When
finished the
receiver restarts.
Select the
best resolution
for your TV.
Select
Test
and
Save
.
Wait while the
receiver connects
to Ethernet
or Phone.
Continue with the
Installation Wizard,
programming the
remote to the receiver.
Select Continue
when finished.
8
Select
Guide
to
view the Program
Guide,
Live TV
to
view Live TV, or
Preferences
to
establish your
preferences.
Содержание VQ4510
Страница 6: ...Safety viii Notes ...
Страница 18: ...Chapter 1 8 Notes ...
Страница 38: ...Chapter 4 28 Notes ...
Страница 53: ...Accessing Your Information 43 What you ll find in this chapter CUSTOMER SUPPORT Your DISH Account ...
Страница 76: ...Chapter 9 66 Notes ...
Страница 88: ...Chapter 10 78 Notes ...
Страница 102: ...Chapter 11 92 Notes ...
Страница 116: ...106 Remote Control Device Codes Reference ...
Страница 117: ...107 LIMITED WARRANTY RESIDENTIAL CUSTOMER AGREEMENT FCC COMPLIANCE ...
Страница 128: ...Appendix 118 FCC Compliance ...
Страница 132: ...Index 122 ...
Страница 148: ...Page 13 This page intentionally left blank ...
Страница 154: ...Page 19 HEIGHT OF OBSTRUCTION APPROXIMATE MINIMUM DISTANCE TO EDGE OF ANTENNA UNIT ANTENNA UNIT LOCATION ...
Страница 163: ...Page 28 NOTES ...
Страница 164: ...11200 Hampshire Avenue South Bloomington MN 55438 PH 952 922 6889 FAX 952 922 8424 kingconnect com 21955 Rev B ...
Страница 169: ...GO ONLINE TO REGISTER YOUR PRODUCT Simply better by design Visit kingconnect com to register KING 22066 Rev A ...
Страница 171: ......
Страница 176: ......


