background image

Chapter 5: Working with Pro Tools LE

59

Editing Regions

The Edit tools in Pro Tools LE are used to edit re-
gions in the Edit window. 

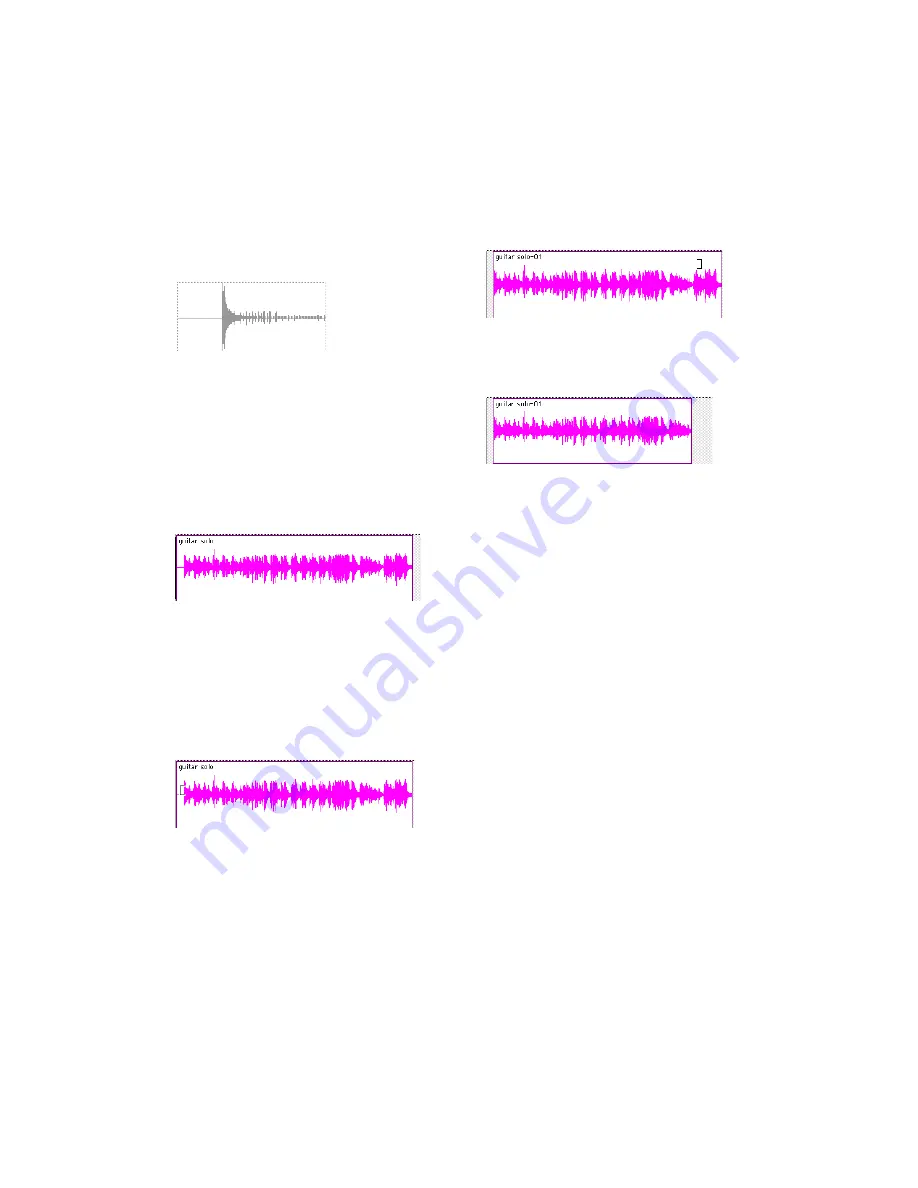
Trimming Regions

After recording an audio track, you will have an 
audio region on that track. If there is some si-
lence at the beginning of the region, or there is 
some extra audio at the end of the region, you 
can use the Trimmer tool in Slip mode to 
shorten the beginning or end of the region.

To trim an audio region:

1  

Select Slip mode.

2  

Select the Trimmer tool.

3  

Move the cursor near the beginning of the au-

dio region (notice the cursor displays as a “[”).

4  

Click at the beginning of the region and drag 

right to shorten the region.

5  

Move the cursor near the end of the audio re-

gion (notice the cursor displays as a “]”).

6  

Click at the end of the region and drag left to 

shorten the region.

You can also extend a region using the Trimmer 
tool if there is audio data beyond the current 
boundaries of the region. To extend the region’s 
beginning, drag to the left; to extend the re-
gion’s end, drag to the right.

Arranging Regions

There are many ways to edit and arrange re-
gions; the following example demonstrates how 
you might create and arrange a drum loop to 
compose a rhythm track.

To create and arrange a rhythm sequence:

1  

Open or create a session in Pro Tools LE. 

2  

Set the session meter and tempo by doing the 

following in the Edit window:

• Click the Ruler View selector and select 

both Tempo and Meter.

• Click the Add Tempo Change button and 

specify the tempo.

Audio region

Audio region on a track

Trimming the beginning of a region

Trimming the end of a region

The trimmed region

Содержание Mbox 2

Страница 1: ...Getting Started Mbox 2 Version 7 0 ...

Страница 2: ...accept any interference received including interference that may cause undesired operation NOTE This equipment has been tested and found to comply with the limits for a Class B digital device pursuant to Part 15 of the FCC Rules These limits are designed to provide reasonable protection against harmful interference in a residential installation This equipment generates uses and can radiate radio f...

Страница 3: ...ycling of waste electrical and electronic equipment The separate collection and recycling of your waste equipment at the time of disposal will help conserve natural resources and ensure that it is recycled in a manner that protects human health and the environment For more information about where you can drop off your waste equipment for recycling please contact your local city recycling office or...

Страница 4: ......

Страница 5: ...ation and Maintenance 10 Installing Pro Tools LE and Mbox 2 12 Optional Software on the Pro Tools Installer CD 13 Launching Pro Tools LE 14 Configuring Pro Tools LE 15 Removing Pro Tools LE 18 Chapter 3 Macintosh Configuration 19 Installation Overview 19 Macintosh System Optimization 19 Hard Drive Configuration and Maintenance 21 Installing Pro Tools LE 21 Optional Software on the Pro Tools Instal...

Страница 6: ... in a Session 48 Importing Data into Pro Tools Sessions 51 Basic Recording 53 Editing 57 Mixing 61 Plug Ins 63 Mix Automation 64 Final Mixdown 65 Appendix A Configuring MIDI Studio Setup Windows Only 67 MIDI Studio Setup 67 MIDI Patch Name Support 69 Appendix B Configuring AMS Mac OS X Only 71 Audio MIDI Setup 71 MIDI Patch Name Support 73 Appendix C Troubleshooting 75 Backing Up Your Work 75 Comm...

Страница 7: ...nalog converters Mbox 2 Package The Mbox 2 package includes the following Mbox 2 desktop audio interface Installer CDs containing Pro Tools LE soft ware DigiRack RTAS Real Time AudioSuite and AudioSuite plug ins optional software and electronic PDF guides This Mbox 2 Getting Started Guide which in cludes instructions for installing and config uring Mbox 2 and an introduction to Pro Tools LE softwa...

Страница 8: ...rding 1 4 inch TRS stereo headphone output with adjustable level control USB powered operation Pro Tools LE Capabilities Pro Tools LE 7 0 on Windows or Macintosh pro vides the following capabilities with Mbox 2 Playback of up to 32 mono digital audio tracks and of playback up to 28 tracks while recording up to 4 tracks depending on your computer s capabilities Up to 128 audio tracks with 32 voicea...

Страница 9: ...add a MIDI interface to your system USB MIDI interfaces work effectively with Pro Tools systems on Windows or Macintosh Serial MIDI interfaces are supported on Win dows systems only For a list of supported adapters refer to the Digi design Web site www digidesign com Hard Drive Requirements For a list of qualified hard drives see our Web site www digidesign com compato If you are using an ATA IDE ...

Страница 10: ...Table 2 lists the required disk space for certain track numbers and track lengths to help you estimate your hard disk usage Table 2 Required hard drive space for audio tracks Number of tracks and length 16 bit at 44 1 kHz 16 bit at 48 kHz 24 bit at 44 1 kHz 24 bit at 48 kHz 1 mono track 1 minute 5 MB 5 5 MB 7 5 MB 8 2 MB 1 stereo track or two mono tracks 5 minutes 50 MB 55 MB 75 MB 83 MB 1 stereo ...

Страница 11: ...t audio from a CD create an audio CD from a Pro Tools ses sion and other topics For additional information see the following online PDF guides Pro Tools Reference Guide explains Pro Tools LE software in detail Pro Tools Menus Guide covers all the Pro Tools on screen menus DigiRack Plug Ins Guide explains how to use the RTAS and AudioSuite plug ins included with Pro Tools LE Digidesign Plug Ins Gui...

Страница 12: ... Pro Tools Operator or Expert study on your own using courses available online or find out how you can learn in a classroom setting at a certified Pro Tools Training Center Products and Developers Learn about Digidesign products download demo software learn about our Development Partners and their plug ins applications and hardware News and Events Get the latest news from Digidesign sign up for a ...

Страница 13: ...audio and MIDI connections to the Mbox 2 See Chapter 4 Mbox 2 Hardware and Connections for details Windows System Optimization Before configuring your computer make sure you are logged in as an Administrator for the ac count where you want to install Pro Tools For details on Administrator privileges refer to your Windows documentation Required Optimizations To ensure optimum performance with Pro T...

Страница 14: ... the Windows System Standby power scheme must be set to Always On This helps prevent long record or playback passes from stopping due to system resources powering down To configure Windows Power Management 1 Choose Start Control Panel 2 Double click Power Options 3 Click the Power Schemes tab 4 From the Power Schemes pop up menu select Always On 5 Click OK This sets System Standby System Hibernate...

Страница 15: ...rk Cards If applicable disable any networking cards other than a FireWire card that you might use to connect an external drive to your system To disable a network card 1 Right click My Computer and choose Man age 2 Under System Tools select Device Manager 3 In the Device Manager window double click Network adapters then double click the Net work Adapter card you want to disable 4 Under the General...

Страница 16: ...ervices DHCP Client TCP IP Net BIOS and other networking related items unless the com puter has no network or internet connec tion in which case these items can be disabled To Disable System Startup Items 1 From the Start menu choose Run 2 Type msconfig and click OK The System Configuration Utility opens 3 Under the General tab choose Selective Star tup 4 Deselect Load Startup Items and click OK 5...

Страница 17: ...recording and editing can quickly decrease overall drive performance It is sug gested that you regularly use Disk Cleanup or an equivalent utility to assess the condition of drives and if necessary delete temporary files and other unused data To use Disk Cleanup 1 Choose Start Control Panel 2 Double click Administrative Tools 3 Double click Computer Management 4 Double click Storage 5 Double click...

Страница 18: ...ng all software components drivers and PACE System files before proceeding to the next step 10 When installation is complete click Finish Installing QuickTime QuickTime 6 5 or later is required for Pro Tools if you plan to include movie files or import MP3 or MP4 AAC files in your sessions Quick Time for Windows XP is available as a free download from the Apple Web site www ap ple com To install Q...

Страница 19: ...s tem you will need to install the Digidesign Ethernet software To install Digidesign Ethernet software 1 Click Start right click My Network Places and then choose Properties 2 Right click the relevant Local Area Connec tion icon and then choose Properties 3 Click Install select Protocol and click Add 4 Click Have Disk 5 Select the DigiNet inf file on your Pro Tools Installer CD in the Controllers...

Страница 20: ...tall MacDrive After installation is complete restart your computer Launching Pro Tools LE When launching Pro Tools LE the first time you are prompted to enter an authorization code To authorize Pro Tools LE software 1 Double click the Pro Tools LE shortcut on your desktop or the application icon in the Pro Tools folder inside the Digidesign folder 2 Enter the authorization code in the dialog makin...

Страница 21: ...the H W Buffer Size pop up menu select the audio buffer size in samples 3 Click OK RTAS Processors The RTAS Processors setting determines the number of processors in your computer allo cated for RTAS plug in processing With computers that have multiple processors or that feature multi core processing or hyper threading this setting lets you enable multi pro cessor support for RTAS processes Used i...

Страница 22: ... CPU Usage Limit 1 Choose Setup Playback Engine 2 From the CPU Usage Limit pop up menu se lect the percentage of CPU processing you want to allocate to Pro Tools 3 Click OK DAE Playback Buffer Size The DAE Playback Buffer Size determines the amount of memory DAE allocates for disk buff ers The optimum DAE Playback Buffer Size for most disk operations is Level 2 DAE Playback Buffer Size settings lo...

Страница 23: ...t S PDIF Use this setting if you are recording through the Mbox 2 S PDIF inputs from an ex ternal digital device This setting will synchro nize Pro Tools to that digital device To select the Clock Source 1 Choose Setup Hardware 2 Choose the clock source from the Clock Source pop up menu 3 Click OK Configuring I O Setup Using the I O Setup dialog you can label Pro Tools LE input output insert and b...

Страница 24: ...tem and Pro Tools you should save an image of your system drive using a backup utility such as Norton Ghost By doing this you can quickly restore your system configuration and settings if you encounter any problems Removing Pro Tools LE If you need to remove Pro Tools LE software from your computer you can use the Add or Re move Programs command To remove Pro Tools from your computer 1 Choose Star...

Страница 25: ...our computer before in stalling Pro Tools hardware and software Before configuring your computer make sure you are logged in as an Administrator for the ac count where you want to install Pro Tools For details on Administrator privileges in Mac OS X refer to your Apple OS X documentation Turning Off Software Update To turn off the Software Update feature 1 Choose System Preferences from the Apple ...

Страница 26: ...he Apple menu and click Spotlight 2 In the Spotlight window click Privacy 3 To prevent indexing of a drive drag its icon from the desktop into the list Disabling the Spotlight Shortcuts The Mac OS X Spotlight feature uses the same key commands Pro Tools uses to start recording Command Spacebar and to record online Command Option Spacebar If you want to retain use of these key commands in Pro Tools...

Страница 27: ... Desktop with the new volume name Installing Pro Tools LE After the Apple System software settings are con figured you are ready to install Pro Tools LE To install Pro Tools LE on Mac OS X 1 Make sure you are logged in as an Administra tor for the account where you want to install Pro Tools For details on Administrator privi leges in Mac OS X refer to your Apple Mac OS X documentation 2 Insert the...

Страница 28: ...unching Pro Tools LE software con nect Mbox 2 to your computer To connect Mbox 2 to your computer 1 Connect the small end of the included USB ca ble to the USB port on Mbox 2 2 With your computer on connect the other end of the USB cable to any available USB port on your computer Launching Pro Tools LE When launching Pro Tools LE the first time you are prompted to enter an authorization code to va...

Страница 29: ...gher Hardware Buffer Size settings allow for more audio processing and effects and are use ful when you are mixing and using more RTAS plug ins To change the Hardware Buffer Size 1 Choose Setup Playback Engine 2 From the H W Buffer Size pop up menu select the audio buffer size in samples 3 Click OK RTAS Processors The RTAS Processors setting determines the number of processors in your computer all...

Страница 30: ...cent for single processor com puters to 99 percent for multi processor com puters To change the CPU Usage Limit 1 Choose Setup Playback Engine 2 From the CPU Usage Limit pop up menu se lect the percentage of CPU processing you want to allocate to Pro Tools 3 Click OK DAE Playback Buffer Size The DAE Playback Buffer Size determines the amount of memory DAE allocates for disk buff ers The optimum DA...

Страница 31: ...DIF Use this setting if you are recording ma terial into Mbox 2 S PDIF inputs from an exter nal digital device This setting will synchronize Pro Tools to that digital device To select the clock source 1 Choose Setup Hardware 2 Choose the clock source from the Clock Source pop up menu 3 Click OK Configuring I O Setup Using the I O Setup dialog you can label Pro Tools LE input output insert and bus ...

Страница 32: ...nfiguration and settings if you encounter any problems Removing Pro Tools LE If you need to remove Pro Tools software from your computer you can use the Installer CD or the downloaded Installer file To remove Pro Tools from your computer 1 Make sure you are logged in as an Administra tor for the account where Pro Tools is installed For details on Administrator privileges in Mac OS X refer to your ...

Страница 33: ...x 2 Basics Guide for basic setup information such as connecting audio inputs headphones mics and instruments The following illustrations show two possible setups depending on the equipment in your studio Figure 1 Mbox 2 micro studio configuration running Pro Tools LE on a desktop computer powered speakers monitor mixer DAT or S PDIF microphone Mbox 2 instrument USB FireWire headphones computer dis...

Страница 34: ...Mbox 2 Getting Started Guide 28 Figure 2 Mbox 2 micro studio configuration running Pro Tools LE on a laptop computer Mbox 2 instrument USB FireWire Laptop headphones cable drive MIDI Device MIDI cables ...

Страница 35: ...eadphone Output to connect stereo headphones with a 1 4 inch stereo mini con nector Headphone Level The headphone knob adjusts the output level of the Headphone port which outputs the signal that is routed to Outputs 1 2 in Pro Tools LE and mirrors the Line Outputs Monitor Level The Monitor knob adjusts the output level of the Line Out ports In Pro Tools this will be the signal routed to Outputs 1...

Страница 36: ...speakers This has no effect on Pro Tools playback monitoring recording or on the main outputs Switching your stereo source signal to mono is useful when you are recording a mono input while listening to stereo playback to hear your playing in both sides or for checking the phase relationship of stereo inputs When en gaged the Mono LED lights Monitoring while Overdubbing By panning signals to the c...

Страница 37: ...s for each channel The DI and Mic LEDs indicate the current source input For more information see Analog Audio on page 34 Removable Handle Mbox 2 includes a handle that can be used for carrying and tilting as well as a replacement panel that makes the unit more compact The handle can be used as a stand that tilts the unit into a more easily viewable angle when the Mbox 2 is placed on a desktop The...

Страница 38: ... O The S PDIF in and out ports are unbalanced two conductor phono RCA connectors that utilize a full 24 bit two channel digital data stream The Sony Philips Digital Interface Format S PDIF is used in many professional and con sumer CD recorders and DAT recorders To avoid RF interference use 75 ohm coaxial cable for S PDIF transfers and keep the cable length to a maximum of 10 meters In use the S P...

Страница 39: ... source Mic Line or DI is chosen using the Source selectors Source 2 is at the far left when looking at the back panel and Source 1 is to its right The back panel inputs for Source 1 and Source 2 are lo cated such that they are directly in line with their associated input controls on the front panel This lets you locate input jacks more eas ily when viewing from the front of the unit Making Signal...

Страница 40: ...rally require the most amplification Keyboards preamps and mixers output line level audio which varies with each device between the 10 dBV and 4 dBu standards To accommodate these varying sources Mbox 2 provides switchable line input types with ad justable gain for each input channel To connect an analog audio source 1 Do one of the following To connect a microphone plug an XLR ca ble directly int...

Страница 41: ...and other digital devices Each S PDIF connection provides two channels of 24 bit digital audio To connect a S PDIF device to Mbox 2 1 Use two 75 ohm coaxial cables with male RCA connectors on both ends purchased sepa rately 2 Connect the device s S PDIF output to Mbox 2 s S PDIF input port and the device s S PDIF input to Mbox 2 s S PDIF output port To configure Pro Tools to record from a S PDIF d...

Страница 42: ...uted to the left and right inputs respectively on your recorder These outputs are TRS ports You may need adapter cables if your mixdown deck has RCA inputs Connecting a Digital Deck If you have a CD recorder DAT deck or other de vice that accepts S PDIF connections connect it to the S PDIF In and S PDIF Out RCA ports on the back of Mbox 2 See the Mbox 2 Basics Guide for informa tion on basic MIDI ...

Страница 43: ...IDI and other session information Audio files and fade files Region group files and backup Ses sion files are stored in folders within the session folder Starting a Session To create a new session 1 Launch Pro Tools LE 2 Choose File New Session 3 In the New Session dialog set the audio file type sample rate and bit depth parameters for the new session 4 Choose where you want to save your session I...

Страница 44: ...n along the Timeline for editing of audio MIDI and au tomation data Mix Window Displays the Pro Tools mixer with its familiar fader strip controls for volume pan solo mute and signal routing To switch between the Edit and Mix windows press Control Equals Windows or Command Equals Macintosh Figure 5 Edit window Tracks Main Counter Edit tools Edit Audio region Rulers Track List Group List MIDI notes...

Страница 45: ...ind Fast Forward Pause and Record The Transport window can also show Counter and MIDI Control displays S Figure 6 Mix window Tracks Inserts Sends Track controls Pan sliders Volume fader Level meter Plug In Insert Send controls Figure 7 Transport window Transport controls Counters MIDI controls ...

Страница 46: ...and Tempo rulers indicate changes in meter and tempo within the session The Markers ruler displays markers to important track locations Setting a Tempo You can set the tempo for your session by using the Song Start Marker located in the Tempo ruler To set the session tempo with the Song Start Marker 1 In the Tempo ruler double click the Song Start Marker 2 In the Tempo Change dialog enter the BPM ...

Страница 47: ...lick to enable the Click option or Enable the Metronome Click button in the Transport window 2 Create a mono Auxiliary Input Aux Input track 3 Insert a Click plug in on the Auxiliary Input track 4 In the Click plug in window choose a click sound from the Librarian pop up menu this menu displays factory default when you first insert the plug in 5 Choose Setup Click and set the Click and Countoff op...

Страница 48: ...ave File Save As or File Save Copy In Save Saves the currently open session file leav ing it open for you to continue working Save As Creates a duplicate session file with the name you choose and leaves the duplicate open for you to continue working This can be useful if you want to experiment with different ar rangements in the session without affecting the original session Save Copy In Saves a c...

Страница 49: ...ew system resources and usage Choose Window System Usage Transport Controls The Transport window provides access to all Pro Tools LE transport commands Different transport controls can be displayed or hidden in this window To show the Transport window Choose Window Transport To configure the Transport window Choose View Transport and select from the available view options The Transport window prov...

Страница 50: ...Audio mixer channels used for input routing and submixing Master Faders Provide master channel controls and options for any output or bus path MIDI Tracks Record play back and edit MIDI data Instrument Tracks Combine the functions of MIDI and Auxiliary Input tracks letting you control and monitor instrument plug ins or ex ternal MIDI devices in a single channel strip To create a new track 1 Choose...

Страница 51: ...IDI tracks and Instrument tracks can all be automated See Mix Automation on page 64 for more information Audio Tracks Audio tracks Auxiliary Inputs and Master Fad ers share many identical controls Figure 8 shows the controls found in audio or Auxiliary Input tracks Master Faders provide all the same features as audio tracks and Auxiliary Input tracks with the following exceptions Input Selector A ...

Страница 52: ...omment area Automation mode Record Enable Solo button Group ID Volume fader Output window Voice selector Inserts up to 5 Sends up to 10 Track Type indicator Color bar button button selector selector Pan indicator Volume indicator Figure 9 MIDI track in the Mix window MIDI Velocity meter MIDI Output selector MIDI Input selector Automation Mode selector Mute button Solo button Record Enable Pan indi...

Страница 53: ...to tracks and arranged in any order Audio regions can also be auditioned from the Region List by Alt clicking Windows or Option clicking Macintosh the audio region name The Region List pop up menu provides features for managing regions and files such as sorting selecting importing or exporting files Figure 10 Stereo Instrument track in the Mix window Audio Output Path selector Mute button Solo but...

Страница 54: ... tions appear as markers under the Timebase rul ers You can store up to 999 Memory Locations or markers in a session To define a memory location 1 Navigate to the location where you want to store a marker or memory location or Begin playback somewhere before the point where you want to store a Memory Location or marker 2 Create a memory location by doing one of the following Press Enter on the num...

Страница 55: ...oom in vertically and horizontally using the Track Height selector and Zoom tools To change track height Click the Track Height selector the scaled ver tical bar at the left of the track and select a track height from the pop up menu New Memory Location dialog Memory Locations window Zoom and Track Height tools in the Edit window You can apply many commands including track height selection to more...

Страница 56: ...llows Drag up to zoom in vertically Drag down to zoom out vertically Drag to the right to zoom in horizontally Drag to the left to zoom out horizontally Zoom Toggle The Zoom Toggle button lets you store a zoom state and toggle between it and the current zoom state When Zoom Toggle is enabled the Edit window displays the stored zoom state When Zoom Toggle is disabled the Edit window reverts to the ...

Страница 57: ...n on creating memory loca tions see Memory Locations on page 48 Importing Data into Pro Tools Sessions Pro Tools LE lets you import audio MIDI and a wide range of Pro Tools session data into your current session Importing Audio Pro Tools LE lets you import audio files from your hard drive or from a CD This is very useful if you have audio files already recorded to disk or if you are working with C...

Страница 58: ...I files you want to import 2 Drag MIDI files from the Workspace browser to the Track List 3 In the Import MIDI Settings dialog choose the import location and settings for the MIDI you are importing Importing Files from Windows Explorer and Macintosh Finder Pro Tools lets you drag and drop audio MIDI region group REX and ACID files directly from Windows Explorer or Macintosh Finder to the Timeline ...

Страница 59: ...ls Input levels are adjustable using the gain knobs on the front of Mbox 2 You can also adjust in put signal levels at the source When you feed a signal into Pro Tools make sure to adjust the input level to optimize the dy namic range and signal to noise ratio of the re corded file If the input level is too low you will not take full advantage of the dynamic range of your Pro Tools system If the i...

Страница 60: ...ndow 4 Click Return To Zero to start recording from the beginning of the session You can also record to a selection in a track or from the cursor loca tion in the Edit window 5 Click Record Enable in the Transport window to enable recording 6 Click Play or press the Spacebar to record on all record enabled tracks 7 Record your performance 8 Click Stop in the Transport window or press the Spacebar ...

Страница 61: ...d channel to be recorded or leave it set to All 5 Do one of the following depending on the type of instrument you are using If you are using an instrument plug in click an Insert selector and insert the plug in on the Instrument track The track s MIDI output is automatically assigned to the instrument plug in If you are using an external MIDI device click the track s MIDI Output selector at the to...

Страница 62: ...output but MIDI activity 11 Adjust the audio output level of the Instru ment track with its Volume fader To record MIDI on the Instrument track 1 Verify that the Instrument track you want to record to is record enabled and receiving MIDI 2 In the Transport window click Return To Zero to start recording from the beginning of the ses sion You can also record to a selection in a track or from the cur...

Страница 63: ...nd MIDI In the Edit window audio and MIDI tracks can be edited into regions or re peated in different locations to create loops re arrange sections or entire songs or to assemble tracks using material from multiple takes Audio and MIDI editing are typically used to Fix or replace mistakes Re arrange songs and projects Clean up track timing and rhythm by aligning hits to Grid values like bars and b...

Страница 64: ... their current state then continue making additional edits to the new playlist knowing you can always go back to the previous version To create multiple playlists for editing 1 Start with a track on which you want to try different edits 2 From the Playlist selector s pop up menu choose Duplicate 3 Name the duplicated playlist and click OK 4 Make your first series of edits 5 Return to the original ...

Страница 65: ...udio re gion notice the cursor displays as a 6 Click at the end of the region and drag left to shorten the region You can also extend a region using the Trimmer tool if there is audio data beyond the current boundaries of the region To extend the region s beginning drag to the left to extend the re gion s end drag to the right Arranging Regions There are many ways to edit and arrange re gions the ...

Страница 66: ...er tool and select the Separa tion Grabber tool 9 With the Separation Grabber tool drag the se lection to the beginning of the new audio track A new region is created and appears at the be ginning of the new track 10 With the new region still selected choose Region Loop 11 In the Region Looping dialog enter the number times you want to loop the region and click OK You now have a new rhythm track w...

Страница 67: ... inputs can be from any hardware input or bus path Once recorded an audio track s input is its audio file on disk Auxiliary Inputs can be any hardware input or internal bus path For all types of audio tracks outputs can be routed to any hardware output or internal bus path You can use these signal routing features to set up virtually any mixer architecture for your projects including sends and ret...

Страница 68: ...t tracks can be created to act as re turn channels for busses as well as for inputs from hardware sources To create a return 1 Choose Track New and specify 1 Mono or Stereo Auxiliary Input then click Create 2 Click the Input selector of the Auxiliary Input and set it to the bus path you assigned to the sends on the source tracks 3 Click the Output selector of the Auxiliary In put and choose an out...

Страница 69: ...Stereo Mas ter Fader track then click Create 2 Set the outputs of all audio tracks in the ses sion to Outputs 1 2 and set the panning of each track 3 Set the output of the Master Fader to your main output path Outputs 1 2 Plug Ins Plug ins provide EQ dynamics delay and many other types of effects processing and function either in real time RTAS or in non real time AudioSuite RTAS plug ins are nond...

Страница 70: ... or automate changes to track volume send levels mutes pan and plug in parameters To write automation 1 Choose Window Automation Enable 2 In the Automation Enable window enable an automation type volume pan mute send level send pan send mute or any plug in automa tion by clicking its button so that it is high lighted 3 In each track you want to automate select an automation mode with the Automatio...

Страница 71: ... To Bounce to Disk 1 Choose File Bounce to Disk 2 Select any mono or stereo output or bus path as the source for the bounce 3 Select the File Type such as WAV Format such as mono or stereo Resolution such as 16 bit and Sample Rate such as 44 1 kHz 4 If you are changing the sample rate of the bounced file choose a Conversion Quality set ting 5 Click Bounce Using Dither on Mixdown You should use a d...

Страница 72: ... is appropriate for mono files and Type 2 or Type 3 are appropriate for stereo files 5 Choose File Bounce to Disk to perform the mixdown Sample Rate Conversion on Mixdown When you specify a different sample rate for a bounced file for example when mixing down a session recorded at 48 kHz to 44 1 kHz for re lease on an audio CD a Conversion Quality set ting becomes available in the Bounce to Disk d...

Страница 73: ...atch names for your external MIDI devices Entire MIDI Studio Setup configurations created within MSS can be imported and exported MIDI Studio Setup Window The MIDI Studio Setup window is organized into three sections Interface controls are at the top of the window All the currently defined in struments are displayed in the Instrument Name list on the left side of the window A de tailed view of MID...

Страница 74: ...a manufacturer and model for the new de vice from the corresponding pop up menus If the Manufacturer and Model pop up menus do not provide a name for your particular device choose None 5 From the Input pop up menu choose the in put port on your MIDI interface that is con nected to the MIDI Out of your instrument 6 From the Output pop up menu choose the output port on your MIDI interface that is co...

Страница 75: ...d Channels grid sets the send channels for the MIDI device specified in the Instrument Name field Receive Channels The Receive Channels grid sets the receive chan nels for the MIDI device specified in the Instru ment Name field MIDI Patch Name Support Pro Tools supports XML Extensible Markup Language for storing and importing patch names for your external MIDI devices Pro Tools installs MIDI patch...

Страница 76: ...ank pop up menu appears in the upper left hand corner of the win dow Once patch names have been imported into Pro Tools they are available for that MIDI de vice in all sessions To clear patch names In the Patch Select dialog click the Clear but ton and click Done Patch Select button Edit window Patch Select button Mix window Patch Select dialog Patch Select button Patch Select button Change button...

Страница 77: ...it appears in the window with each of its ports numbered 3 For any MIDI devices connected to the MIDI interface click Add Device A new external de vice icon with the default MIDI keyboard image will appear 4 Drag the new device icon to a convenient lo cation within the window 5 Connect the MIDI device to the MIDI inter face by clicking the arrow for the appropriate output port of the device and dr...

Страница 78: ...priate MIDI chan nels 1 16 for the Transmits and Receives op tions These determine which channels the device will use to send and receive MIDI External Device Icon Naming a new MIDI device For Manufacturer and Model names AMS refers to one or more files with the suffix middev in the directory Root Library Audio MIDI Devices Pro Tools installs a file that contains information for many commercially ...

Страница 79: ...actory default patch names of many common MIDI devices These files reside in directories sorted by manufacturer in Library Audio MIDI Patch Names Digidesign To import MIDI patch names into Pro Tools 1 Verify the MIDI Device name in the Audio MIDI Setup window see Audio MIDI Setup on page 71 2 Verify the MIDI track s output is correctly as signed to the MIDI device 3 Click the MIDI track s Patch Se...

Страница 80: ...ith patch names and the Patch Name Bank pop up menu appears in the upper left hand corner of the win dow Once patch names have been imported into Pro Tools they are available for that MIDI de vice in all sessions To clear patch names In the Patch Select dialog click the Clear but ton and click Done Patch Select dialog MIDI patch name files midnam can be edited in any text editor or you can use thi...

Страница 81: ...m configuration and settings if you encounter any problems Common Issues Pro Tools Won t Launch Problem When you double click the Pro Tools applica tion or a Pro Tools session file Pro Tools doesn t launch or displays an error message Possible Solutions Check to be sure your computer has the re quired amount of RAM to launch Pro Tools See the compatibility page of the Digidesign Web site www digid...

Страница 82: ...ures should be turned off Before You Call Digidesign Technical Support Register Your System Register your purchase immediately after re viewing the registration information card in cluded with every Pro Tools system Registering your purchase is the only way you become eligi ble to receive complimentary technical support and future upgrade offers Registering is one of the most important steps to co...

Страница 83: ...ftware Pro Tools software version Plug in versions Other Digidesign software Additional plug ins from Digidesign Devel opment Partners Other Hardware Refer to the manufacturer s documentation for operational details The most common hardware additions include 1394 FireWire cards for Windows systems manufacturer model Video Capture cards manufacturer model To verify that your hardware is qualified f...

Страница 84: ...Mbox 2 Getting Started Guide 78 ...

Страница 85: ... Disk command 65 C channel strip controls Mute 61 Pan 61 Solo 61 Volume 61 click external MIDI 42 plug in 41 Click plug in 41 Clock Source 17 25 and digital output 36 Internal setting 17 25 S PDIF digital setting 17 25 Conductor ruler 40 connecting Mbox 2 Macintosh 22 Windows 12 CoreAudio driver Macintosh 22 CPU Usage Limit 16 24 D DAE Playback Buffer Size 16 24 dither 65 drive formatting Macintos...

Страница 86: ...ower 31 S PDIF 29 USB connection 29 input and output connectors 32 inputs analog 33 digital 32 gain 31 monitoring 30 inserts plug ins 64 installing Pro Tools LE Macintosh 21 Windows 12 installing QuickTime Windows 12 Instrument tracks 44 47 K key commands 6 L latency see monitoring Link Timeline and Edit Selection option 48 M MacDrive utility Windows 14 Master Faders 44 45 63 Mbox 2 back panel 32 ...

Страница 87: ...Pencil tool 58 phantom power 35 indicator 31 when to use 31 playback audio 54 MIDI 57 starting and stopping 44 Playback Engine dialog 43 playlists 58 plug ins 63 AudioSuite 63 Click 41 dither 65 inserting on tracks 64 RTAS Real Time AudioSuite 63 power management settings Macintosh 20 Windows 8 Pro Tools LE capabilities 2 configuration Macintosh 23 configuration Windows 15 installing Macintosh 21 ...

Страница 88: ...sage Limit 16 24 DAE Playback Buffer Size 16 24 Hardware Buffer Size 15 23 I O Setup 17 25 RTAS Processors 15 23 Sample Rate 17 25 T technical support product registration required 76 tempo 40 41 Tempo Change dialog 40 Tempo ruler 40 Timebase ruler 40 Track Height selector 49 tracks 44 audio 44 45 Auxiliary Inputs 44 45 61 creating 44 Instrument 44 47 Master Faders 44 45 63 MIDI 44 46 playing back...

Страница 89: ......

Страница 90: ......

Отзывы: